Titration Tutorial: Tips & Tricks for Titrating
Overview
Not sure what titration is or what you can do with it? Then you are in the right place! In this tutorial, you will find information on titration, including the chemicals that are commonly used and the chemical reactions that make titration work, as well as how titration is performed and some tips to get better results.
What is Titration?
Titration is a method commonly used in chemistry to figure out the amount of a chemical in a solution. This chemical is called the titrand. To figure out the amount of titrand in the solution, a known amount of a different chemical is added to the titrand's solution; this chemical— called the titrant, or titrating solution—reacts with the titrand. By measuring how much of the titrating solution is needed to react with all of the titrand in the solution, you can calculate how much titrand was in the solution. Simply put:
- Titrand: A chemical you want to know the quantity of in your sample.
- Titrant (titrating solution): A chemical you add, in a known quantity, to react with the titrand and to help you calculate the quantity of the titrand in your sample.
The point at which all of the titrand has reacted is called the endpoint, or equivalence point. How do you know when the endpoint has been reached? At the endpoint, there is usually a color change in the titrand's solution. This is caused by an indicator, which is included in the titrand's solution just so you can see when you have reached the endpoint. The unknown amount of titrand in the titrand's solution can usually be determined by setting up a proportion with the known amount of titrating solution that was added. How this is done depends on the exact titrating reaction that is being used.
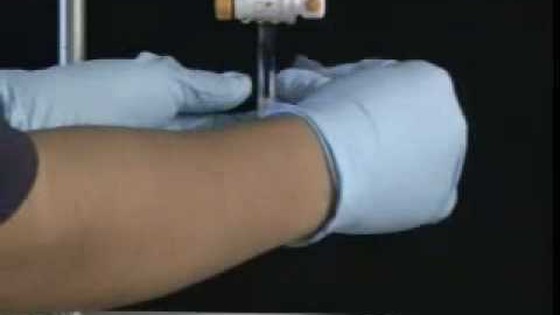
You can watch the video below, made by the Massachusetts Institute of Technology (MIT)'s Department of Chemistry, to see titration in action. Note: This video uses an indicator that turns light pink at the endpoint, but different indicators turn different colors at their endpoints. The next section contains more information about indicators.
Indicators
There are many different types of indicators used in titration experiments. Which indicator is used depends on the chemistry of the reaction taking place between the titrand and the titrating solution. This titration tutorial will cover two commonly used indicators—starch and phenolphthalein—along with their associated reactions.
Starch as an Indicator
Starch is an indicator that reacts with iodine. When there is iodine present, starch reacts with it to create a blue chemical complex. This means the solution turns blue! How is this used in titration? Iodine is included in the titrating solution, and as it is added to the titrand's solution (which includes the titrand and starch), the titrand reacts with the iodine to turn it into iodide ions (which do not react with the starch). However, as soon as all of the titrand has reacted with the iodine and the endpoint is reached, the addition of any more iodine will finally react with the starch and turn the titrand's solution blue!
An example of titration using a starch indicator is the titration of vitamin C, which is technically ascorbic acid. Ascorbic acid reacts with iodine to make dehydroascorbic acid and iodide ions. (This reaction is technically an oxidation-reduction reaction, also called a redox reaction for short.) When ascorbic acid and starch are both in a solution, iodine will react with the ascorbic acid. So when titrating ascorbic acid, a titrating solution containing iodine is added to the titrand's solution, which contains starch (the indicator) and ascorbic acid (the titrand), and when all of the ascorbic acid has reacted with the iodine, any more iodine added will react with the starch and turn the titrand's solution blue! Figure 1, below, shows a picture of the endpoint of an ascorbic acid titration using starch and iodine. Because there is a known concentration of iodine in the titrating solution, by keeping track of how much solution is added, you can determine how much titrand there was.
Note: Because elemental iodine is needed to react with the starch, pure potassium iodine does not work as an indicator in this titration reaction and Lugol's solution (which contains elemental iodine and potassium iodide) must be used instead.
The following Science Buddies Project Ideas involve titration with a starch indicator:
- Which Orange Juice Has the Most Vitamin C?
- Do Oranges Lose or Gain Vitamin C After Being Picked?
- Investigate the Vitamin C Level in Bell Peppers During Various Stages of Ripeness
- Hey, Do You C My Potatoes? Determining Vitamin C Amounts in Cooked Potatoes
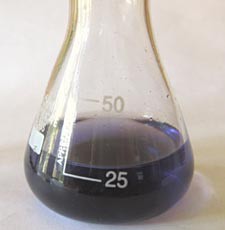 Image Credit: Teisha Rowland, Science Buddies / Science Buddies
Figure 1. The titrand's solution turns blue-black when the endpoint has been reached in a titration using starch as an indicator (to react with iodine).
Phenolphthalein as an Indicator
Phenolphthalein is an indicator that changes color depending on the pH of the solution it is in. The pH of a solution is a measure of how acidic or basic it is. (For a refresher, see the Science Buddies resource on Acids, Bases, & the pH Scale.) Specifically, phenolphthalein is colorless when the pH of a solution is acidic or neutral, but when the solution becomes slightly basic, phenolphthalein turns slightly pinkish, and then darker pink as the solution becomes more basic. How is this used in titration? A base is included in the titrating solution, and it is added to the titrand's solution, which contains an acidic titrand and phenolphthalein. As more base is added to the titrand's solution, the pH changes, becoming more basic, and the solution changes color. Usually, with this indicator, when the titrand's solution just starts to turn pink, you have reached the endpoint.
An example of titration usng phenolphthalein is the titration of vinegar, which is technically acetic acid. When titrating acetic acid, a titrating solution containing a base—normally sodium hydroxide—is added to the titrand's solution, which contains phenolphthalein (the indicator) and acetic acid (the acidic titrand). (The acetic acid reacts with the sodium hydroxide in an acid-base reaction.) When the titrand's solution becomes basic enough due to the addition of the basic titrating solution, the phenolphthalein turns the titrand's solution slightly pink. Phenolphthalein is specifically colorless at a neutral or acidic pH, and becomes light pink as the pH becomes more basic (first turning slightly pink around a pH of 8.3). Figure 2, below, shows a picture of the endpoint of an acetic acid titration using phenolphthalein and sodium hydroxide. Because the number of moles of sodium hydroxide used to titrate the acetic acid equals the number of moles of acetic acid in the titrand solution, by keeping track of how much titrating solution is added, you can determine how much titrand there was.
The following Science Buddies Project Idea involves titration with a phenolphthalein indicator:
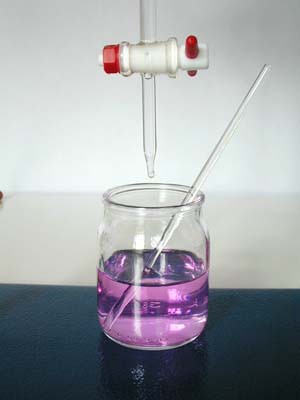 Image Credit: G. Carboni / Copyrighted
Figure 2. The titrand's solution turns slightly pink when the endpoint has been reached in a titration using phenolphthalein as an indicator (to show the change in pH).
Setup & Procedure
There are many steps that should be taken to ensure that a titration is successful and that the results produced are accurate. Check out the video of best practices in titration. Here are some key points to follow and keep in mind when doing a titration:
- Dissolving the starch. If you are using starch as an indicator, it is important to make sure that the starch dissolves well when you are preparing the starch solution. It may take about 15 minutes or more of stirring the starch (and crushing large pieces) in near-boiling water to dissolve the starch. If the starch does not completely dissolve, it can lead to inaccurate results.
- Assembling the titration setup. Figure 3, below, shows what the general titration setup should look like. The buret is held in place by the buret clamp, which is attached to the ring stand. The titrand's solution should be placed directly under the bottom of the buret, as shown in Figure 4, below. The buret, which can be moved up and down, should be adjusted so that it is just above the opening of the flask containing the titrand's solution, as shown in Figure 4.
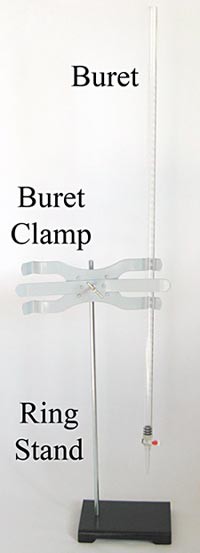 Image Credit: Teisha Rowland, Science Buddies / Science Buddies
Figure 3. This picture shows a general titration setup. Note that the buret clamp is firmly attached to the ring stand. The buret shown here slides into place between the prongs of the buret clamp. The buret is held firmly in place, but can be moved up and down if needed.
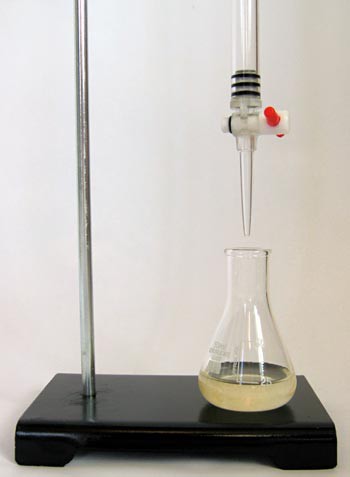 Image Credit: Teisha Rowland, Science Buddies / Science Buddies
Figure 4. The titrand's solution is placed in an Erlenmeyer flask and set right below the bottom of the buret. An Erlenmeyer flask is used because its shape allows a person to swirl the solution to mix it without spilling.
- Filling the buret. Before filling the buret with the titrating solution, make sure that the buret is closed at the bottom. Many burets are closed when their stopper is in the horizontal position, as shown with the red stopper in Figure 5, below. Other burets may close in different ways. Using a funnel, as shown in Figure 6, below, slowly pour the titrating solution into the top of the buret. Fill it somewhere between half full and the top mark. The exact position is not important, as long as the fluid level is not past the markings on the top of the buret. Then make sure there are no air bubbles in the funnel. To do this, put an extra beaker or flask below the buret and let a little bit of titrating solution flow into the container (or just let enough solution flow so that the entire tip of the buret is full of solution).
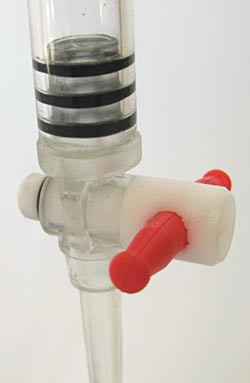 Image Credit: Teisha Rowland, Science Buddies / Science Buddies
Figure 5. Make sure the buret is in the closed position, as shown here with the red stopper on this buret, before filling it with titrating solution.
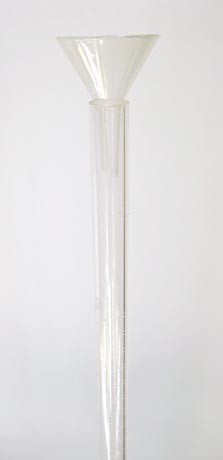 Image Credit: Teisha Rowland, Science Buddies / Science Buddies
Figure 6. Place a small funnel in the top of the buret to slowly fill your buret with the titrating solution.
- Reading the buret. Read the titrating solution level from the bottom of the meniscus, which is the curved surface of liquid. For example, in Figure 7, below, the level should be recorded as 21.85 milliliters (mL), since this is where the bottom of the meniscus is. Be sure to have your eyes level with the liquid level when you are reading it.
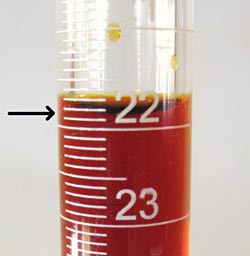 Image Credit: Teisha Rowland, Science Buddies / Science Buddies
Figure 7. When reading the level of liquid in the buret, read from the bottom of the meniscus, which is being pointed to with a black arrow in this picture. For example, the level of the liquid in this buret should be read as 21.85 mL. (Note: The long white line at the top of the buret is the mark for 21 mL.)
- Adding the titrating solution to the titrand's solution. Using the red stopper at the bottom of the buret, slowly add the titrating solution to the titrand's solution one drop at a time. It is important to only let the titrating solution be added one drop at a time because the titration reaction can be very sensitive. One drop may be enough to drive the reaction to completion (if it was near completion before). If more than one drop is added at a time, the data may not be as accurate as it could be. After each drop is added, swirl the flask to mix in the titrating solution. When adding the titrating solution, you may see a temporary color change that goes away when you swirl the flask, as shown in Figure 8, below. If this happens, continue adding one drop at a time; you have reached the titration endpoint when there is a more lasting color change throughout the entire titrand's solution, as shown in Figure 1 and Figure 2.
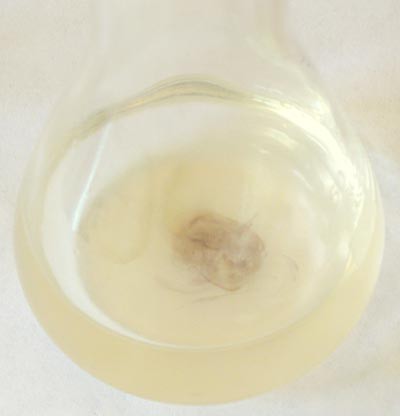 Image Credit: Teisha Rowland, Science Buddies / Science Buddies
Figure 8. This example of titrating ascorbic acid using an iodine titrating solution shows how you may see a temporary (dark blue) color change when adding a drop of the iodine solution. The temporary color change goes away when the iodine solution is mixed in the flask by swirling it.
- Watching for the endpoint. Add the titrating solution, mixing in one drop at a time by swirling the flask, until a color is seen throughout the solution that lasts for longer than 20 seconds. At this point, you have reached the endpoint and the titration is complete. If you are using starch as an indicator, your endpoint may look similar to Figure 1, whereas if you are using phenolphthalein as an indicator, your endpoint may look similar to Figure 2. Note that different indicators will cause the endpoint to have a different color; you should confirm the expected color of your endpoint before starting the titration. Lastly, it is important to not overshoot the endpoint (by adding too much titrating solution) because this can cause your results to be inaccurate.
- Troubleshooting: No color change is seen. There are a number of reasons why a titration may not work. Here are the most common problems that can lead to a titrand's solution not changing colors:
- Using the wrong substances. Make sure that you are using Lugol's iodine solution or another iodine solution sold as a starch indicator and not a pure potassium iodine solution. Also confirm that you are using a soluble starch.
- Using incorrect concentrations. If you are performing an ascorbic acid titration and the standard solution is too concentrated, or your titrating solution is too diluted, or your indicator solution is not the correct concentration, it may require more than 50 mL of iodine solution to titrate the sample. Note: When doing an ascorbic acid titration, the most common problem here is an overly diluted iodine solution; sometimes the Lugol's iodine solution sold in stores is already diluted and you do not need to dilute it more.
- Using too much titrand. If there is a large amount of titrand in the titrand's solution, it may require more than 50 mL of titrating solution for it to change color. You could try using a smaller amount of titrand.
Interpreting Results
The unknown amount of titrand in the titrand solution can usually be determined by setting up a proportion with the known amount of titrating solution that was added. How this is done depends on the exact titrating reaction that is being used.
For example, if you are titrating ascorbic acid using an iodine titrating solution, you need to titrate an ascorbic acid standard, which is a sample of ascorbic acid with a known amount of ascorbic acid in it. Knowing how much iodine titrating solution is needed to titrate this known amount of ascorbic acid, you can set up a proportion to determine how much ascorbic acid is in other samples that were titrated. See Equation 1, below, for how this can be done:
Equation 1.
- Iodine1 is the amount of iodine titrating solution (in milliliters [mL]) needed to titrate the ascorbic acid standard solution.
- Ascorbic Acid1 is the known amount of ascorbic acid in the standard solution (in milligrams [mg]).
- Iodine2 is the amount of iodine titrating solution (in mL) needed to titrate an unknown sample of ascorbic acid.
- Ascorbic Acid2 is the amount of ascorbic acid (in mg) in the unknown sample of ascorbic acid.
Equation 1 can be rearranged to directly solve for the unknown amount of ascorbic acid in the sample ("Ascorbic Acid2"). This gives us Equation 2, below:
Equation 2.
As an example, if you were using 20 mL of a 1 mg/mL ascorbic acid standard solution, this means you had 20 mg of titrand in your standard solution ("Ascorbic Acid1"). If it took 8.5 mL of iodine titrating solution ("Iodine1") to titrate this 20 mg, but to titrate an unknown sample of ascorbic acid it took 6.8 mL of iodine titrating solution ("Iodine2"), you can use the equation to determine that the amount of ascorbic acid in the unknown sample ("Ascorbic Acid2") equals 16 mg.
In the example titration using phenolphthalein in the titration of acetic acid, the unknown amount of acetic acid (the titrand) can again be determined by setting up a proportion with the known amount of sodium hydroxide (the titrating solution). Specifically, the number of moles of sodium hydroxide used to titrate the acetic acid equals the number of moles of acetic acid in the titrand's solution. For example, if you added 12.5 mL (0.0125 liters [L]) of a 0.1 molar (M, which is moles/L) sodium hydroxide to titrate the acetic acid, the number of moles of both sodium hydroxide and acetic acid would be 0.0125 L x 0.1 moles/L = 0.00125 moles. You could divide by the amount of the sample (in liters) to determine the molar concentration of the acetic acid. For example, if your sample volume was 1.5 mL (0.0015 L), it would have a molarity of 0.00125 moles / 0.0015 L = 0.833 M.
References
If you have read through this titration resource and still have unanswered questions, the references below might be helpful.
- ChemTalk. (n.d.). Titration Curves and Equivalence Point Calculations. Retrieved November 10, 2021.
- Tabacco, S. and Siddiqui, A. (2003). The Digital Lab Techniques Manual: Titration. Massachusetts Institute of Technology (MIT). Department of Chemistry. Retrieved November 8, 2013.
- Shodor Education Foundation, Inc. (n.d.). Redox Reactions. The University of North Carolina at Chapel Hill. Department of Chemistry. Retrieved November 10, 2021.
- University of Canterbury. (n.d.). Determination of Vitamin C Concentration by Titration. Outreach, College of Science. Retrieved July 10, 2021.
The following are resources from Science Buddies on acids, bases, and the pH scale, as well as chemistry safety:
The following science project ideas on titration are available from Science Buddies:
- Measuring the Amount of Acid in Vinegar by Titration with an Indicator Solution
- Which Orange Juice Has the Most Vitamin C?
- Do Oranges Lose or Gain Vitamin C After Being Picked?
- Investigate the Vitamin C Level in Bell Peppers During Various Stages of Ripeness
- Hey, Do You C My Potatoes? Determining Vitamin C Amounts in Cooked Potatoes