Purposeful Packaging
Summary
Overview
Students will play the role of packaging engineers, exploring how to protect shipped items in innovative ways. Students will use data analysis of consumer surveys to inform the iteration of their materials and designs.
Learning Objectives
Students will:- Design a more sustainable way of packing items for shipment.
- Collect consumer feedback using surveys.
- Calculate averages, analyze survey data and evaluate the effectiveness of their design.
NGSS Alignment
The 3 dimensions of NGSS allow for customization of standards to align with other content being taught. While this lesson aligns to the stated Performance Expectation, the descriptions of the 3 dimensions below it were specifically selected from the NGSS appendices to support the lesson objectives.- MS-ETS1-2. Evaluate competing design solutions using a systematic process to determine how well they meet the criteria and constraints of the problem.
|
Science & Engineering Practices
Engaging in Argument from Evidence.
Evaluate competing design solutions based on jointly developed and agreed-upon design criteria.
|
Disciplinary Core Ideas
ETS1.B: Developing Possible Solutions.
There are systematic processes for evaluating solutions with respect to how well they meet the criteria and constraints of a problem.
|
Crosscutting Concepts
Patterns.
Graphs, charts, and images can be used to identify patterns in data.
|
Common Core State Standards: Mathematics
- 6 CONTENT. 6.SP.B.5: Summarize numerical data sets in relation to their context, such as by: giving quantitative measures of center (median and/or mean) and variability (interquartile range and/or mean absolute deviation), as well as describing any overall pattern and any striking deviations from the overall pattern with reference to the context in which the data were gathered. (6.SP.B.5.C)
Materials
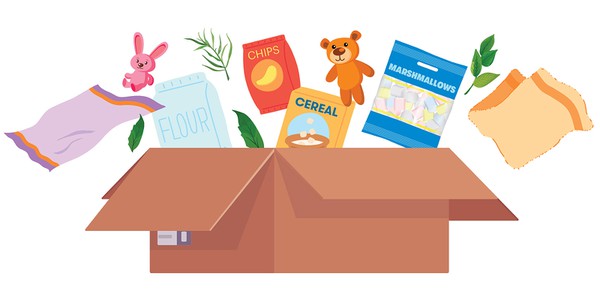
Look for items from different categories; see the suggestions below for ideas.
- Try to provide a couple different types of items for each category. Materials can vary among groups and do not need to be identical.
- In addition, feel free to substitute specific materials in creative ways. For example: a bag of cotton balls might represent a bag of marshmallows.
| Reusable Packing Materials (4-5 total per group) | Team Test Rig (1 per group) |
|---|---|
|
|
Additional Resources
| Tools | Handouts (1 per student) |
|---|---|
|
Background Information for Teachers
Vocabulary
- Packaging engineer: Packaging engineers design ways for items to be packaged and shipped for safety, attractiveness and cost efficiency.
- Sustainable: Ensures that the natural resources used to make a product are being replaced/renewed faster than they are being used.
Resources and References
- 7 Branded Products with Unique Eco-friendly Packaging, YouTube, uploaded by Bizongo February 2018. (2:06 min)
- 10 Eco-Friendly Packaging Ideas, YouTube, uploaded by EcoMastery Project, March 2020. (3:17 min)
- Carbon Footprint Calculator, United States Environmental Protection Agency
- Business Price Calculator, United States Postal Service
For more lesson plans, videos and other facilitation resources see thetech.org/resources.
Prep Work
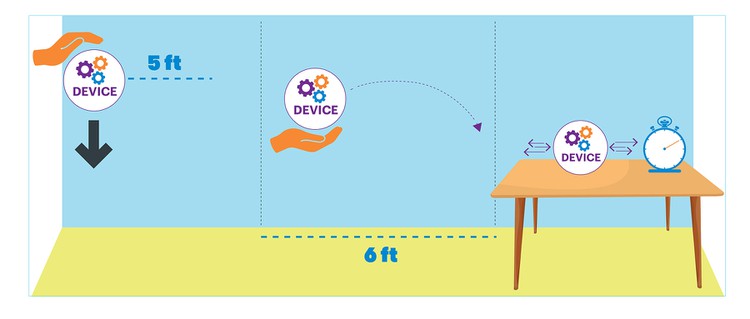
Test Area Set-Up- Choose locations for at least two testing areas per class. Ensure there is space for all three tests in each testing area.
- Mark the test area with the spacing and height needed for each of the tests.
- Have the test area tools (tape and string) available in each testing area so students can close the box prior to testing.
| Drop Test | Toss Test | Shake Test |
|---|---|---|
| Hold the box about 5 feet above the ground. Drop it. | Stand about 6 feet away from another person. Toss the box to them and have them catch it. | Shake the box back and forth for 10 seconds. Listen for movement inside. |
| Mark a spot 5 ft high on the wall. | Mark two spots 6 ft apart. | Set up a table with the timer. |
 Image Credit: The Tech Museum
In the first column of the chart a hand holds the device 5 feet from the floor. In the second column a hand holds the device 6 feet from a table. In the last column the device is shown on the table next to a timer. Arrows show that the device is being moved back and forth.
- Build a solution (or solutions) yourself, with other educators or kids you know. This will give you practice with the materials and tools to be able to anticipate student questions as they build.
- Collect, organize and set up materials.
- Set up the Test Areas.
- If distributing the Materials Use Survey digitally, create an online version using Google Forms, Poll Everywhere, Survey Monkey or another online survey tool.
- Be prepared to finalize the survey questions during "Data Analysis" once students have chosen materials for their designs.
Lesson Instructions
| Lesson Outline | |
|---|---|
| Frame the Challenge | 15 min total |
| Activate Prior Knowledge | 10 min |
| Introduce the Lesson | 5 min |
| Design Challenge Part 1 | 40 min |
| Introduce the Design Challenge | 5 min |
| Prototype (Build and Test) | 15 min |
| Share Solutions | 10 min |
| Data Analysis | 10 min |
| Design Challenge Part 2 | 35 min |
| Redefine the Problem | 5 min |
| Prototype (Build and Test) | 15 min |
| Share Solutions | 10 min |
| Debrief | 5 min |
Frame the Challenge
Activate Prior Knowledge (10 min)
- Engage students in a brief discussion about the real-world problem, using some of the following Guiding Questions:
- How often do packages get delivered to your home? (Weekly? Monthly?)
- What kinds of packing materials are used in these packages? What is the purpose of these materials?
- What do you do with packing materials after you open the package? What do you think others do with packing materials after an item is received (reuse, compost, put in trash, etc.)?
- Is there a way that we can use common household items as packaging? What could those be?
- During the discussion point out that even when shipping is "free" to the consumer, there are costs to the seller and the environment.
- Help students understand the costs of transporting goods such as fuel consumption and single-use plastic packing material.
- Encourage students to consider how shipping multiple items together might affect these costs.
- Spark students' interest in considering sustainable ways items are packaged and shipped with a video or news article from the Resources.
- How online shopping has created a big packaging waste problem, YouTube, uploaded by Global News April 2019. (1:34 min)
- Online shopping can be worse for the environment than driving to a store, CNN Business, July 2020, Parija Kavilanz.
Introduce the Lesson (5 min)
- Introduce the idea of using data to support an argument as you talk to students about the impact of packaging on the environment. Share some quick data points to illustrate the issue:
- 91% of all packaging materials goes to landfill (Yes, even the "recyclable" materials).
- 1/3 of waste going to landfills is packing material.
- Two in five Amazon customers receive one or more packages from Amazon per week.
References- "Packaging Waste 101: The Problem", Supply Chain Solutions Center, Environmental Defense Fund, 2020.
- Containers and Product Specific Data, Facts and Figures about Materials, Waste and Recycling, Environmental Protection Agency, 2018.
- "The Future of Retail 2018", Walker Sands Communications, 2018.
- Introduce the career of a "packaging engineer": packaging engineers design ways for items to be packaged and shipped for safety, attractiveness and cost-efficiency.
- Students will be acting as packaging engineers, exploring and testing different types of packing materials and evaluating them against the criteria and constraints.
- They will be designing for a big online retailer that's looking for ways to make their business more sustainable, reducing or neutralizing their impact on natural resources.
- Introduce the design scenario:
Your team of packaging engineers has been hired to create a more sustainable packing material that customers find useful. Your challenge is to design a way to fill the extra space inside a shipping box with materials that won't go straight to the landfill and still protect the shipped item. Then you'll analyze those materials and make sure they are items that customers want and need.
- Perhaps customers already order this material and could choose to time the shipping of their packages so that they can use it to cushion other items.
- Or perhaps this item is so useful customers would choose to pay extra for it instead of standard packing materials peanuts/plastic/paper.
Consider presenting students with the design scenario and then giving them 2-3 days to gather materials from home. Students could bring in materials (or material ideas) over several days so they are ready for the day of the lesson. We suggest you still have a selection of general materials on hand to augment their choices.
Design Challenge Part 1
Introduce the Design Challenge (5 min)- Introduce the design problem.
- Ask students to briefly brainstorm what criteria or features would be required for a successful design. Record student ideas in a visible location and ask the group to agree on two or three important criteria for success. See sample criteria below.
- Introduce constraints for the challenge.
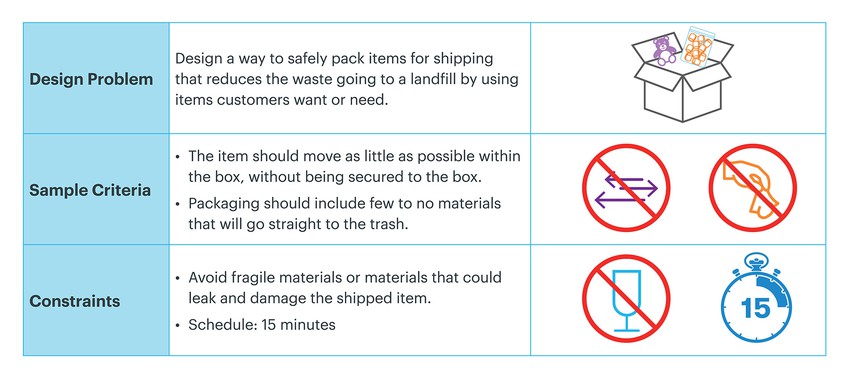
 Image Credit: The Tech Museum
The Design Problem is to Design a way to safely pack items for shipping that reduces the waste going to a landfill by using items customers want or need. There are two Sample Criteria. The item should move as little as possible within the box, without being secured to the box. Packaging should include few to no materials that will go straight to the trash. There are two Constraints: Avoid fragile materials or materials that could leak and damage the shipped item. and keep the schedule to 15 minutes.
- Introduce students to the Test Area and process for all three tests. Address any questions students have.
- Students should use the tape or string to securely close the box for testing.
- Students will drop, toss, then shake the box to test their design. The amount of movement heard during the shake test will serve as an indication of how protected the item is.
- Students will record their test results on a scale of 1-5 in their Purposeful Packaging Data Collection Handout.
- If you have not already done so, group students into teams of 2-4.
- Invite and encourage students to use the testing area throughout build time to help them iterate as they go.
Have students also consider the age of potential users and the safety requirements related to young children. These considerations can be added to the constraints as well.
For example:- Device can not create any choking hazard. Therefore all pieces must be at least 3 centimeters in diameter and 6 centimeters in length.
Prototype (Build and Test) (15 min)
- During the prototyping time, walk around and support teams.
- Use open-ended questions to encourage students to reflect on their process.
Prototype Questions:
- What are the characteristics of materials that make good packaging?
- What materials do you or your family use frequently that share these characteristics?
- How does your design meet the criteria? What changes could you make to meet the criteria?
- Encourage teams to test while they build. Remind students to record their test observations on their Purposeful Packaging Data Collection Handout.
- Provide reminders on time and if teams feel like they are "done," use one or more of these Challenge Cards (English or Spanish) to push their designs further.
Share Solutions (10 min)
- At the end of the time limit, learners stop even if they haven't been able to complete their design.
- Sharing can be done by gathering around the test area as each team should demonstrate their device while they share.
- Keep their sharing simple and focused on what they did and why.
- Sharing Questions may include:
- Tell us about your design.
- Which criteria does your design meet?
- How does your design solve the design problem?
- How did your design perform during testing? What did you notice?
- What would you change about your design if you had more time?
- In addition, have learners give each other positive feedback on their designs. Encourage them to tell the other team one thing they liked or noticed.
Data Analysis (10 min)
- Before moving on to Part 2, students will collect some data on what kinds of materials people use regularly.
- As a class, determine the materials you will ask about in the Materials Use Survey.
- It may help to discuss what "use" means before completing the survey. In general, "use" should NOT include recycling, composting or packaging.
- For example: If someone regularly puts natural materials in a garden compost, would that mean that unbleached paper is useful to them? On the other hand, taking paper and immediately placing it in the recycling bin might not be considered using it.
- Each student fills out the survey and considers which materials they use consistently. Have them think about how often they use these materials each month.
- Collect the data for the entire class. This can be done via chart papers posted around the room and quickly totalled or a collection of paper surveys for a quick tally.
- Once they have the data, teams should complete the Data Analysis Handout.
- This analysis will be used to inform their prototyping in Part 2.
- Have students reflect on what they can infer from their data, as well as where it has limitations.
- For example: I asked my mom about this. That is not ALL adults, but I do think her friends use the same stuff.
- Asking potential users about their needs is also a great way to build empathy.
While class averages can give a quick snapshot of how frequently materials are used, students can use their charts to visualize how some materials are used differently by different people. You might have students compare their charts and create visuals of the data in order to look for patterns by type of product (e.g. food items, items from nature, etc.) or by user (teens, parents, businesses).
Design Challenge Part 2
Redefine the Problem (5 min)
- Iteration is an important part of the design process. Before providing students time to revise their designs, refocus students on defining the problem.
- How can we ensure that the packaging will be used and not thrown away?
- Introduce the new suggested criteria:
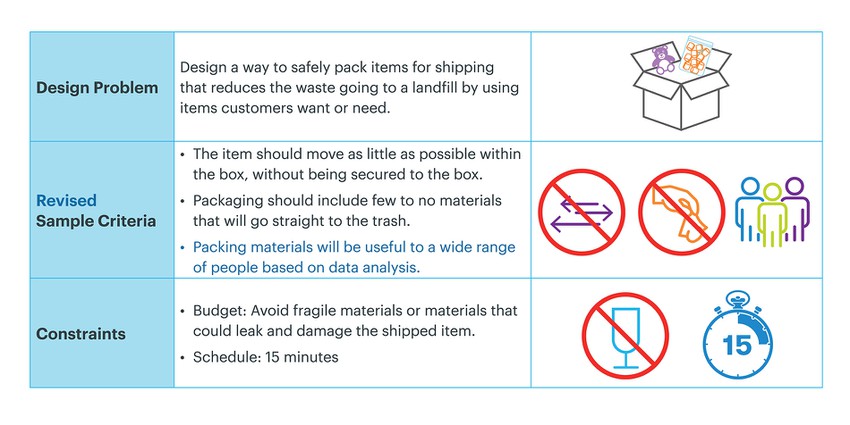
 Image Credit: The Tech Museum
The design problem is to design a way to safely pack items for shipping that reduces the waste going to a landfill by using items customers want or need. The revised Sample criteria are that: The item should move as little as possible within the box, without being secured to the box, Packaging should include few to no materials that will go straight to the trash. The new sample criteria is that the Packing materials will be useful to a wide range of people based on data analysis. The constraints are that the budget is to: Avoid fragile materials or materials that could leak and damage the shipped item. And to keep to a schedule of 15 minutes.
- Students will work in the same teams they had during their first round with this challenge.
- Clarify the process and address any questions students have.
- Students will revisit their design to choose materials that they believe will be commonly used by others.
- Students will use their Data Analysis Handout and the results from testing designs in Part 1 to inform their prototyping. - For example: If their analysis shows that most people do not find the materials they chose useful, they may need to rethink their design with a different set of packing materials.
- Remind students to test throughout build time to help them iterate as they go.
These video resources provide some examples of environmentally friendly packaging that can also inspire students as they prototype.
- "7 Branded Products with Unique Eco-friendly Packaging", YouTube, uploaded by Bizongo February 2018. (2:06 min)
- "10 Eco-Friendly Packaging Ideas", YouTube, uploaded by EcoMastery Project, March 2020. (3:17 min)
Prototype (Build and Test) (15 min)
- During the prototyping time, walk around and support teams.
- In addition to the previous open-ended questions, use some of the following questions about the new criteria:
Prototype Questions:
- What are the characteristics of materials that make good protective packaging?
- What materials do you or your family use frequently that share these characteristics?
- How does your design meet the criteria? What changes could you make to meet the criteria?
- How does your design compare to traditional packing material using these same criteria?
- What information did your data analysis provide? How can you use that to adjust your designs?
- How might it impact the environment if your packaging is useful to a wide variety of people?
- Teams that have met all of the criteria can once again use the Challenge Cards (English or Spanish) to push their designs further.
Share Solutions (10 min)
- At the end of the time limit, learners stop even if they haven't been able to complete their design.
- Sharing can be done by gathering around the test area as each team should demonstrate their device while they share.
- Keep their sharing simple and focused on what they did and why. In addition, have teams share their data analysis and how it influenced their decisions.
- Sharing Questions may include:
- Tell us about your design.
- Which criteria does your design meet? What did you notice?
- How does your design solve the design problem?
- How did your design perform during testing? What did you notice?
- What did your data analysis uncover? How did this influence your decisions?
- What would you change about your design if you had more time?
- How do you imagine that using _______ instead of _______ will affect the health of humans or the natural environment?
- In addition, have learners give each other positive feedback on their designs. Encourage them to tell the other team one thing they liked or noticed.
Debrief (5 min)
- After students share and test their modified solutions, bring the conversation back to the engineering concepts and what they learned.
- Lead a short debrief with some of these questions.
Debrief Questions:
- What patterns do you notice in the materials that are used most frequently?
- Which designs performed best on the damage protection test?
- What patterns do you notice in the materials that performed best?
- How did the survey info/data analysis affect the decisions your team made? How did it affect the class designs?
- What would our class recommendation be for sustainable packaging materials?
- Carbon Footprint: Have students calculate the cost and carbon footprint of sending different sized packages. They can also calculate their own carbon footprint and consider ways that they can reduce packaging use at home.
- Shipping Cost: Calculate the cost to ship their packages using the US Postal Service shipping calculator for businesses.
- Marketing:
- Have students develop a website or social media campaign to advertise their packaging solution to others. See if they are able to get additional data and analyze how useful people think their solution is.
- Have students create a video pitch or commercial to convince customers to use their solutions over traditional packaging. For this authentic assessment and related resources see the Purposeful Packaging Unit Plan.
- Introduce the challenge to students asynchronously and have them gather supplies for a live video prototyping session.
- Have students gather materials from around their house for testing. Share examples from the materials list and explain that they will be used to protect another object during "shipping." Remind them to choose materials that are lightweight, non-breakable and could provide cushion or structure for protection.
- Use a synchronous video session to have students begin prototyping and testing. Students can continue iterating asynchronously.
- Create an online version of the Materials Use Survey with a tool like Google Forms and share it with students to complete.
- Have students share their results and testing:
- Asynchronously using an online tool (shared spreadsheet, Flipgrid, Padlet, etc).
- Synchronously in a live video session. If possible, have students share solutions and review each other's work before iterating asynchronously again.
Assessment
Authentic assessment opportunities help students make connections between what they are learning and how those skills may be useful in a future situation or even in a career.
Have students develop a website or social media campaign to advertise their packaging solution to others. See if they are able to get additional data and analyze how useful people think their solution is.
See the Purposeful Packaging Assessments for:
- Assessment Educator Guide
- Pitch Planner
- Rubric


