Abstract
When biologists want to separate different pieces of DNA, RNA, or proteins they use a technique called gel electrophoresis. In this science project you'll build a gel electrophoresis chamber and use it to discover how many components are in different colors of food coloring dye.
Summary
None
Readily available
No issues
This science project was adapted from DiSpezio, M. (n.d.) The Gene Hunters: Build an Electrophoresis Chamber. Part of the Scientific American Frontier's Teachers' Guide.
Styrofoam™ is a registered trademark of The Dow Chemical Company.
/-/https/i.ytimg.com/vi/QWkfXjGohVk/hqdefault.jpg)
Objective
In this science project you will build your own gel electrophoresis chamber and use it to compare molecules in different colors of food coloring dye.
Introduction
/-/https/www.sciencebuddies.org/cdn/Files/7020/10/gel-chamber-thumbnail.jpg)
A forensic scientist sits in her lab with three DNA samples in front of her. One sample is the DNA left behind at the crime scene by the criminal; the other two samples are DNA from possible suspects. How will she determine if either of the suspects' DNA matches the crime scene DNA? The scientist knows she can use an enzyme to cut each DNA sample at a particular sequence of nucleotides; this will leave behind several different pieces of DNA. The exact number of pieces and their sizes will be unique to each individual. This means that there will be an exact match in the pattern of different-sized pieces of DNA between one of the suspects and the DNA left at the crime scene, but not to any other suspects' DNA. The only problem left is, how will she "see" and "measure" the different pieces of DNA in each sample? You might have seen such a scene on the television show CSI. The answer is gel electrophoresis!
Gel electrophoresis is a technique used to separate and view macromolecules. Macromolecules are "large" molecules, such as DNA, RNA, and proteins. During gel electrophoresis, the macromolecules (DNA in the forensics example above) are loaded into a gel. Then a current is applied across the gel. The result is a separation of the macromolecules, based on mass. In order to "see" the macromolecules in the gel, scientists add either dyes, which stain the area of the gel that contains the macromolecules, or chemicals that bind the macromolecules and fluoresce when the gel is exposed to ultraviolet light.
So how does gel electrophoresis work? It is based on the principle that nucleic acids, like DNA and RNA, are negatively charged. This means that if you put nucleic acids in an electric field, they will migrate away from the negative end of the field and toward the positive end. The nucleic acids are placed inside the gel for two main reasons. One, the gel is a way of holding them to know where they are. Two, the migration needs to occur in a manner that allows for the separation of different-sized pieces of DNA or RNA. The gel has many microscopic holes through which the nucleic acids wiggle as they migrate within the electric field. The smaller the nucleic acid sequence, the easier it is for it to wiggle through the holes. So, smaller pieces of DNA and RNA "run" through the gel faster than larger pieces. Returning to our forensic science example, this means that the individual pieces of DNA in each sample are sorted within the gel—the larger pieces appear at the top of the chamber and the smaller pieces appear at the bottom of the chamber. The scientist compares the pattern of the pieces of the crime scene DNA to the pattern of the suspects' DNA and looks to see if there is an exact match.
Protein gel electrophoresis works similarly, except that proteins are not always negatively charged. In order to force the proteins to migrate toward the positive end of the electric field, the proteins are denatured, forced to unfold, in the presence of a chemical that coats the protein in negative charges. The amount of coating is relative to the size of the protein, which means that the total negative charge is greater in larger proteins. Using this technique, proteins, like nucleic acids, can be separated based on mass.
Gel electrophoresis is a common technique in laboratories and has many uses, including the forensics example above. The most common uses are:
- Sorting pools of macromolecules to determine how many different macromolecules are in a sample.
- Determining the exact size of a macromolecule. This can be done by running a mixture of molecules of known sizes, called a ladder, in the same gel as the macromolecule you want to measure. Then you can determine which known molecule in the ladder is closest in migration pattern to the unknown molecule; thus, approximate size.
- Purifying a single type of macromolecule.
For example, a scientist may want to learn more about the proteins that a bacteria releases into the environment. To do this, the scientist collects the liquid media the bacteria grows in and runs a sample of the media in a gel to look at how many proteins are in there. Perhaps the scientist wants to know the identity of one of the proteins. Based on size, the scientist may be able to guess what some of those proteins are; to check if he's right, the scientist can take advantage of the fact that the protein is now "trapped" in the gel. By cutting out the region of the gel containing the protein that's the size he's interested in, and using other techniques to separate the gel from the protein, he can purify the protein and use that pure sample for further experimentation.
The equipment for gel electrophoresis is fairly simple. There is a chamber to hold the actual gel. The chamber has both positive and negative electrodes to which you connect a power source in order to create the electric field. The gel is immersed in a buffer solution, which provides ions to carry the current and keeps the pH fairly constant. The sample is loaded into wells in the gel.
/-/https/www.sciencebuddies.org/cdn/Files/3231/10/BioChem_img024.jpg)
Figure 1. This gel electrophoresis chamber is connected to a power supply by black and red leads. The red lead is attached to the positive electrode; the samples will run toward the positive electrode when the power is turned on. (Photo by Jeffrey M. Vinocur, April 21, 2006.)
In this science project you'll build your own gel electrophoresis chamber. Once it is built, you'll be able to examine different food coloring dyes and explore some of the following questions. For a preview of what the experiment will look like, watch the video. How many different macromolecules make up each food coloring dye? Is there only one per color? Which color runs through the gel fastest? Do different brands of food dyes contain the same macromolecules? You might be surprised by the results!
Terms and Concepts
Before starting this science project you will need to familiarize yourself with the following terms:
- Gel electrophoresis
- Macromolecule
- DNA
- RNA
- Protein
- Mass
- Nucleic acid
- Denature
- DNA, RNA, and protein ladders
- Electrode
- Agarose
Questions
- What is gel electrophoresis?
- What are the components of a gel electrophoresis chamber?
- What kinds of macromolecules can you "look at" with gel electrophoresis? Do you need to use different techniques for the different kinds of macromolecules?
- How do you visualize the macromolecules in the gel?
- What are real-life examples of what gel electrophoresis is used for?
Bibliography
- This website provides a simple animated walk-through of gel electrophoresis and is an excellent starting point.
The University of Utah, Genetic Science Learning Center. (2008). Gel Electrophoresis. Retrieved March 4, 2008. - Wikipedia gives a slightly more involved and technical explanation about how gel electrophoresis works.
Wikipedia contributors. (2019, January 6). Gel Electrophoresis. Wikipedia: The Free Encyclopedia. Retrieved January 21, 2019.
Materials and Equipment
- Plastic travel soap box, or other sturdy, rectangular, plastic box
- Stainless steel wire, the gauge should be no larger than 18 and no smaller than 24
- Wire cutters
- 9-volt batteries (5); make sure the batteries are fresh and fully charged when you start the project. The electrophoresis chamber drains the batteries fairly rapidly; if you plan to run multiple trials, you'll need additional batteries.
- Alligator clip leads (2)
- Styrofoam™ tray or flat piece; the Styrofoam tray that grocery store meat is packaged in works well.
- Scissors
Once your gel electrophoresis chamber is built, you will need the following items to run your experiment:
- Kitchen scale or measuring spoons
- Measuring cup, graduated cylinder, or other measuring utensil that shows volume in milliliters (mL)
- Bowl for mixing
- Microwave-safe bowl for mixing and heating
- Baking soda
- Deionized water, available in the bottled water section of a well-supplied grocery store.
- Agar agar powder, available in some grocery store or online from Amazon.
- Microwave
- Butter knife
- Food coloring dyes, minimum of three colors
- Plastic syringe or medicine dropper
- Ruler with centimeter units
- Lab notebook
Experimental Procedure
Building the Gel Electrophoresis Chamber
To start this science project, you will first need to build your gel electrophoresis chamber. The plastic box will be the actual gel chamber, the stainless steel wire will be the electrodes, the batteries will be the power source, and you'll use the Styrofoam to make a comb for creating wells in your gel.
- Cut two pieces of the stainless steel wire with your wire cutters. The wire should be slightly longer than the width of the plastic box.
- Bend the wires so that they hook over the sides of the plastic box and run the width of the box. Place one wire at the top of the box; this will be your negative electrode. Place the other wire at the bottom of your box; this will be your positive electrode.
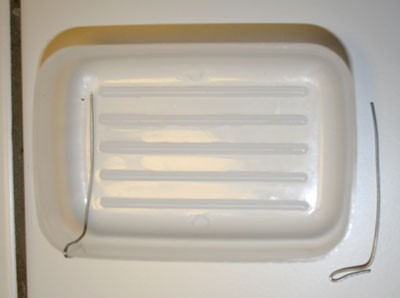
Figure 2. Each stainless steel wire electrode is bent in such a manner that it hooks over the side of the box.
- Connect your five 9-volt batteries together in series by snapping the positive (+) terminal of one into the negative (-) terminal of another until you've formed a battery pack with all five batteries. There should be one positive and one negative terminal left exposed.
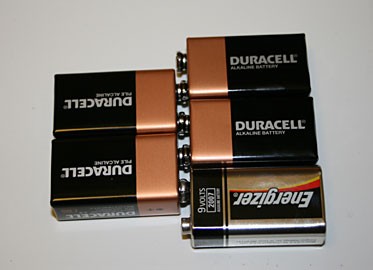 Figure 3. The five 9-volt batteries are clipped together to form one battery pack.
- When you're ready to begin the experiment, connect one alligator clip lead to each of the exposed terminals in the battery pack. Complete the circuit by attaching the lead from the negative terminal to the negative electrode, and the lead from the positive terminal to the positive electrode. Now your gel electrophoresis chamber should be fully powered. Remember, don't complete the circuit until your experiment is set up.
- Using a pair of scissors, cut out a comb out of the Styrofoam.
- The comb will be placed vertically into the plastic box and need to stand upright, so it should be wider at the top so that the comb can rest on the edges of the plastic box.
- The teeth should be evenly spaced and there should be at least 2 millimeters of space between the bottom of the teeth and the bottom of the plastic box.
/-/https/www.sciencebuddies.org/cdn/Files/3232/10/BioChem_img025.jpg)
/-/https/www.sciencebuddies.org/cdn/Files/3233/10/BioChem_img026.jpg)
/-/https/www.sciencebuddies.org/cdn/Files/3234/10/BioChem_img027.jpg)
Figure 4. This Styrofoam comb will be used to create the wells in the gel for the samples.
Food Coloring Dye Separation Experiment
Once you've assembled your gel electrophoresis chamber, you are ready to start your food coloring dye separation experiment.
- The first step in the experiment is to make the buffer solution that you will use for both making the agar gel and running the samples. The buffer should be a 1% solution of baking soda. To make this, combine 2 grams (g) of baking soda with 200 mL of deionized water in one of your bowls and stir well. (If you don't have a kitchen scale, 2 g of baking soda is approximately ½ teaspoon.)
- Make a 1% agar gel solution by combining 1 g of agar powder with 100 mL of your buffer solution in a microwave-safe bowl. (If you don't have a kitchen scale, 1 g of agar is approximately ¼ teaspoon.)
- Heat the agar solution in a microwave to dissolve the powder. Stop the microwave every 10-15 seconds to stir the solution.
- When you see that the solution is starting to bubble, remove it from the microwave. The solution should be translucent. Make sure to watch the agar solution carefully and remove it promptly from the microwave; when it gets hot it will easily bubble over.
- Remove the stainless steel wire electrodes from the gel chamber.
- Insert the Styrofoam comb into either end of the gel chamber, leaving approximately 0.5 centimeters (cm) between the end of the box and the comb. Gently pour the agar solution into the gel chamber. Add just enough solution to the box so that the comb teeth are submerged approximately 0.5 cm. If the gel is too thick, it will be difficult to observe good separation of the food coloring dyes.
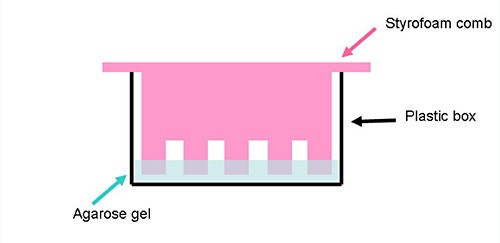 Figure 5. To form the wells, there must be a few millimeters of space between the bottom of the comb's teeth and the plastic box.
- Wait until the gel solidifies, which may take at least 30 minutes at room temperature. Tip: When the gel is set, it should be firm to the touch and wiggle like solid jello.
- Pour the remaining 100 mL of your buffer solution over the solidified gel. Add enough buffer to submerge the gel.
- Gently pull the comb out of the gel. Be sure not to remove the comb until you are sure that the agar gel is completely set. The resulting wells will be used as reservoirs for your samples.
- Using the butter knife, carefully cut a thin slice of the gel from the top and the bottom to make room for the electrodes.
- Re-attach the stainless steel wire electrodes.
- Using a plastic syringe or medicine dropper, fill each well in the gel with a different color of food dye. A small drop of food coloring dye is sufficient. You might find it easier to first put a drop of food coloring dye on a piece of wax paper and then use a syringe or medicine dropper to transfer the food coloring dye from the wax paper to the gel.
- Using the alligator clip leads, attach the battery pack to the wires resting on the gel chamber. The positive terminal of the battery pack should be connected to the positive electrode; this is the electrode toward which you want the food coloring dye to migrate as it separates. You should see bubbles forming around the electrodes in the buffer as the current passes through them.
- If you don't see bubbles, recheck all your electrical connections. Make sure the batteries are properly placed in series, and that the batteries are fresh and fully charged.
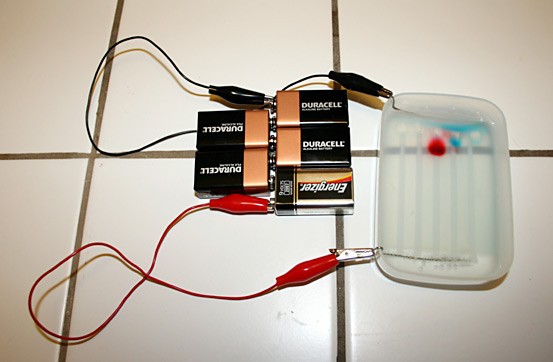 Figure 6. Gel electrophoresis chamber running samples of food coloring dye. Notice the bubbles forming around the electrodes.
- Check the progress of your gel every 10-15 minutes. Run the gel until you see good migration and separation of the food coloring dyes.
- If you've used the electrophoresis chamber in a previous trial and feel that it is no longer working as efficiently, you might need to troubleshoot the following:
- Replace the batteries with fresh, fully charged ones. Running the electrophoresis chamber can drain the batteries.
- Make new stainless steel electrodes.
- If you've used the electrophoresis chamber in a previous trial and feel that it is no longer working as efficiently, you might need to troubleshoot the following:
- Compare each food coloring dye sample. How many bands do you see for each color? Which one ran the farthest? Using a ruler, measure how far from the wells each band migrated. Make a data table, like the one below, for all your observations.
/-/https/www.sciencebuddies.org/cdn/Files/3235/10/BioChem_img028.jpg)
/-/https/www.sciencebuddies.org/cdn/Files/3236/10/BioChem_img029.jpg)
| Food Dye Color | Number of Bands | Migration Distance of Each Band (cm) |
|---|---|---|
| Red | ||
| Blue |
Troubleshooting
For troubleshooting tips, please read our FAQ: Forensic Science: Building Your Own Tool for Identifying DNA.
Ask an Expert
Global Goals
The United Nations Sustainable Development Goals (UNSDGs) are a blueprint to achieve a better and more sustainable future for all.
/-/https/www.sciencebuddies.org/cdn/Files/19752/5/E-WEB-Goal-09.png)
Variations
- Are all food coloring dyes made from the same molecules? Compare different brands of food coloring dyes. Do they migrate the same distance over time? Do they have the same color composition?
- What food dyes are in your favorite colored candies? Use Bio-Rad's STEM Electrophoresis Kit to jump start your investigation. You will need a teacher's help to order the kit as Bio-Rad sells directly to schools.
- What variables affect the rate of electrophoresis separation? There are many variables to explore. Several to start with might be the type of electrode, the amount of power, and the agar percentage of the gel.
- Use your gel electrophoresis chamber to determine if two different types of plants use the same molecule for pigment. To prepare your samples, take the flowers from a plant, grind up the flower, add a little bit of isopropyl alcohol, and continue grinding. Once the solids settle, pour the pigment-tinted alcohol into a separate container. Let most of the alcohol evaporate and then add a drop or two of your buffer solution to reconstitute the pigment.
- Try combining this experiment with one of the DNA extraction science projects like the Do-It-Yourself DNA or the Extracting Onion DNA Science Buddies project ideas. Can you see the DNA you extracted on your gel? Are there different bands? Note: you will need to use a stain to visualize the DNA. DNA stains are available from online science supply companies, like Science Kit catalog #WW6488701 or Wards Natural Science catalog #38 V 9014.
Frequently Asked Questions (FAQ)
- Only use every other well. If you created 5 wells, use wells 1, 3 and 5, and leave 2 and 4 empty. If there is more distance between the dyes, it will be harder for them to run together.
- Use a plastic pipette to put the dye in the wells. A pipette is similar to an eyedropper, but smaller, so it is easy to put it directly into the well and only squeeze out a drop or two of dye.
Ask an Expert
Careers
If you like this project, you might enjoy exploring these related careers:
/-/https/careerdiscovery.sciencebuddies.org/cdn/Files/1326/17/unsplash-FaNUdWGJqBg.jpg)
/-/https/careerdiscovery.sciencebuddies.org/cdn/Files/962/18/pexels-photo-4299436.jpg)
/-/https/careerdiscovery.sciencebuddies.org/cdn/Files/1588/17/pexels-photo-5827300.jpg)
/-/https/careerdiscovery.sciencebuddies.org/cdn/Files/1171/18/pexels-photo-4033151.jpg)
/-/https/careerdiscovery.sciencebuddies.org/cdn/Files/947/17/pexels-photo-3825412.jpg)

/-/https/img.youtube.com/vi/Djzx54j-2ZU/0.jpg)
/-/https/img.youtube.com/vi/jr3BOE_EpOk/0.jpg)
/-/https/img.youtube.com/vi/ksG87OUZOkA/0.jpg)