Abstract
A singing monkey? An elderly couple doing the chicken dance? What kind of funny electronic cards do you like to email people? Feel free to dream up your coolest and funniest card ideas, because in this science project, you'll create your own animated greeting card with a simple-to-use programming language called Scratch. Scratch is a programming language that makes it easy to create interactive stories, games, music, and art. When the program you have written is complete, you can even share it online!Summary
David B. Whyte, PhD, Science Buddies

Objective
Use the Scratch programming language to make an interactive greeting card.
Introduction

Who doesn't like to get a greeting card? Getting a card lets you know that someone took time out of their day to think of you. But more and more these days, people are sending and receiving electronic greeting cards. These "e-cards" have the advantage of being easy to send, quickly received (now it doesn't matter if I don't remember my grandmother's birthday until the day of!), and more fun because of their interactive nature. For example, you could design a card where the recipient gets to interact with the card by clicking on it, answering a question, or pressing buttons, and these interactions trigger animations. See the Bibliography section for an example of a "Happy Birthday" card made with Scratch, or do a web search for "Scratch greeting card" to find more examples.
But what is an electronic card, and how does it work? The electronic greeting card is actually a computer program. Any time you are using a computer, you are interacting with a computer program. The program tells the computer what to do. When you type something with a keyboard, for example, computer programs translate the sequence of keys you hit into a list of letters on the screen. Other programs allow you to upload pictures and send them to friends online. In this computer science project, you won't just use programs written by someone else, you will write your own interactive computer program with an easy-to-use program called Scratch. Do not worry, it is easy! Scratch is built for kids with no programming experience at all. It has lots of easy-to-understand blocks (code) that you snap together to give the computer its instructions. Also, this science project has lots of advice, tips, and help to get you started. Plus, it's fun and gives you the power to create almost anything you can dream up!
In this computer science project, you will get to make your own animated greeting card. You will decide what the card will say and which pictures you want to add. In Scratch, the pictures are called sprites. You will write scripts to make your sprites do all sorts of things. For example, you could write scripts that make a character jump, a hat spin, or a word rock back-and-forth. Once you get started with programming, you'll find there are limitless possibilities for what you can create.
Terms and Concepts
- Animation
- Computer program
- Scratch programming language
- Code
- Sprite
Questions
- What are pictures called in Scratch?
- Based on your research, where was the Scratch programming language developed?
- What kinds of animations and interactions do electronic cards usually offer?
Bibliography
These resources will introduce you to Scratch:
- Raspberry Pi Foundation (n.d.). Getting started with Scratch. Retrieved December 4, 2023.
For an example of a greeting card made with Scratch, see:
- Scratch Team, MIT. (2013, August 12). Greeting Card. Retrieved July 24, 2014.
Materials and Equipment
- Computer with internet access.
Experimental Procedure
Getting Started with Scratch
- The first thing you should do is sign onto Scratch. If you do not have an account yet, click on 'Sign Up' to create an account.
- If this is your first time using Scratch or if you need a refresher, read the Getting Started with Scratch guide from the Raspberry Pi foundation.
Making and Sharing Your Greeting Card
- Define a need. Decide on the occasion and for whom you're making the card.
- Do background research. Figure out what kind of pictures, animations, and interactions in the card will be enjoyable to the recipient.
-
Establish design criteria. Decide what your card will contain. The card can be as detailed and action-packed as you want, but there are a few basic elements it must have to make it a strong science project:
- A title, such as "Happy Birthday," "Happy Valentine's Day", etc.
-
One or more pictures.
- The images (and text) in Scratch programs are called sprites.
- You can make sprites using the Scratch editor or you can import them (meaning bring them in from another file folder within Scratch or from your computer).
- See below for details about making new sprites.
-
Scripts that "animate" the text and pictures. See Figures 1–5, below, for examples of scripts you could adapt for your greeting card.
- Scripts are the instructions that control your sprites.
- They can make a sprite spin, bounce, change color, appear and disappear, and do just about anything else you can imagine. The examples below show a few scripts you could adapt for your card, but there are many more you can create yourself!
- Since you're making an interactive card, at least one of the scripts should include a way for the recipient to trigger an action.
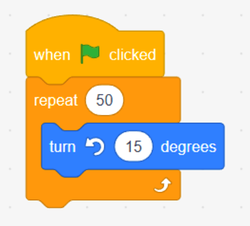 Image Credit: Science Buddies
In a program called Scratch, scripts can be made. In this example, the script activates when the green flag is clicked. After the green flag is clicked, the sprite will turn 15 degrees and repeat 50 times.
Figure 1. This script makes the sprite to which it is attached spin when the green flag is clicked. In this case, the sprite will spin 15 degrees counterclockwise a total of 50 times and then stop.
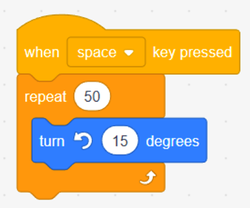 Image Credit: Science Buddies
In this example, the script activates when the spacebar is pressed. After the spacebar is pressed, the sprite will turn 15 degrees and repeat 50 times.
Figure 2. In this script, the sprite spins when the spacebar is pushed. This is similar to the script above, but uses the space bar, rather than the green flag, to activate the script.
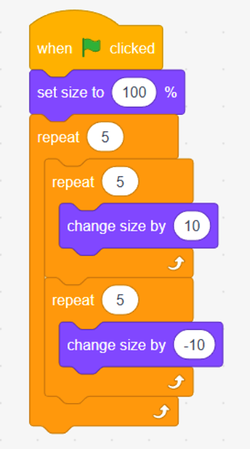 Image Credit: Science Buddies
This script changes the size of the object, in this example, a beating heart. The objects size will increase by 10 percent and decrease by 10 percent alternatively 5 times. The growing and shrinking will repeat 5 times.
Figure 3. This script will make the sprite to which this is attached grow and shrink rapidly five times, like a beating heart.
 Image Credit: Science Buddies
This script will make an object point in a specific direction, rotate 15 degrees left, pause slightly, rotate back 15 degrees right and then repeat 10 times. This script will be activated once the green flag is clicked.
Figure 4. This is a script example that makes the sprite rock back and forth.
 Image Credit: Science Buddies
This script makes the sprite ask a question, wait for an answer, then changes its look. There are two pictures, one where she is on the ground and one where she is in the air. When the pictures are used alternatively, the girl looks like she is jumping up and down
Figure 5. This script makes the sprite 1) ask a question, 2) wait for an answer, 3) change its look ("costume") repeatedly if the answer is "yes." In this case, the "costumes" are two pictures of a girl—once while she's in the air and once while she's on the ground. When the pictures are shown alternately, this script makes the girl appear to be jumping up and down.
- Prepare preliminary designs. Now it's time to put all the pieces together and figure out exactly how the Scratch card will look! Start by making some simple sketches on paper of what you want the card to look like (don't worry if you aren't an artist—stick figure art is fine!).
- Build and test a prototype. Once you've made your preliminary designs on paper, you're ready to start programming the card.
-
Start by adding some pictures and text (sprites) to your card. There are several ways to add sprites (see Figure 6):
- You can use the Scratch editor to paint a new picture or add text by clicking on the image of a cat with a plus sign and click on the paintbrush.
- You can import pictures into the Scratch program from your computer by clicking on the upload file icon.
- You can have the Scratch program pick a random sprite for you by clicking on the star icon.
- You can look up an image to use by clicking on the magnifying glass.
Scratch program with four buttons highlighted. There are four buttons for new sprites. From top to bottom, they are: Upload Sprite, Surprise, Paint, and Choose a Sprite.
Figure 6. New sprites. There are four buttons for new sprites. From top to bottom, they are: Upload Sprite, Surprise, Paint, and Choose a Sprite.
- To add a sprite, click on one of the "Choose a Sprite" buttons. It's a good idea to give each sprite a descriptive name. See Figure 7 below for directions on where to enter sprite names.
A partyhat is chosen as a costume for a sprite in the Scratch program.
Figure 7. Click on Costumes to edit your sprites. You can name them using the text box, shown here with the red circle around it.
- Add scripts that make your sprites move, ask questions, etc. according to your sketches and designs.
- Periodically run your card to see if your scripts are behaving the way you intended. If they aren't, you'll have to figure out why. See the Troubleshooting section, below, for more advice.
- Redesign and retest as necessary. Read the Science Buddies Troubleshooting a Program in Scratch page if you need help with your program. Also, take time to evaluate if you like how it all looks. Does it get across the message you wanted? If you aren't happy with it, feel free to go back to step 4 and try again.
- Present the results. Once you have made your card, you can share it. If the recipient is there with you, you can run the card on the computer for him or her.
- If they're far away, you can email or message your recipient the URL (web address) for your finished project. To do this, you can first click on your profile on the top-right of the browser, then click on 'My Stuff'. There, you can see a list of your projects. Click on your greeting card project. Once you do so, you can copy the URL at the top of the browser and send it to your recipient.
Preparing Your Science Presentation
For general advice on engineering presentations, see the Science Buddies Engineering Design Project Guide.
-
Consider including the following in your presentation:
-
A goal. For example, to "write an interactive computer program that can be shared online."
- Include the theme of your card in the goal section.
- A list of requirements. These are the things your program must do.
- A description of Scratch.
-
Scripts you wrote, with a description of what they do and how they work.
- Include original scripts that you created.
- Laptop with your program open on a browser. Make sure you have internet access. If you are not able to bring a computer to your presentation, take several screenshots of your programming instructions and greeting card and print them out.
-
A goal. For example, to "write an interactive computer program that can be shared online."
Ask an Expert
Global Connections
The United Nations Sustainable Development Goals (UNSDGs) are a blueprint to achieve a better and more sustainable future for all.

Variations
- Create other greeting cards with new themes.
- Add more interactive elements to your card.
- Create new scripts to make your sprites move. For example, how would you make a sprite hop across the card?
- Add music to your card.
Careers
If you like this project, you might enjoy exploring these related careers:


Related Links
- Science Fair Project Guide
- Other Ideas Like This
- Computer Science Project Ideas
- My Favorites
- Engineering Design Project Guide
- Scratch User Guide