Abstract
People have a variety of reasons to use heart rate monitors. For example, patients in a hospital might have stationary, bedside equipment monitor their heart rate and alert medical staff in case of an emergency. Somebody going for a run might wear a portable heart rate monitor to keep track of their workout intensity. Heart rate monitors are not all the same—their appearance and function will vary depending on the intended use. In this project you will design, build, and program your own heart rate monitor that fits the needs you identify.Summary
 Image Credit: Ben Finio, Science Buddies / Science Buddies
Objective
Design, build, and test a heart rate monitor circuit.
Introduction
A heart rate monitor is a device that measures your heart rate, or pulse, usually in beats per minute (BPM). There are many different types of heart rate monitors. Some, called electrocardiogram machines (abbreviated ECG or EKG), measure your pulse and detect other information from electrical signals from the heart using electrodes placed on the body. These are commonly found in hospital rooms or ambulances (Figure 1). Others are portable, sometimes worn recreationally and used to track heart rate during workouts. Some of these require a chest strap (Figure 2), which takes electrical measurements similar to an EKG machine. Many modern smartwatches can measure heart rate directly on the wrist. Some of these use a green light-emitting diode (LED) aimed at the skin, and measure the amount of light reflected back. Since red blood absorbs green light, the amount of light reflected back changes as blood pulses through tiny blood vessels near the surface of the skin. This method is called photoplethysmography, and is how the sensor used in this project works. All of these types of heart rate monitors involve electrical circuitry, computer programming, a case or enclosure for the circuit, and a way to display or relay the information to the user.
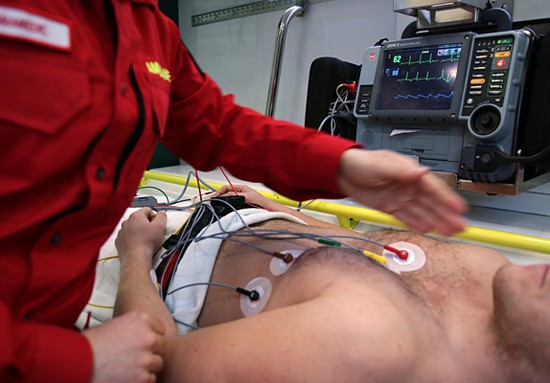
Figure 1. An EKG machine in an ambulance. Electrodes placed on the patient's chest measure electrical signals from the heart, which are displayed on the monitor in the background.
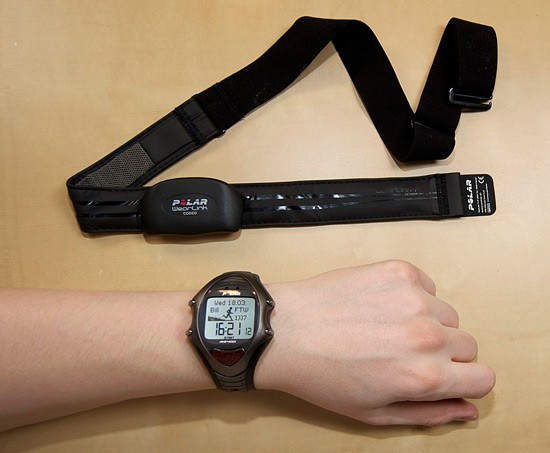 Image Credit: Wikimedia, user Bill Ebbesen / Public Domain
Figure 2. A wearable heart rate monitor, including a chest strap and a wristwatch.
In this project, you will use the engineering design process to design, build, and test your own heart rate monitor circuit. How you build the circuit and what it does will depend on how exactly you expect it to be used. The Bibliography contains some resources that will help you get started, and the Materials section contains some suggestions for materials. However, since this is an open-ended project, you will need to do some of your own research.
Terms and Concepts
- Heart rate monitor
- Beats per minute (BPM)
- Electrocardiogram (ECG or EKG)
- Light-emitting diode (LED)
- Photoplethysmography
- Engineering design process
Questions
- What are the different physical methods used to measure heart rate?
- What are some different scenarios where someone would want to monitor their own or someone else's heart rate?
- Look at the devices in Figures 1 and 2. How are they similar? How are they different? How are they designed for different situations?
Bibliography
This page explains how one type of smartwatch measures heart rate:
- Apple Inc. (2019, February 8). Your heart rate. What it means, and where on Apple Watch you'll find it. Retrieved February 25, 2019.
This resource will help you decide which Arduino board is right for your project:
- SparkFun Electronics (n.d.). Choosing an Arduino for Your Project. Retrieved February 25, 2019.
This website contains tutorials and example code for the pulse sensor you will use in this project:
- World Famous Electronics LLC. (n.d.). Pulsesensor.com. Retrieved February 25, 2019.
If you have never prototyped circuits with a breadboard before, this page will be very useful:
- Finio, B. (n.d.). How to Use a Breadboard. Science Buddies. Retrieved February 25, 2019.
This page contains information about the engineering design process:
- Science Buddies Staff (n.d.). The Engineering Design Process. Science Buddies. Retrieved February 25, 2019.
Materials and Equipment
This is an engineering design project. That means that exactly what you need to buy will depend on what you want to build. See the Procedure for help getting started with the design process. Once you design your heart rate monitor, use this page as a starting guide for what parts to purchase. Most of the parts you need should be available from an electronics vendor like SparkFun Electronics or Adafruit Electronics.
- Pulse sensor
- Arduino board
- If you are building a stationary/bedside heart rate monitor, the
Arduino Uno R3
is a good choice.
- For a wearable heart rate monitor, check out the LilyPad Arduino product line.
- Arduino accessories. The exact accessories you need will depend on the type of Arduino you purchase. You can usually find these items in the "Related Products" or "Hookup Accessories" section on the SparkFun website. You can also consult the Getting Started guide for your particular Arduino board. In general, you will need:
- A power supply, either a DC wall adapter or a battery
- A cable to connect your Arduino to your computer so you can program it
- Circuit parts, such as a breadboard, jumper wires, and resistors. For wearable/sewable circuits, you will need a needle and conductive thread.
- An output device for your circuit, like LEDs, a buzzer, or a screen/display. Tutorials and Arduino code libraries are available online for most of these parts.
- Materials to build a case or enclosure for your circuit
Disclaimer: Science Buddies participates in affiliate programs with Home Science Tools, Amazon.com, Carolina Biological, and Jameco Electronics. Proceeds from the affiliate programs help support Science Buddies, a 501(c)(3) public charity, and keep our resources free for everyone. Our top priority is student learning. If you have any comments (positive or negative) related to purchases you've made for science projects from recommendations on our site, please let us know. Write to us at scibuddy@sciencebuddies.org.
Experimental Procedure
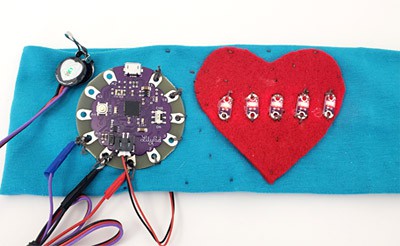
Remember to refer to this guide if you are not familiar with the engineering design process. You will go through the first several steps of the process before you purchase any materials and start building something. Then you will go back to the Materials tab and decide what parts you need to buy. Figure 3 shows some examples of what you might build in this project.
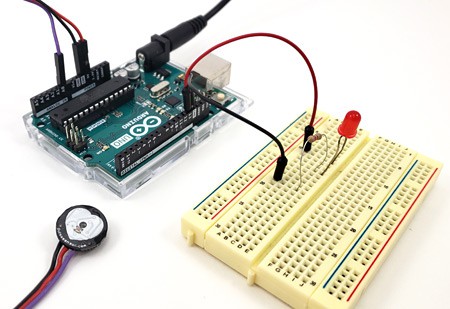 Image Credit: Ben Finio, Science Buddies / Science Buddies
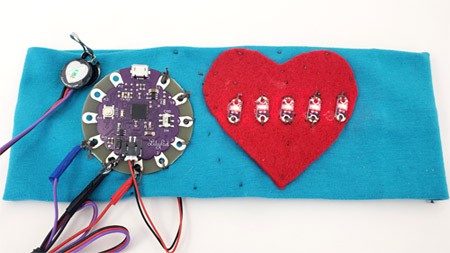 Image Credit: Ben Finio, Science Buddies / Science Buddies
Figure 3. An Arduino Uno connected to a pulse sensor and an LED on a breadboard. A LilyPad Arduino with a pulse sensor and LEDs sewn onto a headband.
- Define the problem. As explained in the Introduction, there are different types of heart rate monitors, used for different purposes. Before you can build one, you need to decide who will use it and under what circumstances. Someone wearing a heart rate monitor while mountain climbing will need a very different product than parents who want to monitor their newborn baby's heart rate while she is sleeping.
- Do background research. This step could involve interviewing people who use, or want to use, a heart rate monitor. They are your "customers." What do they want in a heart rate monitor? You can also do research on existing heart rate monitors and technologies. If you have not already, make sure you review the information in the Bibliography before you continue. You need to understand how the pulse sensor you will use in your circuit works, and the basics of using an Arduino. Note that the specific pulse sensor recommended in the materials list is designed to be clipped onto a person's fingertip or earlobe.
- Specify requirements. Based on your problem definition and background research, specify the requirements for your heart rate monitor and the constraints you have to work with. Here are some suggestions to get you started:
- How much can it cost? What is your budget?
- How much time do you have to build it? Especially if you need to learn new skills (like building circuits or programming), you should take those into account.
- How big or heavy should it be? Does it need to be portable, or will it be in a fixed location?
- How durable or sturdy does it need to be? Does it need to withstand someone dropping it, or wearing it while moving around?
- How easy and convenient should the monitor be to use? Is it designed for someone to use by themselves (a self-sufficient adult), or someone who will need help (a baby, or a person in an ambulance)?
- What information will it convey, or how will it communicate with the user? For example, will it blink LEDs with each pulse? Will it display the heart rate on a screen? Will it sound an alarm if the heart rate goes too low or too high? Will it do more than one of these things?
- Note: the example code and circuits on the pulse sensor website shows you how to blink a single LED with each pulse, and how to display the heartbeat on a computer monitor (by connecting your Arduino to a computer with a USB cable). If you are not sure where to begin, you can use that as a starting point.
- Brainstorm solutions. Based on your requirements, start thinking of different ways you could build your heart rate monitor circuit and program your Arduino. Do not worry about details (like exactly what Arduino board you will buy) at first. Try to come up with general ideas for at least three different solutions. The brainstorming phase can include jotting down ideas and making sketches of possible designs, or drawing a flowchart that describes how your program will work. For example, if you know you want to do a wearable design, you could think of different ways the user could wear the monitor (wrist strap, attached to a piece of clothing, etc.).
- Choose the best solution. To decide which of your ideas is the best solution, now you will need to work them out in more detail.
- This is where the Choosing an Arduino for Your Project resource will be useful. The type of Arduino (and accessories) you select will depend on the desired size, cost, and use for your heart rate monitor. They will also depend on your level of skill/comfort with circuits and programming. For example, some Arduino boards may require soldering, and some accessories may not have as much example code readily available. A complete list of materials for each of your ideas will allow you to calculate their cost.
- This is also where the engineering design process can start to become iterative. For example, you might find that you cannot buy parts to meet all your requirements and still fit within your budget. Now you will have to go back to step 3 (specify requirements) and make a decision: do you increase your budget, or change your requirements? You could even go back to step 2 (brainstorming) and come up with some totally new ideas.
- Figure out which of your designed solutions best fulfills all your requirements. You might have to make some trade-offs if a single solution is not the best option for every category. A decision matrix worksheet can be useful for doing this. Once you have narrowed it down to a single solution, order the parts you need for your circuit.
- Build a prototype. Once you have all your parts, prototype your circuit and program your Arduino. You will need to follow the appropriate tutorials or getting-started resources depending on what type of Arduino you ordered. Solderless breadboards are a great way to prototype circuits. You can also use alligator clips to temporarily connect sewable circuit components. That way it is easy to redo connections if you make a mistake. It will be easier to test your circuit before you build a case/enclosure for it, in case you need to change something.
- Test your solution. At first, it will probably be easiest to test your heart rate monitor on yourself, while you are near a computer and have all your tools and circuit parts handy. That way you can quickly debug and make changes to your code or circuit if something does not work properly. After you have your circuit working, try testing it in "real world" usage situations, or with volunteers. For example, for a wearable heart rate monitor, try wearing it while you go for a walk, or ask a friend to wear it. Do you run into any problems? For example, do any wires come loose when the user moves around? Is it difficult to keep the pulse sensor attached to your fingertip or earlobe? Are the pulse sensor readings affected by ambient light? Based on your observations, you may need to make changes or improvements to your design. You might even need to order more parts. Make sure you document all your observations and design changes.
Keep iterating and improving your design until it satisfies all your requirements. However, you do not have to stop there—there is always room for improvement! If your time and budget allow, can you make your heart rate monitor even better? Even if you are out of time or money, your final design report can discuss how you would change the design if you had more resources available. Can you design a "version 2.0" of your monitor?
Ask an Expert
Global Connections
The United Nations Sustainable Development Goals (UNSDGs) are a blueprint to achieve a better and more sustainable future for all.
Variations
- The internet of things (IoT) refers to all the "smart" devices, like thermostats, baby monitors, and garage door openers, that can send and receive data over the internet. Can you build an IoT heart rate monitor? For example, instead of (or in addition to) flashing LEDs or sounding a buzzer as an alarm, it could send an email or text message alert to a caretaker if a patient's heart rate gets too high. Check out this section of SparkFun's Arduino buying guide for help designing an internet-connected project. The Raspberry Pi is another hobbyist board very popular for internet-connected projects.
- There are other types of Arduino-compatible health-related sensors available, like muscle sensors that sense muscle contractions, or gas sensors that can detect various hazardous gases. You can find some of them at https://www.sparkfun.com/categories/146.
Careers
If you like this project, you might enjoy exploring these related careers:
Related Links
- Science Fair Project Guide
- Other Ideas Like This
- Electricity & Electronics Project Ideas
- Human Biology & Health Project Ideas
- My Favorites


