Abstract
You probably know that turning off the lights and the water, and not wasting paper are all ways to help the environment and conserve our resources. Did you know that another way is to use fuel cells? A fuel cell is a device that converts the energy in chemicals to electricity and it creates no pollution. The starting chemical does not have to be something complex — in fact you it can even be water! In this science fair project try your own hand at converting water to electricity with the help of a fuel cell.Summary
Michelle Maranowski, PhD, Science Buddies
Edited by Teisha Rowland, PhD, Science Buddies

Objective
Investigate how a fuel cell works and determine its efficiency.
Introduction
A fuel cell is an electrochemical device that converts the energy in chemicals into electricity. A battery is also an electrochemical device that converts chemical energy into electricity, but there is a limited supply of chemicals in a battery, so eventually the chemicals are all consumed and the battery no longer supplies electricity. In a fuel cell, however, the chemicals can be replenished, so the fuel cell can continue to produce electricity. You can read more about electricity in the Science Buddies Electricity, Magnetism, & Electromagnetism Tutorial.
In a proton exchange membrane fuel cell (PEMFC) the fuel used is hydrogen and the byproduct of the PEMFC is clean water. A big advantage of fuel cells is that they do not create pollution. In addition, the fuel cell has no moving parts so it does not break down like an internal combustion engine can. This means that there could be fewer breakdowns for a car that uses a fuel cell, compared to a car with a standard internal combustion engine.
The fuel cell was first demonstrated by William Grove in 1839. The first thing that Grove did was to pass a current through water and separate water into its components: hydrogen and oxygen. This process is called electrolysis. He then wondered if electrolysis could be reversed. The answer was yes. When the hydrogen and oxygen recombined, an electric current was produced. While William Grove invented an interesting device, the fuel cell remained a lab curiosity for many years due to the expense of making one, as well as other complexities. Finally, in the 1930s, Francis Thomas Bacon developed an alkali electrolyte fuel cell, which was eventually used in NASA's Apollo missions.
The fuel cell is made up of five parts: the anode, a catalyst layer, an electrolyte layer, another catalyst layer, and finally, the cathode. Fuel, such as hydrogen gas in the case of a PEMFC, enters the system at the anode. The hydrogen gas then reacts with the catalyst layer, ionizes, and is separated into hydrogen ions and electrons, as shown here:
In the dissolution reaction above, two hydrogen molecules are ionized into four positively charged hydrogen ions and four negatively charged electrons. As described above, this reaction is called electrolysis. The electrons move externally out of the PEMFC into the cathode. This is because the electrolyte, the layer sandwiched between the anode and the cathode, allows only positive H+ ions to pass through. The electrons that move out of the fuel cell (electricity) are used to power loads such as lights or motors. At the same time, oxygen gas comes into the fuel cell at the cathode. The oxygen, electrons, and hydrogen ions react at the cathode catalyst and create water, as shown in the reaction below:
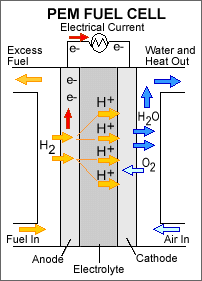 Image Credit: U.S. Department of Energy / Public domain
A proton exchange membrane (PEM) fuel cell consists of five major parts: a fuel intake/exit, an anode, an electrolyte, a cathode and an air intake/exhaust. In the PEM fuel cell an electrolyte is contained between an anode and cathode with a fuel intake along the outside wall of the anode and an air intake along the outside wall of the cathode. Hydrogen fuel is forced over the outside wall of the anode and separates into hydrogen ions and electrons. Electrons travel up the anode to power a device while hydrogen ions pass through the electrolyte later towards the cathode. Hydrogen ions pass through the inside wall of the cathode and react to oxygen from air that passes over the outside wall of the cathode and forms water. Water is produced on the outside of the cathode wall and is ejected from the system as exhaust.
Figure 1. This is a schematic of a proton exchange membrane fuel cell (PEMFC). The two catalyst layers are between the anode and the electrolyte, and the electrolyte and the cathode. (U.S. Department of Energy, 2007.)
The second reaction shown above is typical of a PEMFC using hydrogen gas as the fuel. There are several different types of fuel cells, each with advantages and disadvantages. Some of the advantages of the PEMFC are that they start up rapidly and are compact and lightweight. One major disadvantage is that the electrolyte is required to be saturated with water for optimal operation.
Fuel cells are used in many industries, including consumer electronics, telecommunications, and transportation. Several cities have buses that are powered by fuel cells instead of by internal combustion engines, which are powered by gasoline.
 Image Credit: U.S. Department of Energy / Public domain
Figure 2. This is a zero-emission bus. (U.S. Department of Energy, 2007.)
In this science fair project you will accomplish two things. You will help the environment and learn about this area of science by investigating the efficiency of the PEMFC. The thermal efficiency of the standard internal combustion engine is much less than 40%. What is the efficiency of the fuel cell kit you will investigate in this science project?
Terms and Concepts
- Fuel cell
- Electrolysis
- Anode
- Catalyst
- Electrolyte
- Cathode
- Ionize
- Efficiency
- Ohm's law
Questions
- How many different kinds of fuel cells are available?
- What are the advantages and disadvantages of each of the different kinds of fuel cells?
- How do the different parts of the fuel cell work?
- What is the efficiency of a standard internal combustion engine? How is its efficiency measured?
Bibliography
Check out the following sources to learn more about fuel cells.
- Wikipedia Contributors. (2008, April 28). Fuel cell. Wikipedia: The Free Encyclopedia. Retrieved April 28, 2008.
- Bonneville Power Administration. (n.d.). Energy Efficiency. Fuel Cells: Power for the Future. Retrieved February 12, 2013.
- Nice, K. and Strickland, J. (2000). How Fuel Cells Work. Howstuffworks. Retrieved May 9, 2008.
The United States Department of Energy has a lot of information on fuel cells. Here is a link that describes the different fuel cells:
- U.S. Department of Energy. (2007, March 8). Fuel Cells. Retrieved May 16, 2008.
The following website has some good information on the history of the fuel cell:
- National Museum of American History Smithsonian Institution. (2007, September). Collecting the History of Fuel Cells. Retrieved May 19, 2008.
This video from NOVA talks about fuel cells and other clean energy technologies:
- NOVA. (2011, April 20). Power Surge. Retrieved April 11, 2013.
Materials and Equipment
-
Science fair fuel cell kit, such as the Horizon Fuel Cell Technologies solar hydrogen education kit at
Amazon.com
- If you are using this kit, or a similar kit that has a motor that cannot be easily attached to alligator clip cables, you will also need metal paperclips (2), a pair of pliers, and electrical tape.
- Ruler, metric
- Scissors
- Distilled water
- Fresh AA batteries (2)
- Phillips screwdriver
-
A resistor that is less than 0.5 ohms, such as a 300 mOhm resistor
- You can purchase this at www.mouser.com, part number 660-CF1/4CT52RR30J, or at Digi-Key, part number A105966TB-ND.
- If you can not find a resistor this low you can use 3 1-ohm resistors in its place. See the FAQs to learn how to make this modification to the project.
- Note: It is important to use such a low-resistance resistor for this science project because a higher resistance resistor could affect the voltage data you collect and make your results inaccurate.
- Digital multimeter, such as the Equus 3320 Auto-Ranging Digital Multimeter at Amazon.com. Always select a multimeter that fits the requirements of what you are testing. For this science fair project, you will need a multimeter that can test voltages from 0-10 V.
-
Alligator clip cables (3). Alligator clip cables are available through electronics suppliers, or online at
Amazon.com.
- Note: The Procedure shows two red and one black alligator clip cables but any color alligator clips will work.
- Helper
- Timer or stopwatch
- Lab notebook
Disclaimer: Science Buddies participates in affiliate programs with Home Science Tools, Amazon.com, Carolina Biological, and Jameco Electronics. Proceeds from the affiliate programs help support Science Buddies, a 501(c)(3) public charity, and keep our resources free for everyone. Our top priority is student learning. If you have any comments (positive or negative) related to purchases you've made for science projects from recommendations on our site, please let us know. Write to us at scibuddy@sciencebuddies.org.
Experimental Procedure
Preparing the Motor
-
To do this science project, you will want to have a motor that can be easily attached to alligator clip cables. If you are using a motor that has exposed metal at the ends of its cables, you can skip this section, but if you are using the Horizon Fuel Cell Technologies solar hydrogen education kit, you will want to slightly modify the motor in the following way so that alligator clip cables can be easily attached to it later:
- Take a metal paperclip, unfold the longer prong, and use pliers to crimp this end into a Z-like pattern, similar to a bobby pin. See Figure 3, below, for an example. The crimping should help hold the paper clip inside the end of the motor's cable.
- Repeat step 1a with a second metal paperclip.
- Insert the crimped paperclip prongs into the ends of the motor's cables, as shown in Figure 4, below. Use the pliers to adjust the paperclips if needed so that they fit snugly.
- To make sure that the paperclips do not fall out, secure them on the ends of the motor's cables using some electrical tape, as shown in Figure 5, below.
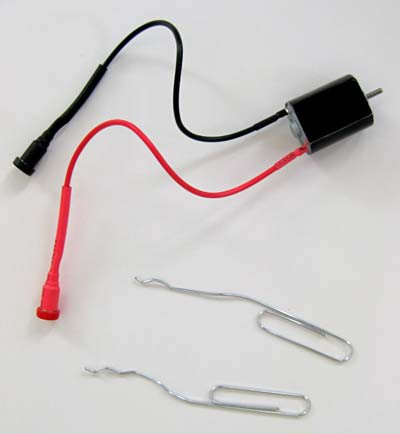 Image Credit: Teisha Rowland, Science Buddies / Science Buddies
Figure 3. Crimp the ends of two paperclips so that they snugly fit in the ends of the motor's cables.
 Image Credit: Teisha Rowland, Science Buddies / Science Buddies
Figure 4. Carefully insert the crimped paperclips into the ends of the motor's cables.
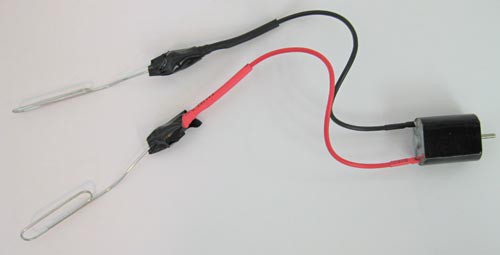 Image Credit: Teisha Rowland, Science Buddies / Science Buddies
Figure 5. Use a little electrical tape to secure the paperclips to the ends of the motor's cables.
- Set the motor aside for now. You will use it in the "Creating Energy" section, below.
Fuel Cell Setup
-
Open the fuel cell kit and make sure that you have all of the pieces described in the operating instructions manual. Read through the manual to confirm that you have all of the pieces and to understand how your fuel cell operates.
- Note: The specific instructions and images in this science project are for using the Horizon Fuel Cell Technologies solar hydrogen education kit, but a similar fuel cell kit should work in a similar manner. For this science project you will not need to use the solar panel that comes with the kit.
-
Identify the reversible fuel cell (or "RFC") that is in the kit. Gently place the fuel cell in its plastic stand, which allows the fuel cell to sit upright. If the fuel cell has protective tubing attached to it, gently remove the tubing now. The fuel cell should look like the blue fuel cell shown in Figure 6, below.
- This reversible fuel cell can be used to electrolyze water and to create power.
- The top of the fuel cell has labels that show which side is the hydrogen side ("H2" in black font) and which is the oxygen side ("O2" in red font).
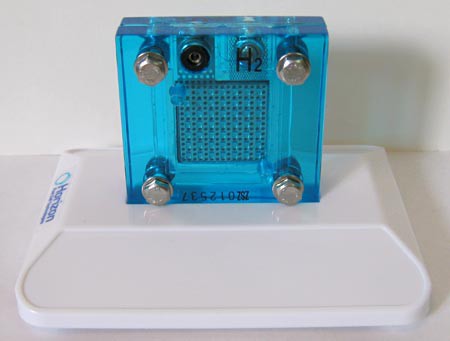 Image Credit: Teisha Rowland, Science Buddies / Science Buddies
Figure 6. This is a reversible fuel cell sitting in its plastic stand, with the hydrogen side facing the viewer.
-
Attach two short pieces of tubing (included in the kit) to the fuel cell.
- Cut two 4 centimeter (cm)-long pieces of tubing from the tubing provided with the kit.
- Push a black plug (included in the kit) into the end of one of the two pieces of tubing you cut. Push the other end of this tubing piece securely onto the top pin of the hydrogen side of the fuel cell, as shown in Figure 7, below.
- Take the second, unplugged piece of cut tubing and push one end onto the top pin of the oxygen side of the fuel cell.
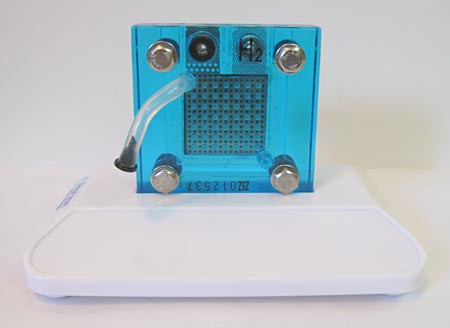 Image Credit: Teisha Rowland, Science Buddies / Science Buddies
Figure 7. Attach a plugged piece of tubing on to the top pin of the hydrogen side of the fuel cell.
-
Hydrate the electrolyte material in the fuel cell.
- Take the small syringe and suck water into it by placing the tip of the syringe into the distilled water and pulling the plunger. Suck a few milliliters (mL) into the syringe.
- Now push the syringe onto the tubing on the oxygen side and slowly inject the distilled water into the fuel cell, as shown in Figure 8, below. After 2-3 seconds (sec) you will see water coming out from the bottom pin. Stop injecting water after a drop or two comes out. This may only take about 0.5 mL of water.
- Detach the syringe, push a red plug into the end of the tubing, and let the fuel cell sit for 3 minutes (min). (Plugging the inlets prevents electrolyzed gases from escaping.) After this time, the fuel cell will be ready for electrolysis.
- Note: To obtain the best operation of the fuel cell, the electrolyte needs to be hydrated, but the fuel cell should not be full of water. This is why the grid inside of the fuel cell will only be partially filled with water.
 Image Credit: Teisha Rowland, Science Buddies / Science Buddies
Figure 8. Hydrate the fuel cell's electrolyte material through the oxygen side's tubing.
Electrolysis
- The first step to using this unit as a fuel cell is to electrolyze water. This creates the fuel. Caution: Hydrogen is flammable, so keep the fuel cell and hydrogen storage tank away from sparks.
-
Set up the hydrogen and oxygen storage tanks exactly as described in the operating instructions manual.
- Take the round, smaller cylinders out of the larger, conical cylinders.
- Attach the larger cylinders into their plastic stand, carefully twisting them into place.
- Fill the cylinders with distilled water up to the "0" mark.
- Place a smaller cylinder into each of the larger cylinders, as shown in Figure 9, below. Make sure that the little notch on the bottom of each inner cylinder is not blocked by the rim of the outer cylinder of the tank. Also confirm that the inner cylinder is seated tightly inside of the outer cylinder.
- If needed, adjust the water level in each tank so that it is up to the "0" mark still. You can use the syringe to transfer water to do this.
- Cut two more pieces of tubing, making each one be 20 cm long. Connect the hydrogen storage tank, via a piece of this tubing, to the bottom inlet on the hydrogen side and, using the other tubing piece, connect the oxygen storage tank to the bottom inlet of the oxygen side, as shown in Figure 10, below. Make sure that the tubing is tightly sealed on both inlets.
 Image Credit: Teisha Rowland, Science Buddies / Science Buddies
Figure 9. Fill each cylinder to the "0" mark, then place the smaller, rounded cylinders inside of the larger cylinders and adjust the water level, if needed, so that it is still at the "0" mark.
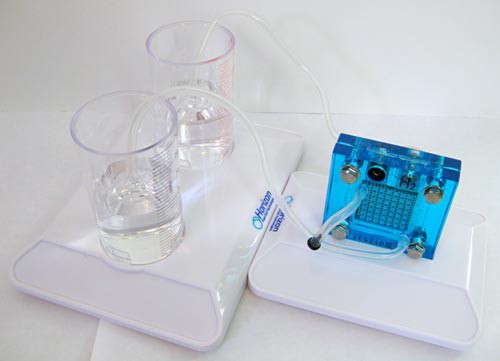
Figure 10. Use tubing to connect each tank to the correct side of the fuel cell.
- Switch the empty battery pack to the "off" position, remove its screw, and insert the two AA batteries. Make sure to connect the batteries in the correct polarity. There is a diagram on the inside of the pack that you can follow.
-
Now get the timer, digital multimeter, and resistor ready for measurement.
- If you are using more than one resistor, then twist all of the metal leads on one end of the resistors together and the leads on the other end of the resistors together. You can read the FAQs to make sure you are connecting the resistors so that the total resistance is less than 0.5 Ohms and see Figure 11, below, for how the resistors should look.
- Record the resistance of your resistor(s) in your lab notebook. This should be either the known, manufacturer's listed resistance for the resistor (if you are using one that is less than 0.5 Ohms) or the total resistance of the resistors you combined (based on total resistance calculations, as shown in the FAQs).
-
Note: Because less than 0.5 Ohms is a very low resistance, and the multimeter itself has some internal resistance, it can be inaccurate to measure the resistance of the resistor(s) with a multimeter. (In other words, you will get an artificially high resistance reading.) This is why you should use the known resistance of the resistor, or the calculated total resistance.
- For an advanced challenge that is not necessary for doing this science project, you could confirm the resistance of your resistor(s) by forming a circuit with the battery pack and resistor(s), and then using two multimeters (at the same time) to measure the current of the circuit (hooking one multimeter up in series) and the voltage drop across the resistor (hooking the second multimeter up in parallel across the resistor). (If you decide to try this, you may find the Science Buddies reference How to Use a Multimeter to be helpful.) You could then use Ohm's law, as described in the "Determining Efficiency" section, below, to calculate resistance.
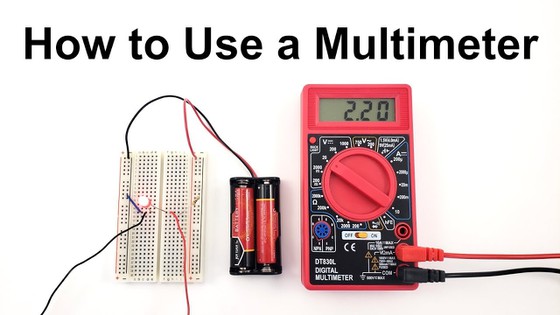
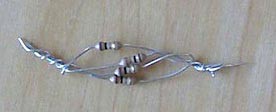 Image Credit: EnvEng_img057
Figure 11. If you are using more than one resistor, twist them together, as shown here. Confirm (through calculations, as shown in the FAQs) that the total resistance is less than 0.5 Ohms.
-
Use the alligator clip cables to hook the battery pack (which should be switched off), resistor, and reversible fuel cell in a circuit, as shown in Figure 12, below. Use the extra pair of black and red cables that come with the kit to do this.
- Plug a black cable into the port on the top of the H2 side of the fuel cell, and plug a red cable into the port on the top of the O2 side, as shown in Figure 13, below.
- Take the black alligator cable and clip one end to the black wire from the battery pack. Clip the other end to the black cable that is plugged into the fuel cell.
- Take a red alligator cable and clip one end to the red wire from the battery pack. Clip the other end of the alligator cable to the resistor. Use the second red alligator cable to clip to the other end of the resistor. Finally, clip the other end of this alligator cable to the red cable that is plugged into the fuel cell.
- Note: In this setup, the resistor is in series with the battery pack so that you can measure the current being supplied to the fuel cell. We will describe how to do this in a moment.
- Figure 14, below, shows a diagram of this circuit.
 Image Credit: Teisha Rowland, Science Buddies / Science Buddies
Figure 12. Connect the battery pack, resistor, and reversible fuel cell (RFC) in a circuit, as shown here.
 Image Credit: Teisha Rowland, Science Buddies / Science Buddies
Figure 13. Plug the extra red cable into the port on the top of the O2 side of the fuel cell, and the black cable into the port on the top of the H2 side.
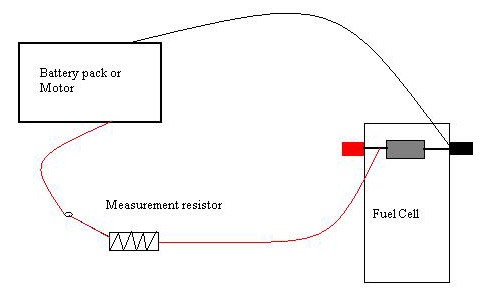 Image Credit: Michelle Maranowski, Science Buddies
Figure 14. This is a diagram of the circuit for this project.
-
When the battery pack is switched on, you will start timing the fuel cell reaction as the distilled water electrolyzes into hydrogen and oxygen. Before you turn on the battery pack, make sure your helper is ready with a timer and that you are ready to take voltage measurements using the multimeter.
- You will use the multimeter to determine the voltage drop across the fuel cell. This is the input voltage. To do this, measure the voltage across the alligator clips that are directly attached to the fuel cell's black and red cables. See Figure 15, below, for how to do this. Tip: You can also read the reference How to Use a Multimeter to learn how to use a digital multimeter to measure voltage.
- You will also use the multimeter to determine the current that is being supplied to the fuel cell. This is the input current. To do this, measure the voltage drop across the resistor, as shown in Figure 16, below. Once you know the voltage drop across the resistor and the value of the resistor you will use Ohm's law to calculate the input current, which will be discussed in the "Determining Efficiency" section, below.
- You will have your helper help keep track of the time while you take voltage measurements at 30 sec, 1 min, and 1.5 min after electrolysis starts. You will measure both the input voltage (across the fuel cell) and the voltage drop across the resistor at these time points, so you will need to work quickly. Prepare a data table in your lab notebook to record your voltage measurements.
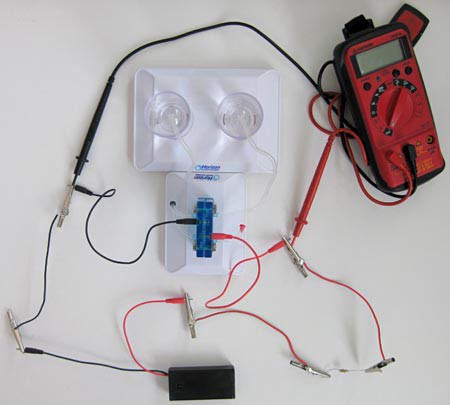 Image Credit: Teisha Rowland, Science Buddies / Science Buddies
Figure 15. This picture shows how you will use the multimeter to measure the voltage drop across the fuel cell. (Note: The battery pack and multimeter are turned off in this picture.)
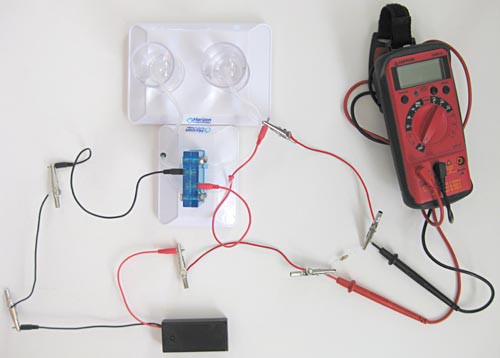 Image Credit: Teisha Rowland, Science Buddies / Science Buddies
Figure 16. This picture shows how you will use the multimeter to measure the voltage drop across the resistor. You will use this data to calculate the input current. (Note: The battery pack and multimeter are turned off in this picture.)
-
Switch the battery pack on and have your helper start timing. Use the multimeter to take voltage readings across the fuel cell and the resistor, at 30 sec, 1 min, and 1.5 min after switching the battery pack on, as described in step 6. Be sure to record your data (in volts) in a data table in your lab notebook.
- You will see evidence of electrolysis (as the distilled water electrolyzes into hydrogen and oxygen) when the level of the distilled water in the inner cylinder decreases. Hydrogen gas is pushing the water out. You can see the amount of hydrogen created by reading the change in water level (it should have originally been at the "0" mark).
-
Time the electrolysis until the hydrogen tank is full. You will know that you have filled the hydrogen tank when all of the water in the inner cylinder has been displaced and you see the water bubbling. Stop the timer and record the time in your lab notebook. Switch the battery pack off and disconnect the battery pack from the fuel cell.
- In your lab notebook, record the final water levels in the hydrogen and oxygen storage tanks. How did they change?
- Because gas can escape from the storage tanks, you should immediately continue on to the next part of the Procedure.
Creating Energy
-
In place of the battery pack, you will be connecting a load, specifically a small motor that is included in the kit, to the fuel cell and determining how much energy the fuel cell uses to run the motor. Before connecting the motor, make sure your helper is ready with the timer and that you are ready to take voltage measurements using the multimeter.
- As before, you will use the multimeter to determine the voltage drop across the fuel cell. This is the voltage supplied by the fuel cell. Also as before, you will use the multimeter to measure the voltage drop across the resistor, and later use this to determine the current that is being supplied by the fuel cell.
- See step 6 in the "Electrolysis" section, and Figures 15 and 16, above, for how to take these measurements. (Note: The motor will now be in the place of the battery pack.)
- Also as before, you will have your helper help keep track of the time while you take voltage measurements over time. You will measure both the supplied voltage (across the fuel cell) and the voltage drop across the resistor at these time points, so you will need to work quickly. Prepare a data table in your lab notebook to record your voltage measurements.
-
Use the alligator clips to attach the motor to the rest of the circuit, as shown in Figure 17, below. Make sure you can hear the motor whirring and/or feel the motor running. Have your helper start timing. Use the multimeter to take voltage readings across the fuel cell and the resistor at 30 sec, 1 min, and 1.5 min after the motor started running, as described in step 1. Be sure to record your data (in volts) in a data table in your lab notebook.
- Connect the motor in the same way as the battery pack. Specifically, take the black alligator cable and clip its free end to the black wire from the motor. (The other end of this alligator cable should still be clipped onto the black cable that is plugged into the fuel cell). Take the free end of the red alligator cable and clip it to the red wire of the motor. (The other end of this cable should still be clipped to the resistor, which should be connected to another red alligator cable on its other side, and that cable should be clipped to the fuel cell's plugged-in red cable.)
-
As soon as the motor is clipped in place and the motor is running, immediately start timing. Note: You may need to listen closely, and feel the motor with your hand, to tell if the motor is running.
- Tip: If the motor does not appear to be running, you can confirm that the paperclips and motor have a good connection, and that the motor works, by turning on the battery pack and placing its cables to the metal ends of the motor's cables. (Make sure you match the colors correctly or it could damage the motor.) This should make the motor run.
- As the reaction of the fuel cell continues, the hydrogen in the storage tank is being consumed. You will see water re-entering the inner cylinder.
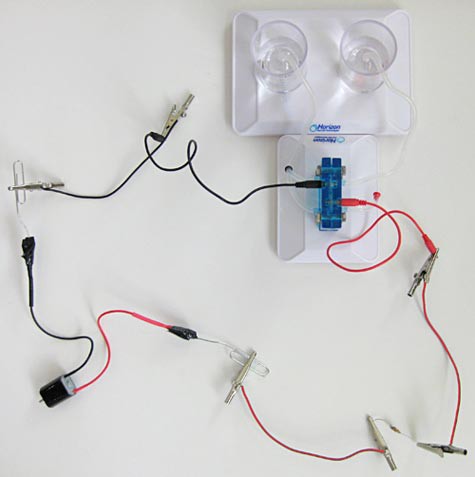 Image Credit: Teisha Rowland, Science Buddies / Science Buddies
Figure 17. When you are ready, hook up the motor to the fuel cell, as shown here, and use your multimeter to take voltage measurements across the fuel cell and across the resistor over time.
- Stop the timer as soon as the motor stops running. You will know when the motor stops running when you stop hearing the whirring sound, or can no longer feel it running. Record the time in your lab notebook.
Determining Efficiency
-
First calculate the input energy the fuel cell used to electrolyze hydrogen using the voltage measurements you recorded in the "Electrolysis" section, above.
- Use Ohm's law to calculate the input current. To do this, divide the voltage drop across the resistor (in volts [V]) by the value of the resistor in (Ohms [Ω]). The unit of measure for current is amperes (amps [A]). Average the three input current measurements to obtain the average input current. Record the average input current in your lab notebook.
- Calculate the electrical power (in Watts [W]) by using Equation 1, below. Use the average voltage you measured across the fuel cell as the voltage, and the average input current as the average current, and then solve for power.
Equation 1:
- P is the power in watts (W)
- I is average current in amperes (A)
- V is average voltage in volts (V)
-
Calculate the energy (in Joules [J]) by using Equation 2, below. Energy is the amount of power expended in an amount of time. For time, use the seconds it took for the hydrogen tank to become full.
- Note: The accurate way to calculate the input energy is to first integrate the current over the time it took to electrolyze, and then multiply that by the average voltage. However, for the purpose of this science fair project, you can estimate the integral by averaging the current.
Equation 2:
- E is energy in watt-seconds or joules (J)
- P is power in watts (W)
- t is time in seconds (sec)
- Equation 3, below, shows how Equations 1 and 2 can be combined to more directly solve for energy. (Equation 3 is derived by substituting 'power' in Equation 2 with the definition of 'power' from Equation 1). You can use Equations 1 and 2 together, or use Equation 3 by itself, to do your calculations.
Equation 3:
|
-
Now calculate the output energy the fuel cell used to run the motor using the voltage measurements you recorded in the "Creating Energy" section, above.
- Again use Ohm's law to calculate the average current, as described in step 1a, above.
- Use Equation 4, below, to calculate the output energy. Note how it is similar to Equation 3, above. For the average voltage, again average the voltage measurements you took across the fuel cell. For time, use the number of seconds the fuel cell could run the motor for.
Equation 4:
|
- Using the input energy and the output energy, calculate the efficiency of the fuel cell with Equation 5. (Note that this equation gives you a percentage. For example, if your result were 0.10, this would be equal to 10%.) Record this number in your lab notebook.
Equation 5:
- Repeat this experiment at least two more times, starting from "Fuel Cell Setup" through "Determining Efficiency." Prior to every trial, gently take the inner cylinder out of the outer cylinder for both the hydrogen and oxygen storage tanks. Disconnect the storage tanks from the fuel cell. Unplug the tubing attached to the top inlet on the O2 side of fuel cell and use the syringe to blow some air into the fuel cell. This will move any excess gases out of the fuel cell. Stagnant gases in the fuel cell will affect efficiency.
-
Plot the efficiency of the fuel cell. Label the x-axis Trial and the y-axis Efficiency.
- How efficient is the fuel cell? Is there much variability in your results?
- How do you think the efficiency of this fuel cell compares to a standard internal combustion engine?
- As you evaluate your results, keep in mind that you are only determining the efficiency of this specific kit and setup, which is likely different for other fuel cell kits and setups.
Troubleshooting
For troubleshooting tips, please read our FAQ: Fuel Cells—Fueling the Future!.
Ask an Expert
Global Connections
The United Nations Sustainable Development Goals (UNSDGs) are a blueprint to achieve a better and more sustainable future for all.

Variations
- How does temperature affect the efficiency of the fuel cell? After electrolyzing water, try placing the fuel cell in the butter compartment of your refrigerator for 30 minutes and then repeating the "Creating Energy" steps of the project. Never freeze the fuel cell. Freezing the fuel cell will damage it. Try placing the fuel cell on a warm window sill or using a hair dryer to heat up the fuel cell.
Frequently Asked Questions (FAQ)
 Image Credit: Michelle Maranowski, Science Buddies / Science Buddies Image Credit: Michelle Maranowski, Science Buddies / Science Buddies
|
| Figure 1. Resistors connected in a series configuration. |
In the series configuration, the total resistance is a sum of the individual resistances. If R1, R2, and R3 are each equal to 1 Ohm, then the total resistance, Rt, is 3 Ohms.
Equation 1.
Another way to connect resistors is to connect them in a parallel configuration, as shown in Figure 2.
 Image Credit: Michelle Maranowski, Science Buddies / Science Buddies Image Credit: Michelle Maranowski, Science Buddies / Science Buddies
|
| Figure 2. Resistors connected in a parallel configuration. |
In the parallel configuration, the total resistance is calculated as shown in Equation 2.
Equation 2.
If R1, R2, and R3 are each 1 Ohm, the resistance of the configuration, Rt, is 1/3 Ohms
.To do this project, you need a resistor with a value less than ½ Ohms. If you can't find a resistor of this value, then simply put together 3 1-Ohm resistors in parallel.
Careers
If you like this project, you might enjoy exploring these related careers:


Related Links
- Science Fair Project Guide
- Other Ideas Like This
- Energy & Power Project Ideas
- My Favorites
- How to Use a Multimeter