Abstract
What happens if you hold a magnet next to water? You might think that water is not affected by magnetism, but in fact, the water is slightly repelled. Believe it or not, if the magnet is strong enough, you can use this effect to levitate objects that contain water, including insects and even small frogs! In this science project, you will learn about diamagnetism. Materials that are repelled by both poles of a magnet are called diamagnetic. The magnets you will use are not strong enough to float a frog, but they are strong enough to explore this fascinating form of "anti-magnetism."Summary
David B. Whyte, PhD, Science Buddies

Objective
Measure the diamagnetic effects of pyrolytic graphite and other materials.
Introduction
If you were asked to describe a material in detail, how many properties would you list? Here are a few properties that you might include: hardness, density, electrical and thermal conductivity, flammability, melting point, corrosion resistance, color, and magnetism. In this science project, you will focus on the last property in this list: magnetism.
Why are some materials magnetic, while other materials are not? To understand why, it is helpful to think about the materials as collections of atoms. In the case of iron, each of the atoms that make up the material is, itself, a very tiny magnet. If all of the atoms are lined up in one direction, they work together to produce a large magnetic field. But what makes the atoms line up? In the case of iron, and other ferromagnetic materials, the atoms tend to align spontaneously. Ferromagnetic materials can be made into permanent magnets, like the ones holding up artwork and pictures on your refrigerator. Because the atoms tend to spontaneously align with each other in ferromagnetic materials, you can find naturally occurring magnets made of ferromagnetic material, such as iron. You can also make iron magnets in a lab or factory. If you melt iron in a magnetic field, the iron atoms in the liquid metal will tend to align with the magnetic field. If the liquid is allowed to cool, the atoms are trapped in this aligned orientation as the material solidifies (you don't have to actually melt the iron for this to occur; just heating it to the point that the atoms can re-align will work).
Materials can also be classified as paramagnetic and diamagnetic. In the case of paramagnetic materials, the atoms that make up the material are also tiny magnets, similar to the atoms in iron. The atoms in paramagnetic materials will align with a magnetic field. When the atoms in the paramagnetic material align, their tiny magnetic fields combine to produce a magnetic field that becomes a measurable physical characteristic of the object. But unlike the atoms in a ferromagnetic material, the atoms in a paramagnetic material become randomly oriented when the external magnetic field is removed. Paramagnetic materials become weakly magnetic when they are near other magnets, but lose this property when away from the magnetic field. Liquid oxygen is an example of a paramagnetic material. Diamagnetic materials are repelled by both poles of a magnet. Water and graphite are examples of diamagnetic materials. In the case of diamagnetic materials, the atoms that make up the material respond to a magnetic field by aligning in such a way as to weakly counter, or repel, the external field. To be precise, all materials are diamagnetic, since the formation of a repulsive force in the presence of an external magnet occurs in all materials. But in ferromagnets and paramagnets the magnetic field is much stronger than the "anti-magnetic" field due to diamagnetism.
Diamagnetic materials have the interesting characteristic that they make magnetic levitation possible. As it turns out, it is not possible to levitate a magnet just using other magnets. This was proven by a scientist named Samuel Earnshaw in the appropriately named Earnshaw's theorem. Putting it more precisely, he proved that it is not possible to achieve static levitation using any combination of fixed magnets and electric charges. Static levitation means stable suspension of an object against gravity. No matter how cleverly you arrange the magnets, the magnet you are trying to levitate will always escape. But if you add an "anti-magnetic" force, supplied by a diamagnetic material, for example, it is possible to achieve static levitation. The device shown in Figure 1, below, can be used to experiment with static levitation. Two small plates of graphite are permanently glued to the wood above and below the floater magnet (not visible in this picture).
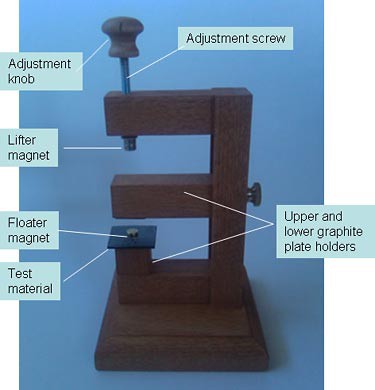 Image Credit: David Whyte, Science Buddies / Science Buddies
Diagram of a magnetic levitator jig. On the top edge of the jig there is a knob and screw which attach to a magnet below the top crossbar. The middle crossbar is a graphite plate holder and separates the lifter magnet from the floater magnet. Finally, the last crossbar has a floater magnet above a test material that is aligned under the lifter magnet. Adjusting the distances between all the magnets and graphite blocks should allow test materials to be suspended in mid-air using magnetic fields.
Figure 1. Shown is a device for measuring diamagnetism in various materials. It has a "lifter magnet," which is attached to a screw that allows it to be moved up and down. The "floater magnet" rests on a platform. There are two pieces of graphite permanently attached to the device, above and below the floater magnet. A third piece of graphite, the test material in this case, has been placed below the floater.
Graphite is strongly diamagnetic. As the lifting magnet is lowered, the floater magnet is attracted to the lifter magnet. The distance the lifter magnet is moved is measured by counting the number of times the threaded height adjuster is turned (the mark on the wooden adjustment knob is used to help count the number of revolutions). At a certain distance, the floater magnet starts to levitate, since the attractive force of the lifter magnet equals the weight of the floater. The floater magnet also experiences repulsive forces from the graphite above and below it. These repulsive forces are required to achieve magnetic levitation.
Diamagnetic materials placed below the floater will push it upward, so that the lifter magnet can be slightly farther away before the floater flies toward the lifter magnet and rests against the upper graphite plate on the wooden arm. If the lifter magnet is lowered further, the floater magnet flies up to the upper piece of wood. The endpoint for the test is the number of turns before the floater magnet flies up. A square piece of graphite, the test material in this instance, has been placed beneath the floater magnet.
The goal of this science project is to measure the diamagnetic repulsion produced by various materials. To do this, the test materials are placed beneath the floater magnet, as shown in Figure 1. If the test material is strongly diamagnetic, it will produce an upward force on the floater magnet. The lifter magnet will be lowered from its maximum height and the distance it moved will be measured by counting the number of times the screw is turned. The lifter magnet will be lowered until the floater magnet flies up and hits the wooden piece above it. All of the test materials must have equal thickness. The material that repels the floater magnet the most will be the one that requires the least number of turns of the height-adjustment screw. This science project will involve some creative problem solving on your part. The procedure lists several materials for testing, but feel free to test others. The actual forces acting on the magnets are complex, so it is difficult to give a complete description of them, but the device is easy to use and opens up many avenues for exploring magnetism!
Terms and Concepts
- Magnetism
- Atom
- Iron
- Permanent magnet
- Ferromagnet
- Paramagnet
- Diamagnet
- Earnshaw's theorem
- Static levitation
- Electron
Questions
- What materials are known to be strongly diamagnetic?
- In what year did Earnshaw prove that levitation was not possible with magnets alone?
- In addition to using diamagnets, what are some other ways to achieve magnetic levitation? Hint: What if the floater magnet were spinning, or if the strength of the lifting magnet were controlled by feedback?
- Based on your research, what is a magnetic domain in a permanent magnet?
- Based on your research, what is the role of electrons in a material's magnetic properties?
- Based on your research, roughly how much stronger is ferromagnetism than diamagnetism?
Bibliography
- Simon, M. (n.d.). Diamagnetic Levitation. Retrieved June 25, 2010.
- Stern, D.P. (2004). Magnetism. Retrieved June 25, 2010.
- Kurtus, R. (2009, April 29). Classifications of Magnetic Materials. Retrieved June 25, 2010.
- Gibbs, P. (1997). Is magnetic levitation possible?. Retrieved June 25, 2010.
- Doherty, P. (n.d.). Exploratorium Snacks: Push Me a Grape. Retrieved June 25, 2010.
- Wikipedia Contributors. (2010, June 28). Magnet. Wikipedia: The Free Encyclopedia. Retrieved June 25, 2010.
Materials and Equipment
- Safety goggles; available from your local hardware store or online from suppliers such as Carolina Biological Supply Company (buy enough for all people helping with the project)
-
Magnetic levitator kit; available from K & J Magnetics at kjmagnetics.com
- Levitation jig (Note: the jig comes with two pieces of pyrolytic graphite permanently attached. To do this experiment you will need a third piece of graphite, not included in the kit. See link below)
- 1 - D62 neodymium lifter magnet
- 1 - D21 disc
- 1 - B221 block
- 1 - B222G-N50 block
- 1 - D31 disc
- 1 - B331 block
- 1 - B333 block
- 1 - D42B disc
- 1 - B442 block
- 1 - instruction sheet
- Pyrolytic graphite, 25 mm x 25 mm x 1 mm thick; available from K & J Magnetics at kjmagnetcis.com
- Pencil
- Sticky notes, 2-in. x 1.5-in. (1 pad)
- Aluminum foil (1 roll)
- Glass cover slips, squares, 25-mm, thickness of 0.09–0.12 mm, Bx 100; available from Carolina Biological Supply Company, item # 633077
- Scissors
- Ruler, metric
- Lab notebook
Disclaimer: Science Buddies participates in affiliate programs with Home Science Tools, Amazon.com, Carolina Biological, and Jameco Electronics. Proceeds from the affiliate programs help support Science Buddies, a 501(c)(3) public charity, and keep our resources free for everyone. Our top priority is student learning. If you have any comments (positive or negative) related to purchases you've made for science projects from recommendations on our site, please let us know. Write to us at scibuddy@sciencebuddies.org.
Experimental Procedure
Important Safety Notes About Neodymium Magnets Before You Begin:
- Neodymium magnets are extremely strong, and must be handled with care to avoid personal injury and damage to the magnets. Fingers and other body parts can get severely pinched between two attracting magnets. Neodymium magnets are brittle, and can peel, crack or shatter if allowed to slam together. Eye protection should be worn when handling these magnets, because shattering magnets can launch pieces at great speeds.
- Never place neodymium magnets near electronic appliances.The strong magnetic fields of neodymium magnets can also damage magnetic media, such as floppy disks, credit cards, magnetic ID cards, cassette tapes, video tapes, or other such devices. They can also damage televisions, VCRs, computer monitors, and other CRT displays.
- Children should not be allowed to handle neodymium magnets, as they can be dangerous. Small magnets pose a choking hazard and should never be swallowed or inserted into any part of the body.
- Never allow neodymium magnets near a person with a pacemaker or similar medical aid. The strong magnetic fields of the magnet can affect the operation of such devices.
- Neodymium magnets are brittle and are prone to chipping and cracking. They do not take kindly to machining.
- Neodymium magnets will lose their magnetic properties if heated above 175°F (80°C).
- Neodymium magnets should never be burned, as burning them will create toxic fumes.
- Like any tool or toy, neodymium magnets can be fun and useful, but must always be treated with care.
Performing the Experiment
- Place the levitator on a level surface.
- Make sure there are no metal or magnetic objects within 3 ft. of the levitator.
- Turn the adjustment knob counterclockwise until the adjustment screw is the whole way up.
- Place the lifter magnet—the D62 (3/8 inch x 1/8 inch) disc—on the lower part of the adjustment screw.
- Move the upper arm so that there is a ½-in. gap between the two attached graphite plates. The size of the gap might need to be adjusted. The goal is to have the floater magnet slightly levitate, then "jump" up to the upper bar as the lifter magnet is lowered.
- Place the 25-mm x 25-mm x 1-mm-thick graphite plate on the lower platform, as shown in Figure 1 in the Introduction. This is a third graphite plate, in addition to the two that are permanently attached to the device.
-
Place the floater magnet on top of the 25-mm x 25-mm x 1-mm-thick graphite plate.
- You can choose any of the magnets that came with the kit to be the floater, though the flat magnets might allow a slightly more precise measurement.
- Make a mark on the knob with a pencil or permanent marker so that you can count the number of rotations of the knob.
- Starting with the lifter magnet at maximum height, note the starting position of the mark on the knob.
- Turn the adjustment knob clockwise.
- Count the number of times the knob is rotated until the floater magnet begins to levitate. Record all data in a data table in your lab notebook.
- Keep turning the knob slowly, still counting the number of turns, until the floater magnet flies up and rests on the bottom of the upper piece of wood.
-
Record the number of rotations at which the magnet flew up.
- Note: Counting the number of turns allows you to get an accurate measure of the distance the lifter magnet has moved. Assume that each full turn moves the lifter magnet 1.0 mm.
- Estimate fractional turns; for example, 10 ½ turns.
- Use the ruler to measure the distance at which the floater magnet flew up to the upper graphite plate on the wooden arm. Measure from the bottom of the lifter magnet to the top of the 25-mm x 25-mm x 1-mm thick graphite plate. Record all data in your lab notebook.
- To start over, turn the adjustment knob counterclockwise until it is at its maximum height. The floater will fall into place.
- Repeat steps 3–16 two more times to ensure your results are accurate and repeatable, recording the number of turns required for the floater magnet to rise up to the wooden arm. Also record the distance from the bottom of the lifter magnet to the top of the 25-mm x 25-mm x 1-mm-thick graphite plate.
- You will now repeat the entire procedure with sticky notes in place of graphite as the test material, as follows. Hold the sticky notes next to the 25-mm x 25-mm x 1-mm-thick graphite plate.
- Peel off a section of notes that is 1 mm thick, the same thickness as the graphite plate. Sticky notes are used since it is easy to adjust the thickness of the paper to be tested.
- Use the scissors to trim the 1-mm-thick pad of sticky notes to a 25-mm x 25-mm square. Now the paper has the same dimensions as the graphite. Be sure to cut the pad so that the pieces stick together.
- Place the 25-mm x 25-mm x 1-mm square stack of paper under the floater magnet. Note: Remove the 25-mm x 25-mm x 1-mm graphite plate.
- Measure the number of turns before the floater magnet flies up to the upper wooden piece.
- Measure the distance between the bottom of the lifter magnet and the top of the paper square, as you did for the graphite.
- Repeat steps 3–17.
-
Repeat steps 3–17 for other materials, such as aluminum and glass.
- For the aluminum: Fold aluminum foil into a 25-mm x 25-mm x 1-mm square.
- For the glass: Use ten 25-mm x 25-mm glass cover slips, each ~ 0.1 mm.
Analyzing Your Results
- Average the number of turns you measured before the magnet flew up for the graphite test material and record the number in your lab notebook. Calculate averages for the other test materials, too. Note: The number of turns times x 1 mm is the distance the lifter has moved.
- Subtract the number of turns measured when graphite was the test material from the number of turns when the sticky notes were the test material. This number is the difference in the distances, in millimeters, required to lift the floater for the two test materials. Call this number "T (graphite-paper)." To reiterate, you are assuming that each revolution moves the lifter magnet 1.0 mm.
-
Repeat step 2 for aluminum and glass.
- You will also need to calculate T (graphite-aluminum) and T (graphite-glass).
- Is the number of turns required to make the floater magnet fly to the upper graphite attached to the wooden piece different for the test materials?
- Rank the materials in order of their diamagnetic properties.
- How do your results compare with published data?
Ask an Expert
Global Connections
The United Nations Sustainable Development Goals (UNSDGs) are a blueprint to achieve a better and more sustainable future for all.

Variations
- Try other test materials. Bismuth, for example, has strong diamagnetic properties. You can obtain bismuth from hobby shops that have casting material.
- Try other sizes of lifter or floater magnets.
- Try different thicknesses or sizes of graphite plates. How does this affect the upward force on the floater magnet?
- What happens if you place 1 mm of paper between the 1-mm-thick piece of graphite and the floater magnet? Try other thicknesses and graph the results.
- Make a rough numerical estimate of the relative diamagnetic strengths of the materials. Assume that the attractive force between the lifter and floater magnets varies as the inverse fourth power of their separation.
Careers
If you like this project, you might enjoy exploring these related careers: