Gear Up Your Candy
Summary
/-/https/www.sciencebuddies.org/cdn/Files/14110/5/moving-two-gears-around-thumbnail.jpg)
/-/https/i.ytimg.com/vi/rTLQAf3DOaE/maxresdefault.jpg)
Introduction
Did you know that gears are all around you? You can find them in wind-up toys, bicycles, carousels, cars and trucks, cranes, drills, wind turbines, analog watches, and so forth! If you've looked closely at a moving bicycle, you have seen gears at work. Are you curious about their purpose? In this activity you will use candy to make gears and explore why they are so versatile.
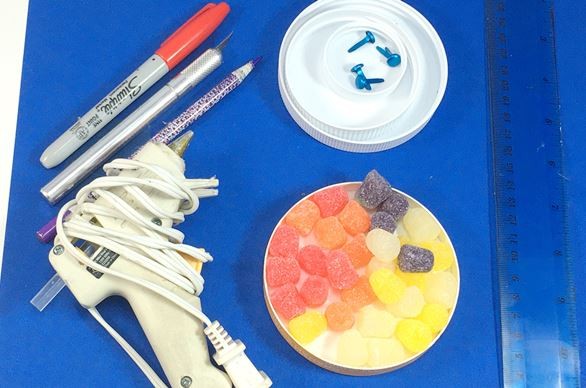
Materials
- At least two round plastic or cardboard lids of different sizes. Lids with diameters of about 5 centimeters and 12 cm work well.
- Scissors or utility knife
- At least 15 individual candies all of the same type, such as spice drops, candy corn or gumdrops
- Large piece of scrap paper
- Glue (a hot-glue gun works well)
- At least two brads, one for each gear you like to make
- Piece of cardboard or poster board, at least 20-by-30 cm
- Permanent marker
- Ruler
- Adult helper
- Optional: A lid with diameter of about 18 cm or more lids, they can be identical in size
/-/https/www.sciencebuddies.org/cdn/Files/14099/7/gears-activity-materials.jpg)
Prep Work
- Start with the larger of your two container lids (for instance, 12 cm) to make the disk of your first gear.
- Locate the center of the lid. (Take your time locating the center as this is important to making the gears turn smoothly.)
- Ask an adult to carefully make a small hole in the center of the lid with the scissors or utility knife. Put a brad in the hole, and test whether or not the disk turns freely around the brad. If not, make the hole a little larger and test again.
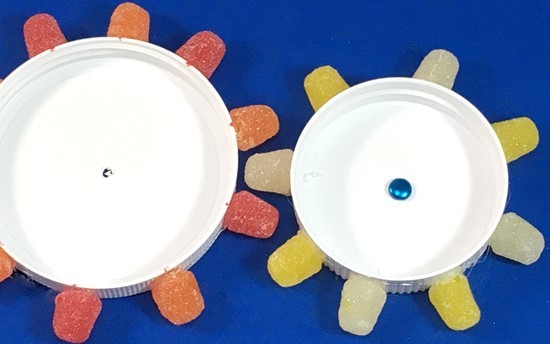
- Arrange an even number of candies around the rim of the lid with the base of each candy touching the disk. The candies should be close together and have no more than a few millimeters of space between them.
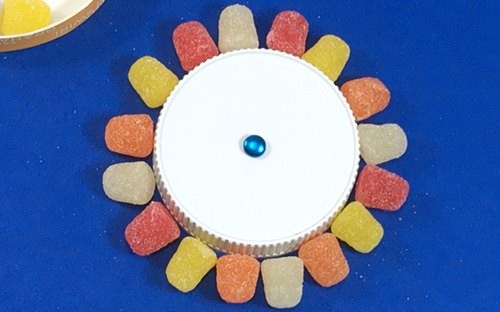
- Remove every other candy. This will leave space for the candies (the teeth of the gear) to mesh with candies on another gear.
- Mark the rim of the lid with a dot for each candy so you can remember where to glue them on.
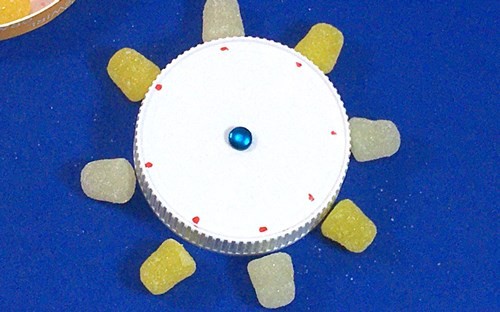
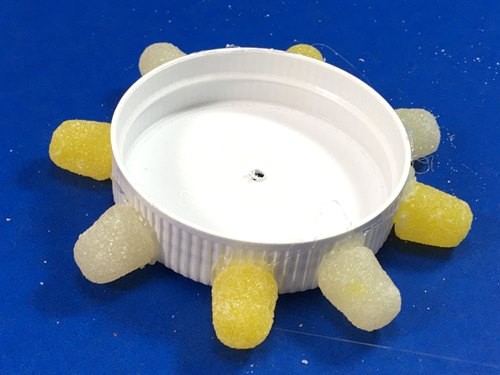
- Lay your lid flat side-down on a piece of scrap paper. Glue the candies to the lid so their sides touch the paper (have an adult help if using a hot glue gun). This ensures the candies, when glued on, form a flat plane.
- Let the glue dry while you repeat this process with the smaller of the first two lids. Prepare at least two lids of different sizes before starting the activity. You can make more later.
- Ensure that the glue is dry and the candies are stable before you start the next steps.
/-/https/www.sciencebuddies.org/cdn/Files/14100/7/candy-around-lid-gears.jpg)
/-/https/www.sciencebuddies.org/cdn/Files/14101/7/mark-spots-to-glue-candy-gears.jpg)
/-/https/www.sciencebuddies.org/cdn/Files/14102/7/candy-glued-on-lid-forms-gear.jpg)
Instructions
- Have an adult help in making a small hole near the middle of your cardboard or poster board. You will use this hole to attach the smaller of the two gears you prepared to the cardboard.
- Thread a brad through the hole in the smaller gear and then through the hole in the cardboard. Bend its arms so the disk is fixed to the board. Test if the disk turns freely around the brad and make adjustments where needed.
- Place the larger gear to the left of the smaller one so one tooth of the smaller gear is interlocked between two teeth of the larger gear. Let the tooth of one gear reach close to the rim of the other gear but not quite touching (just a couple millimeters away from the rim).
- Mark that location of the center of the larger gear on the cardboard, and have an adult help make a hole there.
- Attach the larger gear to the cardboard with a brad.
 What do you think will happen when you turn one of these gears?
 - Try it out!What happens when you turn one gear? What about turning the other gear?
- Now try turning the other gear.Was your prediction correct? Can you tell which gear turned the fastest?
- To make it easier for you to see how fast the gears turn, use the marker to draw a line connecting the center of these two gears.
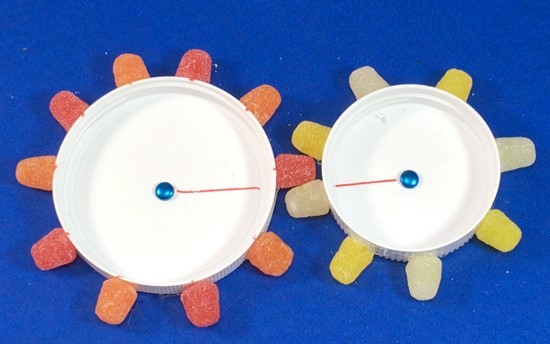
- Turn the smaller gear until it completes one full rotation.How far did the larger gear move? Did it make more than, less than or exactly one complete turn? Can you tell now which gear turned faster? Why would that happen?
- Turn the gears some more.Do you notice in which direction the gears turn? Do both turn in the same direction or in opposite directions? Why would that happen?
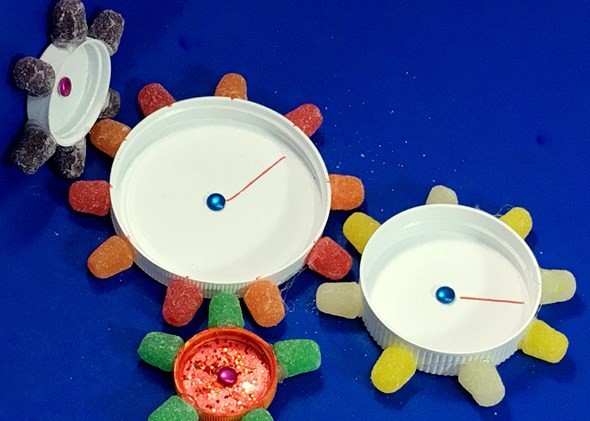
- Optional: Use a container lid with a bigger diameter than the two you used so far to make an even larger gear. Attach it to the right of the set of gears you have so the teeth mesh.What do you think will happen if you turn one gear of this set? Can you tell which gear will turn the fastest and which will turn the slowest? Can you predict the direction in which the other two gears will move when you make one turn?
/-/https/www.sciencebuddies.org/cdn/Files/14103/7/interlock-two-gears.jpg)
/-/https/www.sciencebuddies.org/cdn/Files/14104/7/gears-with-lines-connecting-centers.jpg)
What Happened?
You probably noticed that the smaller a gear is, the faster it rotates. This happens because smaller gears have fewer teeth. Did you also notice that the direction of rotation is the reverse of the other gear when the gears mesh?
Smaller gears have fewer teeth and thus, compared with larger gears, they rotate through fewer teeth before finishing a full rotation. This allows them to turn faster. Take the example of a gear with twelve teeth interlocking with a gear with six teeth. The gear with twelve teeth turns half as fast because it has twice the number of teeth. The interlocking mechanism guarantees that the same number of teeth pass the point where they mesh. When one gear turns over six teeth the other will turn over six teeth as well. When the gear with six teeth makes a full turn the second gear only shifts over six of its twelve teeth. It only makes half a turn and so it rotates half as fast.
Digging Deeper
A gear is a special type of wheel. It is a disk that has teeth, called cogs, around its edge. Most of the time the teeth of two gears interlock, making the two wheels turn together. Sometimes the teeth mesh with a chain that connects the gears. You have probably seen this setup in bicycles.
Gears make tasks easier for humans and for motors. In many machines humans or motors make an axle (a rod that runs through a wheel or gear) turn, and the right gears can make the turning more efficient.
Choosing the right combination of gears is the key to efficient work. Some bikes allow you to choose gears. Depending on the choice the chain will connect different sizes of gears, giving the rider many options for power and efficiency. It allows the rider to conquer a steep hill or move at a fast speed when going downhill—all with the same bike. Wondering how? When riding a bicycle, the rider pushes on the pedals to rotate a small gear. A chain transfers this rotation to another gear that is attached to the back wheel. If the gears are the same size, one rotation of the pedals turns the back wheel once. However, depending on the bicycle and the rider's choice, the chain might connect gears of different sizes. The type of gear chosen determines how many times the back wheel will turn with one rotation of the pedals. This is helpful because a person's capacity in making the peddles turn fast is limited by how fast the rider can move his or her legs. With the help of gears, this no longer limits the speed at which the back wheel rotates. It sounds wonderful to gain speed, but what is gained in speed is lost in power. When the gears are set to transfer one rotation of the pedals to multiple rotations of the back wheel, the rider has to push much harder. Because of this, connecting a larger-sized gear in the front with a small-sized one in the back is a great choice when you are riding downhill but a useless option when riding up a hill. Having a range of gears allows cyclists to adjust their bicycles to the circumstances they are riding in.
/-/https/www.sciencebuddies.org/cdn/Files/14113/4/STEM-activity-gear-up-candy-gears.png)
Ask an Expert
For Further Exploration
- Count the number of teeth on a set of interlocking gears and use these numbers to find out how much faster a larger gear rotates when it meshes with a smaller one.
- Make more gears of different and equal sizes and try different combinations.
- The gears in this activity were all attached to a flat piece of cardboard. Can you make a configuration where one gear is at a right angle with a second gear?
- The axle is the rod that goes through the middle of a gear. The gears you made in this activity rotate around their axles. Sometimes the gears are fixed to their axle, and the axle turns. Can you make a system where at least one gear is fixed to an axle? What happens if you glue gears of different sizes to the same axle? When could a configuration like that be helpful?
- Find tools and machines around your home and neighborhood that have gears. Can you find out why gears are used in this tool?
/-/https/www.sciencebuddies.org/cdn/Files/14105/8/system-of-gears.jpg)
/-/https/www.sciencebuddies.org/cdn/Files/2832/4/ApMech_img023.gif)
/-/https/www.sciencebuddies.org/cdn/Files/3700/5/ApMech_img060.png)
/-/https/www.sciencebuddies.org/cdn/Files/21336/5/blobid1752670764383.jpg)
/-/https/www.sciencebuddies.org/cdn/Files/3216/5/Phys_img081.jpg)
/-/https/www.sciencebuddies.org/cdn/Files/13977/6/pantograph-results-thumbnail.jpg)
/-/https/careerdiscovery.sciencebuddies.org/cdn/Files/1450/21/iStock-1227179796.jpg)
/-/https/careerdiscovery.sciencebuddies.org/cdn/Files/1457/17/pexels-photo-3861938.jpg)
/-/https/careerdiscovery.sciencebuddies.org/cdn/Files/928/17/ThomasWallner.jpg)
/-/https/careerdiscovery.sciencebuddies.org/cdn/Files/17329/6/automotive-technician-iStock-1157319426.jpg)
/-/https/careerdiscovery.sciencebuddies.org/cdn/Files/19369/4/machinist-manufacturing-tool-die-maker-iStock-879134734.jpg)
/-/https/img.youtube.com/vi/Ar78O1hl7TE/0.jpg)
/-/https/img.youtube.com/vi/z9cDaV9edeo/0.jpg)
/-/https/img.youtube.com/vi/x8dDvS8YxU0/0.jpg)