Abstract
Have you ever dyed eggs? Turning eggshells from white into different, dazzling colors can be a lot of fun! To do this, most people buy dye tablets to make different colors in a liquid bath. They then dip the egg into the liquid and wait till it turns the desired color. You can dye eggs in many other ways, and one neat method uses silk ties. Sounds strange to use clothing to dye eggs, right? But it actually works really well! In this science project, you will dye eggs with old or used silk ties and investigate whether heat is needed for the process to work well. Are you just dye-ing to try this out?Summary
Teisha Rowland, Ph.D., Science Buddies
This science project is based on this source:
- Wells, S. (2012, March 23). Silk-Dyed Eggs {AKA Tie-Dyed!} Our Best Bites Zee Studio. Retrieved February 11, 2013.
Objective
Investigate whether heat is important for using silk ties to dye eggs.
Introduction
Dyeing eggs can be a lot of fun. You get to turn a plain, white egg into something colorful, and you even design it yourself, picking which colors to use and where. The most common way people dye eggs is by dipping them in cups of liquid in which they dissolve dye tablets purchased at a store. But people have been dyeing eggs long before these store-bought tablets existed. In fact, dyeing eggs is so much fun that people have explored many other ways to do it over the years, such as by using dyes from plants and spices, or by using completely different methods.
One way you can dye eggs is to use 100% silk ties, such as those in Figure 1.
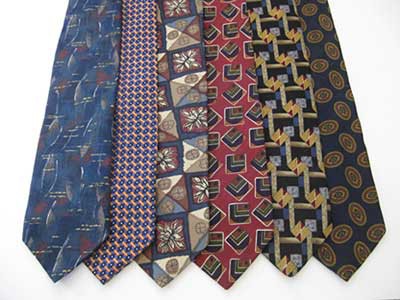 Image Credit: Teisha Rowland, Science Buddies / Science Buddies
Figure 1. A selection of 100% silk ties. They can be used to dye eggs. Tags on the back of the ties usually say if they are 100% silk.
To dye an egg using silk ties, you wrap an egg in a piece of the tie and then place it in water with vinegar added. When the process is done, some of the dye that was on the tie transfers to the eggshell. Ideally, it dyes the egg so that it looks similar to the tie. See Figure 2 for examples. Can you see how the eggs look similar to the ties that were used to dye them? Some of the floral designs are even clearly visible on the egg on the right.
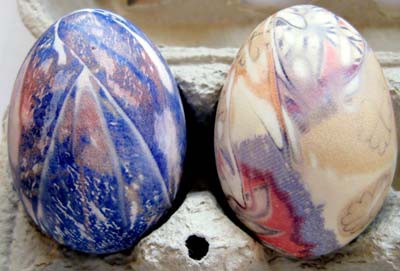 Image Credit: Teisha Rowland, Science Buddies / Science Buddies
Figure 2. These eggs were dyed using silk ties. The egg on the left was dyed using the dark blue tie on the left in Figure 1, while the right egg was dyed using the red, blue, and beige floral-patterned tie, third from the left in Figure 1.
Why do you soak the eggs with vinegar when dyeing them with silk ties? To answer this, you need to explore the chemistry of how silk fabric is dyed. Silk is generally dyed using a specific group of dyes called acid dyes. In order to work (that is, to actually change an object's color), an acid dye needs acids. What are acids? They have a very particular chemical definition, which you can read about in the Science Buddies tutorial Acids, Bases, & the pH Scale. But for this project it is enough to know that acidic ingredients in the kitchen are ones that taste sour. For example, vinegar, lemon juice, and tomato juice are all acids. When using acid dyes, acids are needed for the silk ties to be dyed, and acids are needed for the eggs to be dyed. So the eggs are soaked with vinegar during the dyeing process in order to help the acid dyes transfer their color from the silk ties to the eggshells.
When the acid dyes color something, like the silk or eggshells, they undergo what is called a chemical reaction, which is when one chemical, or substance, changes into another. Chemical reactions are constantly happening all around you, and inside of you. As just one example, you may have seen reddish-brown rust on an old piece of metal before. A chemical reaction turns the metal into rust (specifically, when iron in the metal reacts with oxygen in the air or water). For the acid dyes to color the silk, they must both undergo a chemical reaction that binds them (or makes them stick together). The same kind of reaction happens between acid dyes and an eggshell, binding the two together. Acids are needed for this chemical reaction to work well.
So you now know that adding an acid is important for dyeing the eggshells, but what else might be important? Sometimes a chemical reaction needs heat for it to happen. For example, when you cook an egg, it starts out as unappealing and raw, but adding heat (from the stove or microwave) enables it to undergo chemical reactions that transform it into a tasty, cooked egg. In the same way, the chemical reaction needed to bind acid dyes to silk requires both acid and heat. But what about the reaction needed to dye the eggs with acid dyes - does that need heat, too? In the beginning of this Introduction, we mentioned dyeing eggs with store-bought dye tablets. If you have used those tablets before, you may remember that the instructions often say to use vinegar, an acid, to make the most colorful dyed eggs. However, no heat is involved with using those tablets. The eggs you use are room temperature (or even cold) eggs that have been hard-boiled. In this chemistry science project, you will dye eggs using silk ties and investigate whether heat is important for dyeing the eggs. So get ready to dye some egg-cellent eggs!
Terms and Concepts
- Dyeing and dyes
- Silk
- Chemistry
- Acid dyes
- Chemical reactions
- Heat
Questions
- How are eggs usually dyed?
- What kinds of dyes are used to dye silk?
- What is a chemical reaction?
- Do you think heat will be needed for the eggs to be dyed using silk ties? Why?
Bibliography
Ask an adult to help you do more research by visiting the following websites, which give information on acid dyes, chemical reactions, silk, and dyeing eggs using silk ties:
- Burch, P. E. (2008, July 29). Acid dyes. Paula Burch's All About Hand Dyeing. Retrieved February 19, 2013.
- Rader, A. (n.d.). Chemical reactions. Rader's Chem4Kids. Retrieved February 25, 2013.
- Home Science Tools, (n.d.). Learn about reactions & polymers. Home Science Tools. Retrieved December 14, 2017.
- Cerrato, C. (2000, June 29). How does Easter egg dye work on eggs? MadSci Network. Retrieved February 25, 2013.
This project idea was adapted from the following resource:
- Wells, S. (2012, March 23). Silk-dyed eggs {AKA tie-dyed!}. Our Best Bites. Retrieved February 11, 2013.
Materials and Equipment
- 100% silk ties (3). Look at the tags on the back of the tie to make sure they are 100% silk. The tags may be at the wide end of the tie or at the thin end. Check the front and back of the tags to verify that the tie is 100% silk. Darker blues, purples, and reds transfer dye the best, but other colors could be tried as well. These ties can usually be purchased at a secondhand shop or thrift store. If you are using ties from home, be sure to ask permission before using someone else's silk tie(s) for this science project! The ties will be destroyed in this project.
- Scissors
- White eggs, raw (6)
- Twist ties (12)
- Light-colored tablecloth, pillowcase, or other lightweight, light-colored fabric scrap. Use fabric that you will not mind having cut up. You will need to make six squares that are each approximately 10 by 10 inches in size.
- Cooking pot, medium-sized
- Bowl or cooking pot, similar in size to the cooking pot
- Measuring cups
- Water
- White vinegar (1/2 cup)
- Well-ventilated stove area, as provided by an overhead ventilation system or a nearby window that could be opened, or dust masks (2).
Caution: Some acid dyes are toxic while others are non-toxic. Without knowing exactly which acid dyes are in the ties you will be using, it is best to practice caution and avoid breathing in potentially dangerous dye fumes when heating the ties in hot water. - Ruler
- Timer or clock
- Old dish towels or rags
- Tongs or slotted spoon
- Optional: Sticky notes
- Optional: Camera
- Optional: Vegetable oil
- Lab notebook
- Adult helper
Experimental Procedure
Preparing the Eggs
In this part of the science project, you will prepare the eggs to be dyed with the silk ties.
- Take one of the silk ties and turn it over so that it looks like Figure 3.
 Image Credit: Teisha Rowland, Science Buddies / Science Buddies
Figure 3. Turn a tie over so that you are looking at its back.
-
Using the scissors, carefully cut through the stitches holding the sides of the tie together in the middle, as shown in Figure 4.
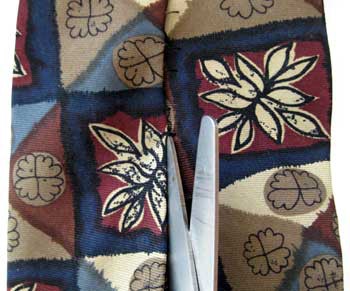 Image Credit: Teisha Rowland, Science Buddies / Science Buddies
Figure 4. Cut through the small stitches along the seam on the back of the tie.- Open the tie up as you cut up through the stitches, as shown in Figure 5.
- If there is a label, cut through it and the stitches holding it in place, too, and then carefully remove it from the tie completely.
- Continue cutting and opening up the tie until you have cut through all of the stitches along the seam.
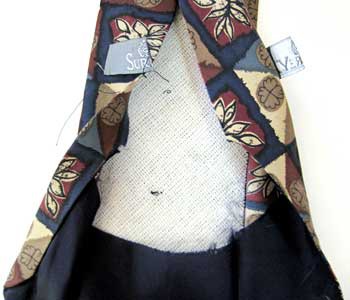 Image Credit: Teisha Rowland, Science Buddies / Science Buddies
Figure 5. Continue cutting through the stitches of the seam and the label, which you should remove.
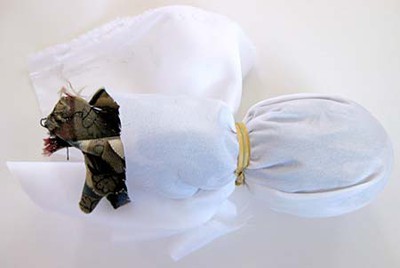
- Remove any (usually white) liners inside of the tie, as shown in Figure 6.
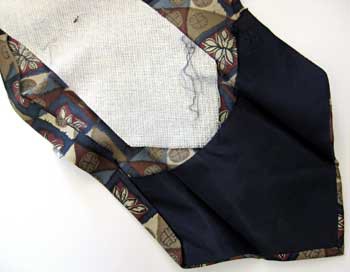 Image Credit: Teisha Rowland, Science Buddies / Science Buddies
Figure 6. Remove any liners inside the tie, as shown with the white liner here.
- If there is a liner sewed to the bottom of the tie, as shown in Figure 7, carefully cut the stitches along the seams to remove this liner. Be careful to cut only the liner part of the tie.
- You can still use the tie if you cut a small hole in it. When you unwrap the egg later, just make sure you notice where the hole is so that you do not expect any dye to transfer there.
- If you cut a large hole in the tie, see if you can shift the silk around on the egg (in step 5d) so that the hole is part of what you gather up and does not touch the eggshell. If the hole is so big that you cannot do this, you will probably need to use a different tie for this science project.
 Image Credit: Teisha Rowland, Science Buddies / Science Buddies
Figure 7. Remove any liner sewed to the bottom of the tie by carefully cutting the stitches of its seams. A black liner is shown here.
- Once you have removed all of the seam stitches and liners, the tie is ready to wrap some eggs.
- Flip the tie over so that its front is facing up.
- Place an egg a few inches away from the tip of the tie, as shown in Figure 8. Position the egg lengthwise with the tie.
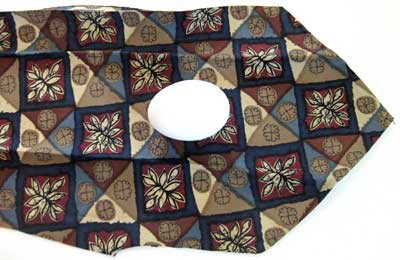 Image Credit: Teisha Rowland, Science Buddies / Science Buddies
Figure 8. Place an egg on the front side of the tie, near the tie's tip.
- Fold the tie's tip over the egg so that it completely covers the egg, as shown in Figure 9.
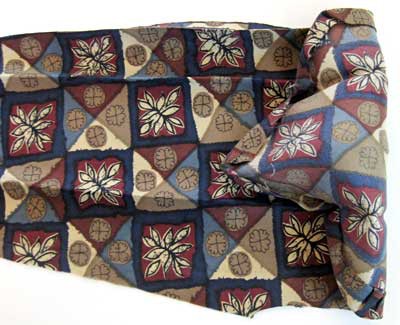 Image Credit: Teisha Rowland, Science Buddies / Science Buddies
Figure 9. Fold the tip of the tie over the egg to cover it.
- Adjust the position of the egg in the tie so that you can gather up enough tie material on one end of the egg and bind it together, as shown in Figure 10.
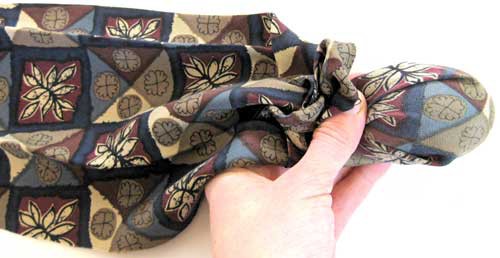 Image Credit: Teisha Rowland, Science Buddies / Science Buddies
Figure 10. Wrap the tie around the egg, leaving enough silk to bind the material together.
- Once you are satisfied with the egg's position, cut off the piece of tie that the egg is wrapped in. Cut straight across the width of the tie, as shown in Figure 11. The cut piece will probably be around 9 by 9 inches in size.
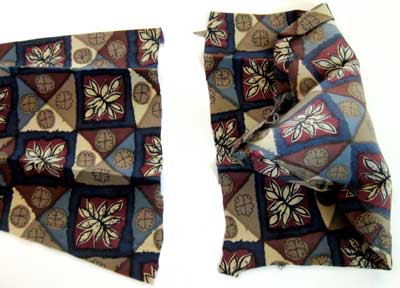 Image Credit: Teisha Rowland, Science Buddies / Science Buddies
Figure 11. When you know how much tie material you need to cover the egg, cut the tie straight across its width, leaving enough to cover the egg.
- Pinch the tie material around the egg so that it is tight, as shown in Figure 12, but be careful not to break the egg!
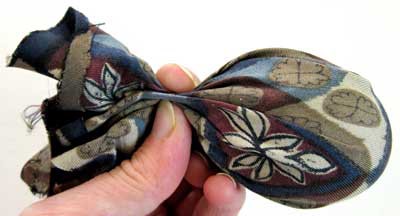 Image Credit: Teisha Rowland, Science Buddies / Science Buddies
Figure 12. Carefully pinch the tie material together at one end of the egg.
- Take a twist tie and tie it around the end of the egg, as shown in Figure 13.
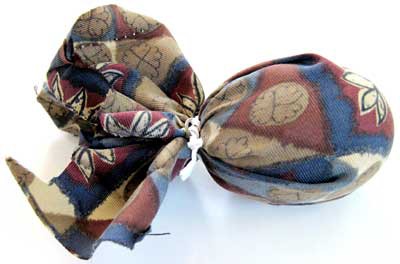 Image Credit: Teisha Rowland, Science Buddies / Science Buddies
Figure 13. Tie a twist tie around the end of the egg.
-
Carefully pull the fabric through the twist tie to tighten the fabric around the egg, as shown in Figure 14. Do this to smooth all of the wrinkles. This will help the dye transfer directly to the eggshell.
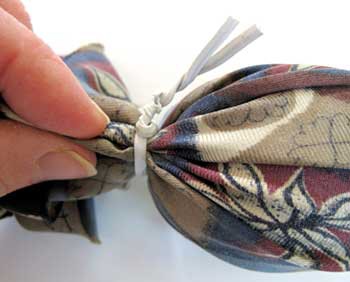 Image Credit: Teisha Rowland, Science Buddies / Science Buddies
Figure 14. Gently pull the fabric wrinkles through the twist tie to tighten the fabric around the egg.
- Take a new egg and place it on the tie material (front side still facing up), several inches above where you just cut the tie, as shown in Figure 15.
- Repeat steps 5c to 5h with the new egg, except in step 5c you will fold the cut region (instead of the tip of the tie) over the egg.
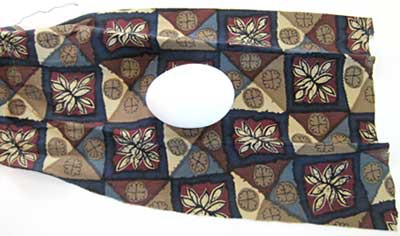 Image Credit: Teisha Rowland, Science Buddies / Science Buddies
Figure 15. Place a new egg on the upper part of the tie and repeat the process to create a second tie-wrapped egg using the same tie material.
- Next you will wrap the eggs in a layer of the light-colored tablecloth, pillowcase, or other lightweight, light-colored fabric scrap. Wrapping the eggs in this second fabric layer will help hold the piece of silk tie material next to the egg. This layer should be light colored to make sure it does not interfere with your results by also dyeing the eggs.
- Wrap the fabric around one of the eggs you wrapped in a piece of tie material.
- Cut the fabric so that you have enough to cover the egg. This will probably end up being a square approximately 10 by 10 inches.
- Twist a twist tie around the fabric on the egg, on top of the other twist tie, as shown in Figure 16.
- Tighten the light-colored fabric as you did in step 5h with the tie material.
- Repeat steps 6b to 6d with the other egg that you have wrapped in a piece of tie material.
 Image Credit: Teisha Rowland, Science Buddies / Science Buddies
Figure 16. After you wrap each egg in a piece of tie, wrap the tie-covered egg in a layer of light-colored fabric, as shown here, and use a twist tie to keep it in place.
- Repeat steps 1-6 using two other ties and four new eggs.
- When you have finished, you should have prepared a total of six eggs for dyeing. You should have two eggs wrapped in one tie, two eggs wrapped in a second tie, and two eggs wrapped in a third tie — with all the eggs wrapped a second time in a layer of light-colored fabric.
- In your lab notebook, assign a number to each tie (1 to 3). You will use this in the Analyzing Your Results section.
Dyeing the Eggs
Now that your eggs have been prepared, you will dye them. Half of the eggs will be boiled and the other half will not. You will compare how heating the eggs affects how well the dye in silk tie material transfers to the eggs.
- Separate the eggs into two groups, with three in each. In each group include an egg covered with fabric from each tie.
- You will boil one group of eggs, while the other you will not.
- By including an egg wrapped with each tie in both groups (boiled and un-boiled) it will be easiest for you to compare how well each egg becomes dyed.
- Carefully place one group of eggs in a medium-sized cooking pot. You will boil these eggs.
- Carefully place the other group of eggs in a similarly sized bowl or pot. You will not boil these eggs.
- Use a measuring cup to add water to the pot until there is at least about 1 inch of water above the eggs. Keep track of how much water you added.
- Add the same amount of water to the second group of eggs. There should be at least about 1 inch of water above the eggs.
- If needed, adjust the amount of water in each pot and bowl so that both have at least 1 inch of water above the eggs (but leave a few inches between the water level and the top of the pot or bowl).
- Add ¼ cup of white vinegar to each group of eggs.
- Place the pot with the eggs to be boiled on a burner on the stove. Have an adult turn the stove on to medium/high and cover the pot with a lid.
- Caution: Some dyes are harmful. To avoid breathing in the vinegar and potentially dangerous dye fumes, leave the lid on the pot while it is on the stove, turn on an overhead stove fan, and/or open a nearby window, or put on your dust mask (and have anyone in the kitchen area put on a dust mask as well).
- The second group of eggs, in the bowl or other pot, should remain sitting on a counter and not be heated. You will be coming back to them in step 11.
- With an adult's help, check on the pot every few minutes to see if the water is boiling. When the water boils, have an adult remove the lid and reduce the heat to medium so that the water simmers. Once it is simmering, start a timer or note what time it is. Simmer the eggs for 20 minutes.
- While the eggs are simmering, lay some old dish towels or rags on a counter.
- After the eggs have simmered for 20 minutes, remove the eggs and let them cool.
- Ask an adult to remove the eggs carefully from the hot water using tongs or a slotted spoon and place them on the dish towels.
- Also remove the un-boiled group of eggs from their bowl and place them together on a different area on the dish towels.
- Make sure you keep track of which eggs were boiled and which were not! You may want to use sticky notes to do this, labeling the group that was boiled and the group that was not boiled.
- Let the eggs sit on the dish towels until they are cool enough to unwrap. This should take about 10 minutes.
Analyzing Your Results
- In your lab notebook, make a data table like Table 1 to record your observations.
| Egg Group | Tie Used to Wrap the Egg |
Dyed Better Than the Egg from the Other Group? (Yes/ No/ About Equal) |
Other Observations |
| Boiled | Tie 1 | ||
| Tie 2 | |||
| Tie 3 | |||
| Not Boiled | Tie 1 | ||
| Tie 2 | |||
| Tie 3 |
- Once the eggs are cool enough, unwrap them.
- Undo the outer twist tie, remove the light-colored fabric layer, undo the next twist tie, and then carefully peel off the piece of tie.
- As you unwrap the eggs, be sure to keep track of which eggs were boiled and which were not.
- Take the eggs that were wrapped in the same tie material and place them next to each other. Compare them. How do the eggs that were boiled look compared to the eggs that were not? Which eggs look like they took the dye better, appearing darker?
- Write your results in the data table (like Table 1) in your lab notebook.
- You should have numbered the three ties used for this project (using numerals 1 to 3) in step 7 of the Preparing the Eggs section. Number the ties now if you have not done so.
- Overall, how do the eggs from the boiled group compare to the eggs in the group that was not boiled?
- How do you think heating the eggs affected the chemical reaction taking place between the acid dyes in the ties and the eggshells?
- Do you think heating the eggs helped the chemical reaction to work better, or did it hinder the chemical reaction? Or did heating the eggs not affect how well the chemical reaction happened?
- What other observations can you make? Do some colors on the ties seem to dye the eggs better than other colors?
- You can use a camera to take pictures of your eggs to go on your Project Display Board.
- If you like, rub the eggs with a little vegetable oil to make them shiny.
- When you have finished making your observations, the eggs can be stored in the refrigerator. Do not eat any of the eggs you used in this experiment because the dyes were not made to be safe to consume.
- The eggs that were boiled will be hard-boiled, but the eggs that were not boiled will still be raw. If you would like, you can blow the raw eggs out to save the shells. You can use this resource to blow out the eggs:
- Wells, S. (2011, April 15). How to: Make blown egg ornaments. Our Best Bites. Retrieved February 19, 2013, from http://www.ourbestbites.com/2011/04/how-to-make-blown-egg-ornaments/
- Alternatively, you can repeat this project but use hollowed-out eggs so you can keep the shells afterwards, as discussed in the resource mentioned. You will need to be very careful not to break the hollow eggs when handling them.
- The eggs that were boiled will be hard-boiled, but the eggs that were not boiled will still be raw. If you would like, you can blow the raw eggs out to save the shells. You can use this resource to blow out the eggs:
Ask an Expert
Variations
- It is possible to use the same tie to dye eggs multiple times. But how many times does this work? Try using the same piece of silk tie material to dye eggs multiple times. Record how the dyed eggs look each time. How many times can you dye an egg using the same piece of tie so that the colors from the silk tie still transfer to the eggshell with the same darkness and details? Do some colors last longer than others? Does the color slowly fade as you reuse the tie, or does it abruptly stop dyeing the eggs?
- In this science project, you put the eggs in a certain amount of water with ¼ cup of white vinegar. Can you dye the eggs better using more or less vinegar? Test this by repeating this experiment and keeping all of the conditions (the silk tie material, the boiling time, etc.) the same but changing the ratio of water to vinegar. Keep the total amount of liquid the same. For example, if you used 5 cups of water and ¼ cup of vinegar, you could also try 5¼ cups of water and no vinegar and 4¾ cups of water and ½ cup of vinegar. Do the eggs dye better using a different ratio of water to vinegar? Do they dye at all when you add no vinegar?
- You probably found that either boiling the eggs or not boiling them dyed them better. But what about temperatures in between the two? Design a way to test dyeing the eggs at different temperatures (in water and vinegar). What temperature works best for dyeing the eggs? What is the lowest temperature needed to dye the eggs effectively? Ask an adult to help you when using the stove.
- You used 100% silk ties in this science project, but other items that are 100% silk, such as blouses, underwear, and other fabric scraps could be used as well. Try this science project again using different items that are made 100% of silk. Do some items work better than others when dyeing the eggs?
- Vinegar is a mild acid that you used in this science project because acid dyes are commonly used to dye silk. For an advanced challenge, you could investigate whether other acids or even bases work. Find out more about common acids and bases that you could use through the Science Buddies tutorial Acids, Bases, & the pH Scale and other resources. Based on your research, make a hypothesis about how well you think different acids and/or bases will dye the eggs and then repeat this experiment to try it out. Be sure always to find out and follow the necessary safety precautions for using different chemicals and ask for adult supervision when using them.
- For a more advanced challenge, you could try dyeing eggs using other types of dyed fabric. You will need to look into what types of dyes are used for different types of fabrics, and what conditions the dyeing processes use. Develop a hypothesis of how well the different dyes will dye the eggs using different fabrics and conditions. Then try it out! Ask an adult for help researching this and follow the necessary safety precautions for being exposed to different dyes. You will most likely need a well-ventilated stove or dust masks and possibly goggles and gloves, depending on what dyes you use and how you handle them. You can use these resources to get you started on finding more out about different types of dyes and general safety precautions needed:
- Burch, P. E. (2009, December 18). About the dyes. Paula Burch's All About Hand Dyeing. Retrieved February 19, 2013, from http://www.pburch.net/dyeing/aboutdyes.shtml
- Dharma Trading Co. (n.d.). Fabric dyes. Retrieved February 25, 2013, from http://www.dharmatrading.com/html/eng/2499574-AA.shtml
Careers
If you like this project, you might enjoy exploring these related careers: