Abstract
What do you do with your old wooden pencils when they get too short to hold? Don't throw them away; you can use them to make circuits! This project will show you how to use pencils to make resistors, an important part of many electrical circuits, and test how they affect the brightness of a lightbulb in a simple circuit.Summary
Objective
Test how the length of a pencil resistor affects the brightness of a lightbulb in a simple circuit.Introduction
Look around you. You can probably see at least one thing in the room that is powered by electricity. Some of them might be plugged into wall outlets, and others might be powered by batteries. All electrical devices have electrical current, or "flow," of electricity moving through them. The current usually flows through wires and other electrical parts, like the lightbulb in a lamp or the motor in a toy car. These parts combined are called an electrical circuit. Figure 1 shows a basic circuit with a battery and a lightbulb.
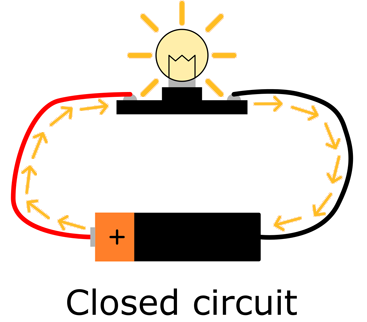 Image Credit: Ben Finio, Science Buddies / Science Buddies
Figure 1. A closed circuit with a battery and a lightbulb. Electrical current is indicated by the yellow arrows.
In order for electricity to flow in a circuit, it must have a complete "loop," or path, to flow through. In a battery-powered circuit, this loop must connect the positive end of the battery (marked with a "+" symbol) to the negative end of the battery (negative is indicated by a "-" symbol, but this is usually not printed on the battery). This is called a closed circuit, as shown in Figure 1. If any part of the loop is broken, this creates an open circuit and electricity does not flow at all, as shown in Figure 2.
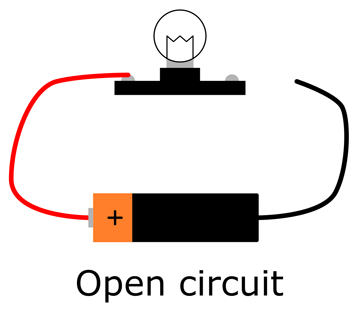 Image Credit: Ben Finio, Science Buddies / Science Buddies
Figure 2. The path for electricity to flow is broken, so this is an open circuit. The lightbulb does not light up because no electricity can flow.
If the positive and negative ends of a battery are connected directly to each other, without anything like a lightbulb or motor in between them, this creates a short circuit, as shown in Figure 3. Short circuits are dangerous because they allow a lot of electrical current to flow, and can cause the battery to get very hot, or even explode. You should never connect the two ends of a battery directly to each other.
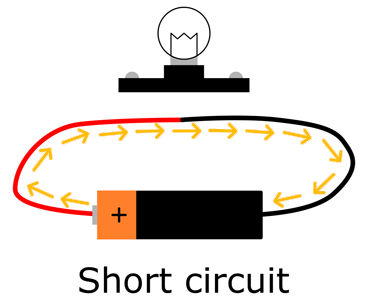 Image Credit: Ben Finio, Science Buddies / Science Buddies
Figure 3. A short circuit with the positive and negative ends of a battery connected directly to each other. This can cause the battery to overheat.
What types of materials are circuits made out of? Circuits have to let electrical current flow through them easily. Materials that let electricity flow through them easily are called conductors. Most metals are conductors. However, materials that prevent electricity from flowing are also important for circuits. These materials are called insulators. Most rubbers and plastics are insulators. Insulators are important because they can help protect you from an electric shock when you touch a wire, or help protect a sensitive circuit from damage. For example, the power cord for a lamp consists of metal wires inside a rubber insulator; and an electronic toy might have a plastic case that protects the circuit inside from damage.
However, not all conductors are the same. An important property of conductors is their resistance, or how much they resist the flow of electrical current. It is easier for current to flow through something with low resistance than through something with high resistance. The resistance of a conductor depends on both the material it is made out of, and its size and shape. Circuit parts with a specific resistance value are called resistors (resistance is measured in ohms [Ω], but you will not need to measure ohms for this project). In this project, you will make your own resistors by cutting pencils to various lengths (the graphite core of wood pencils is a conductor). You will then connect your resistors to a battery and a lightbulb. How do you think the length of the pencil resistors will affect the brightness of the lightbulb? Try this experiment to find out!
Terms and Concepts
- Electricity
- Current
- Circuit
- Positive
- Negative
- Closed circuit
- Open Circuit
- Short Circuit
- Conductor
- Insulator
- Resistance
- Resistor
- Ohm
Questions
- What is electrical resistance?
- What are some examples of materials that have low resistance? High resistance?
- Which do you think will have a higher resistance, a longer pencil or a shorter pencil? Hint: Think about water traveling through a pipe. Is it harder to push water through a long pipe or a short pipe?
- How will the resistance of a pencil resistor affect the brightness of a lightbulb when they are connected to a battery?
Bibliography
- Finio, B. and De Brabandere, S. (2015, March 14). Electricity, Magnetism, & Electromagnetism Tutorial. Retrieved April 21, 2016.
- Rader, A. (n.d.). Electricity & Magnetism: Resistance. Physics4Kids. Retrieved April 21, 2016.
- Henderson, T. (n.d.). Resistance. The Physics Classroom. Retrieved April 21, 2016.
Materials and Equipment 
Recommended Project Supplies
- Basic Circuits Kit, available from our partner
Home Science Tools.
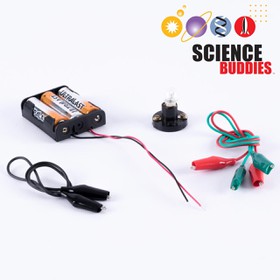
You will need these items from the kit:
- AA batteries (4)
- 3xAA battery holder
- Alligator clip leads (3)
- Mini lightbulb
- Mini bulb screw base
- You will also need to gather these items, not included in the kit:
- #2 pencils (at least 5)
- Metric ruler
- Pencil sharpener
- Coping saw or hacksaw (adult supervision required)
- Lab notebook
To make this a more advanced project, there are two options that will allow you to make more quantitative measurements (see the Variations section for details):
- A lux meter will allow you to measure the exact amount of light coming from the lightbulb, instead of rating brightness on a 0–5 scale.
- A digital multimeter will allow you to measure the resistance of your dimmer switch in ohms, and measure the amount of current flowing through the circuit. See our multimeter tutorial if you do not know how to use a multimeter.
Disclaimer: Science Buddies participates in affiliate programs with Home Science Tools, Amazon.com, Carolina Biological, and Jameco Electronics. Proceeds from the affiliate programs help support Science Buddies, a 501(c)(3) public charity, and keep our resources free for everyone. Our top priority is student learning. If you have any comments (positive or negative) related to purchases you've made for science projects from recommendations on our site, please let us know. Write to us at scibuddy@sciencebuddies.org.
Experimental Procedure
- Watch this video for an introduction to your Basic Circuits Kit.
- Set up your test circuit, as shown in Figure 4.
- Insert three AA batteries into the battery holder (your kit comes with one extra battery). Make sure the "+" symbols on the batteries line up with the "+" symbols inside the battery holder.
- Connect a red alligator clip to the exposed metal part of the red wire from the battery holder (in electronics, red wires are usually used for the "positive" connection).
- Connect a black alligator clip to the exposed metal part of the black wire from the battery holder (in electronics, black wires are usually used for the "negative" connection).
- Attach the other end of the black alligator clip to one of the screws on the lightbulb holder. If necessary, use a small Phillips head screwdriver to loosen the screw slightly, so it is easier to clip to.
- Screw the lightbulb into the bulb holder.
- Attach one end of the green alligator clip to the other screw on the bulb holder.
- You will connect your pencil resistors to the free ends of the red and green alligator clips.
- Test your circuit by touching the exposed metal ends of the red and green alligator clips together. This creates a closed circuit and your lightbulb should light up. If it does not light up, then check the following:
- Make sure the lightbulb is screwed tightly into the base.
- Make sure none of your alligator clip connections are loose.
- Make sure none of your batteries are backwards.
- Important: throughout the project, only connect the lightbulb for long enough to assess its brightness, then disconnect it when not in use. Leaving the lightbulb connected for a long time can cause it to burn out prematurely.
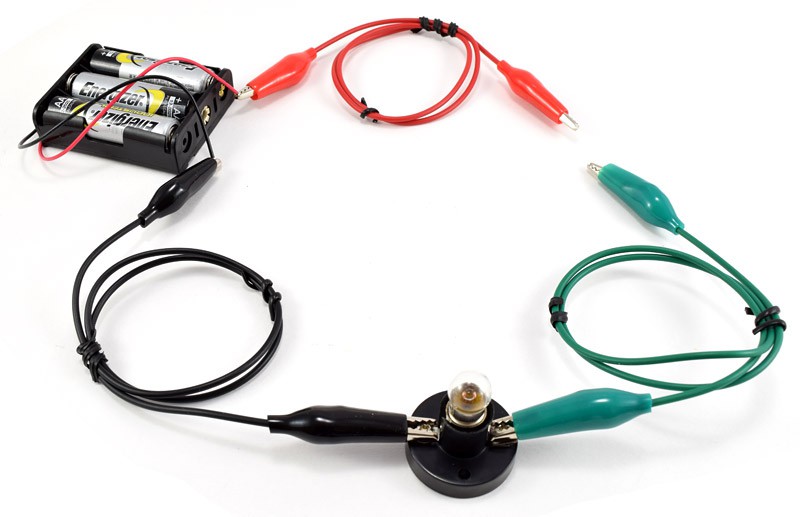 Image Credit: Ben Finio, Science Buddies / Science Buddies
Figure 4. The test circuit for this experiment. The twist ties are not required, but they can help keep your circuit neat by bundling up the alligator clip leads.
- Decide how many pencils you want to test. You can choose the lengths you test, but they should range from very short to almost the full length of the pencil, in regular intervals. For example, you could cut pencils to lengths of 4, 6, 8, 10, 12, and 14 centimeters (cm). Do not worry about changing the length of the pencils after you sharpen them; you will measure their final lengths.
- Have an adult help you use a ruler and a saw to cut pencils to the lengths you decided.
- Use the pencil sharpener to sharpen both ends of the pencils, like in Figure 5.
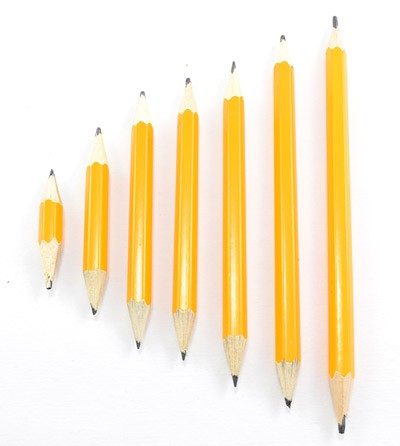 Image Credit: Ben Finio, Science Buddies / Science Buddies
Figure 5. Pencil resistors of various lengths sharpened at both ends.
- Create a data table like Table 1 in your lab notebook.
- User a ruler to measure the tip-to-tip lengths of your sharpened pencils, and record these lengths in your data table.
| Pencil Length (cm) | Bulb Brightness |
|---|---|
| 0 | |
- Now you are ready to start your experiment. Touch the exposed metal ends of the red and green alligator clips together. This is your "control" trial. In the first row of your data table (for resistor length of 0 cm), record how bright the lightbulb is (for example, you could use a scale from 0–5 where 0 is "off" and 5 is "very bright"). Disconnect the alligator clips as soon as you are done.
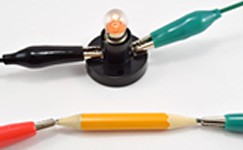
- Next you will test each one of your pencil resistors. Connect your shortest pencil resistor to your circuit using the red and green alligator clips, as shown in Figure 6.
 Image Credit: Ben Finio, Science Buddies / Science Buddies
Figure 6. Connect red and green alligator clips to the graphite point at each end of a sharpened pencil.
- Observe the brightness of the lightbulb, and record the brightness in your data table using the same scale you used in step 8. Remember not to leave the bulb connected when not in use, as this will cause it to burn out sooner.
- Repeat steps 9–10 for each one of your pencil resistors.
- So far you have only completed one trial for each pencil resistor length. Most science fairs require multiple trials for an experiment. If necessary, add columns to your data table for second and third trials, and repeat the experiment.
- Analyze your results.
- How does bulb brightness change as the length of the pencil resistors increases?
- Make a graph of your results with resistor length on the horizontal (x) axis and bulb brightness on the vertical (y) axis.
- How does resistance affect the brightness of the bulb? To answer this, you will need to decide whether longer pencils have higher or lower resistance.
- How does resistance affect the amount of current flowing through the circuit? Hint: Would more current flowing through the lightbulb make it brighter or dimmer?
Troubleshooting
For troubleshooting tips, please read our FAQ: Pencil Resistors.
Ask an Expert
Global Connections
The United Nations Sustainable Development Goals (UNSDGs) are a blueprint to achieve a better and more sustainable future for all.
Variations
- This experiment is a good demonstration of Ohm's law, which relates the current, resistance, and voltage in a circuit. Do some background research on Ohm's law and incorporate it into your project.
- Use a multimeter to measure the resistance of each pencil resistor in ohms, and the amount of current (in amperes) flowing through the circuit for each resistor. See the Science Buddies reference How to Use a Multimeter to learn more about how to measure resistance and current.
- Use a lux meter to measure the brightness of the lightbulb (in lux) instead of rating brightness on a 0–5 scale. For the best results, do the experiment in a dark room with no other light sources.
- What if you wanted to make a variable resistor that could have a continuous range of resistance values, instead of cutting multiple pencils to certain lengths? It turns out that is how you make a dimmer switch! See the How to Make a Dimmer Switch with a Pencil project to learn more. You can do this project using the parts from your Basic Circuits Kit.
- Could you use this circuit to test objects other than pencils? It turns out you can use the circuit to determine whether objects are conductors or insulators. See the Which Materials are the Best Conductors? project to learn more. You can do this project using the parts from your Basic Circuits Kit.
Frequently Asked Questions (FAQ)
- Make sure you do not have an open circuit. Check to make sure none of your alligator clips are loose, and the lightbulb is screwed tightly into its base.
- Make sure your batteries are properly inserted into the battery pack. The "+" signs on the batteries should line up with the "+" signs in the battery pack.
- Finally, try connecting the red and green alligator clips to each other directly, with no pencil or other materials in between, and your bulb should light up. If you connect the alligator clips to a non-conducting material (like paper), the bulb will not light up.
Careers
If you like this project, you might enjoy exploring these related careers:
Contact Us
If you have purchased a kit for this project from Science Buddies, we are pleased to answer any question not addressed by the FAQ above.In your email, please follow these instructions:
- What is your Science Buddies kit order number?
- Please describe how you need help as thoroughly as possible:
Examples
Good Question I'm trying to do Experimental Procedure step #5, "Scrape the insulation from the wire. . ." How do I know when I've scraped enough?
Good Question I'm at Experimental Procedure step #7, "Move the magnet back and forth . . ." and the LED is not lighting up.
Bad Question I don't understand the instructions. Help!
Good Question I am purchasing my materials. Can I substitute a 1N34 diode for the 1N25 diode called for in the material list?
Bad Question Can I use a different part?
Contact Us
Related Links
- Science Fair Project Guide
- Other Ideas Like This
- Electricity & Electronics Project Ideas
- My Favorites


