Abstract
Have you ever wanted to build your very own robot from scratch? Bristlebots are a cheap, easy, and fun-to-build robot made from the head of a toothbrush, a battery, and a small motor. Once completed, they buzz along the top of a table like bugs. How can you make a bristlebot go faster? In this project, you will build bristlebots from two different types of toothbrushes, and race them against each other to find out.
Summary
None
A kit is available from our partner Home Science Tools®. See the Materials section for details.
Adult supervision is required when cutting the head off a toothbrush.
Ben Finio, PhD, Science Buddies
/-/https/i.ytimg.com/vi/Q1zToREgV0c/maxresdefault.jpg)
Objective
Build one bristlebot with straight bristles and one with slanted bristles, and race them to see which is faster.
Introduction
Have you ever wanted to build your own robot? What about tiny robots that you could race against each other? In this science project, you will build and race bristlebots, tiny robots built on the head of a toothbrush, like the ones shown in Figure 1.
/-/https/www.sciencebuddies.org/cdn/Files/6367/33/racing-bristlebots.jpg)
Figure 1. Two bristlebots racing against each other.
The bristlebot uses a small electric motor to move. In order to power the motor, the robot also needs a battery. When you connect the battery to the motor, you complete an electrical circuit. This makes a tiny weight inside the motor spin, causing it to vibrate. When the motor vibrates, it causes the robot to shake and buzz along the tabletop. This is the same type of motor that makes video game controllers and cell phones vibrate.
In this science project, you will build two different bristlebots: one with slanted toothbrush bristles, and one with straight bristles. Then you will race them against each other to see which one is faster!
Terms and Concepts
- Robot
- Motor
- Battery
- Circuit
Questions
- What makes the motor vibrate?
- How can a vibrating motor make something move?
- Which do you think will go faster: a bristlebot with straight bristles or one with slanted bristles?
Bibliography
This project is based on the following post by Evil Mad Scientist Laboratories:
- Evil Mad Scientist Laboratories. (2007). Bristlebot: A tiny directional vibrobot. Retrieved August 6, 2014.
If you want to learn more about some of the concepts in this project, like circuits and vibrational motion, check out these references:
- Henderson, T. (n.d.). Vibrational Motion. The Physics Classroom. Retrieved August 12, 2014.
- Grusin, M. (n.d.). What is a Circuit?. SparkFun Electronics. Retrieved July 31, 2014.
Materials and Equipment 
Recommended Project Supplies
/-/https/www.sciencebuddies.org/cdn/Files/9065/11/bristlebot-robots-trio-1100.png)
- Bristlebot Robotics Kit, available from our partner Home Science Tools®.
- Scissors
- Separate toothbrush head with slanted bristles (not included in the kit)
- Three large, heavy textbooks
-
Flat, smooth surface like a table or countertop. The robots will not work on rough surfaces or carpet.
-
Optional: Stopwatch
-
Lab notebook
Disclaimer: Science Buddies participates in affiliate programs with Home Science Tools®, Amazon.com, Carolina Biological, and Jameco Electronics. Proceeds from the affiliate programs help support Science Buddies, a 501(c)(3) public charity, and keep our resources free for everyone. Our top priority is student learning. If you have any comments (positive or negative) related to purchases you've made for science projects from recommendations on our site, please let us know. Write to us at [email protected].
Experimental Procedure
Building Your Bristlebots
Follow the instructions in the video or the step-by-step instructions and pictures below to build two bristlebots, one with straight bristles and one with slanted bristles.
Step-by-Step Instructions
- Stick foam tape to top of toothbrush.
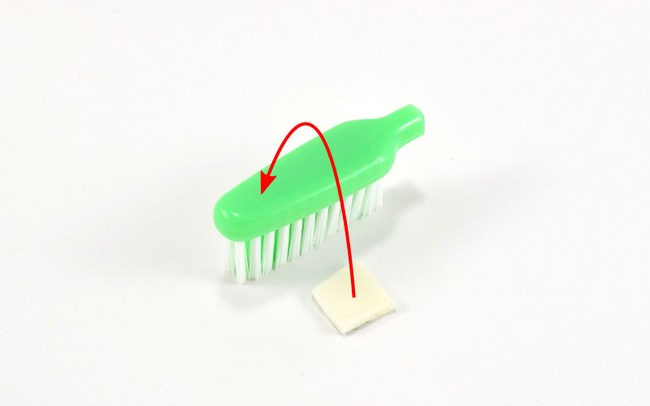
Figure 2. Stick foam tape to top of toothbrush. - Peel backing off foam tape.
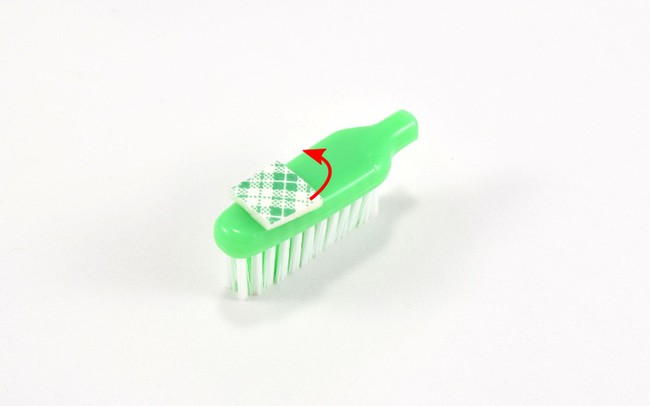
Figure 3. Peel backing off foam tape. - Pull pieces of insulation off ends of battery wires.
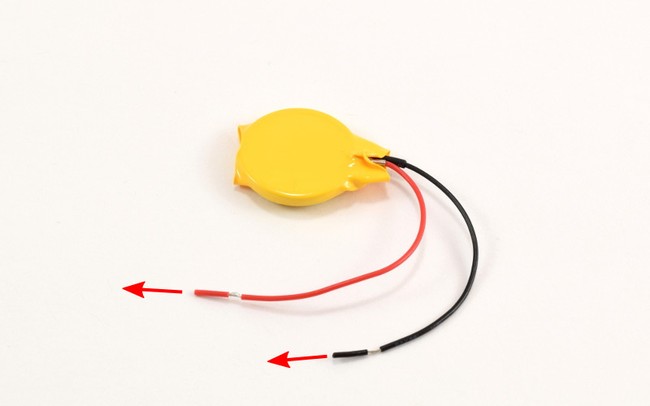
Figure 4. Pull pieces of insulation off ends of battery wires. - Battery with insulation pieces removed.
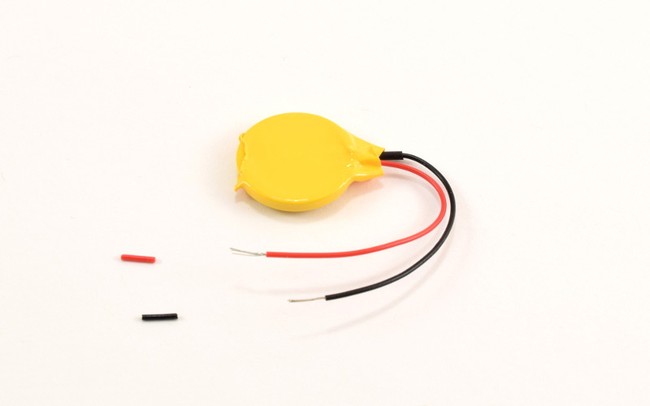
Figure 5. Battery with insulation pieces removed. - Attach battery to foam tape.
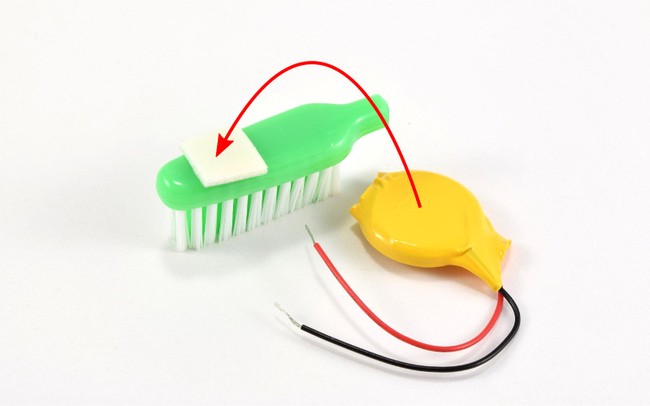
Figure 6. Attach battery to foam tape. - Battery attached to toothbrush.
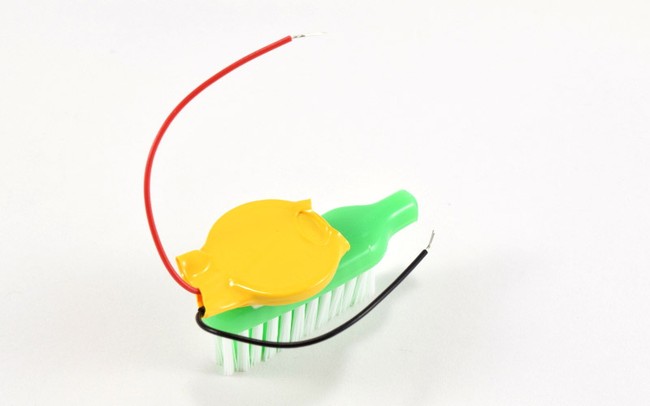
Figure 7. Battery attached to toothbrush. - Peel paper backing off motor.
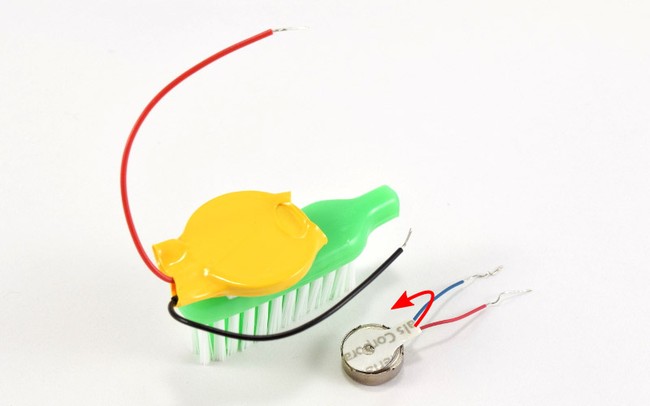
Figure 8. Peel paper backing off motor. - Attach motor to toothbrush.
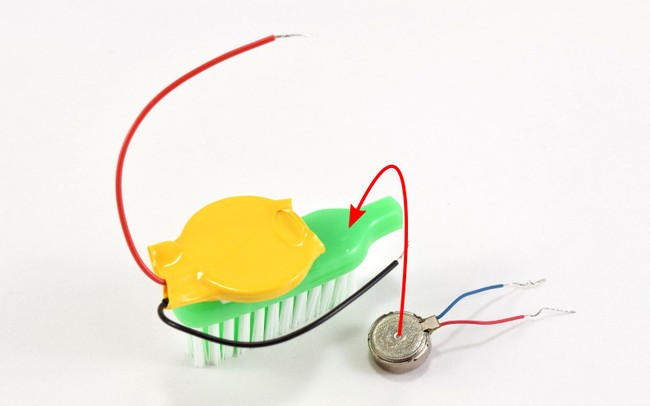
Figure 9. Attach motor to toothbrush. - Battery and motor attached to toothbrush.
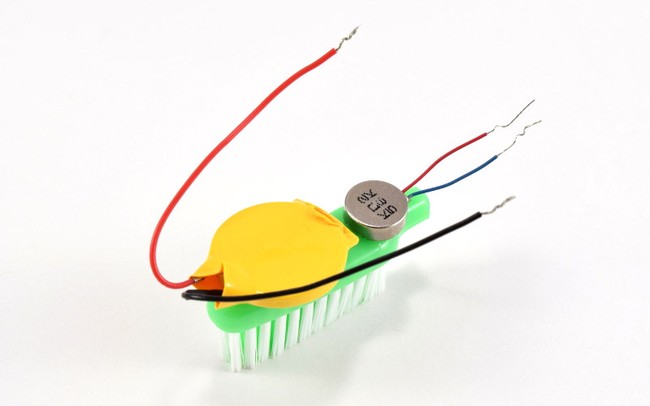
Figure 10. Battery and motor attached to toothbrush. - Twist together red wires.
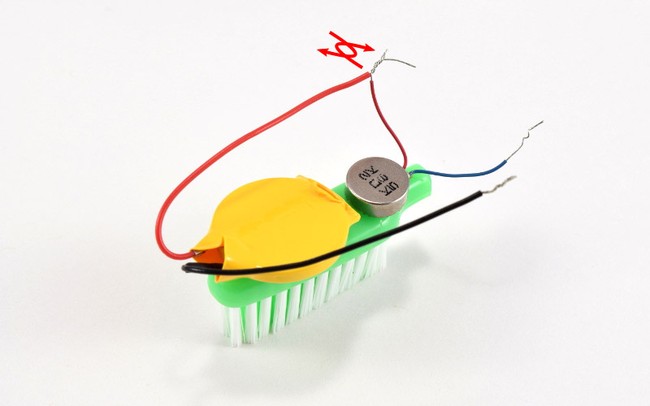
Figure 11. Twist together red wires. - Twist together black wires.
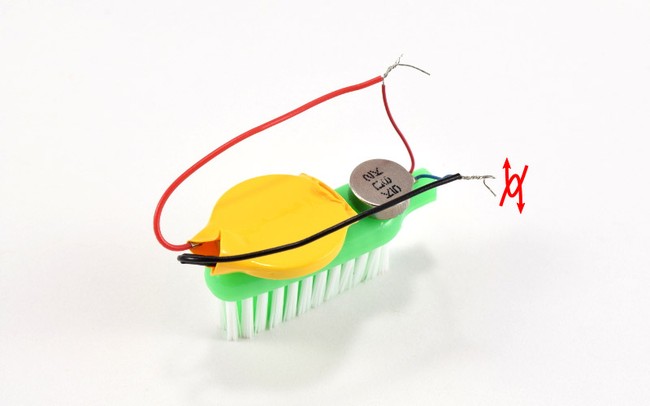
Figure 12. Twist together black wires. - Your bristlebot should now vibrate.
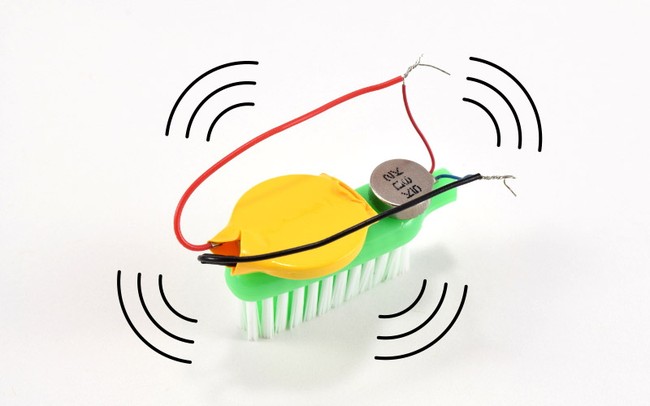
Figure 13. Your bristlebot should now vibrate. - Do not let red and black wires touch. This will create a short circuit, quickly drain the battery, and prevent the motor from vibrating.
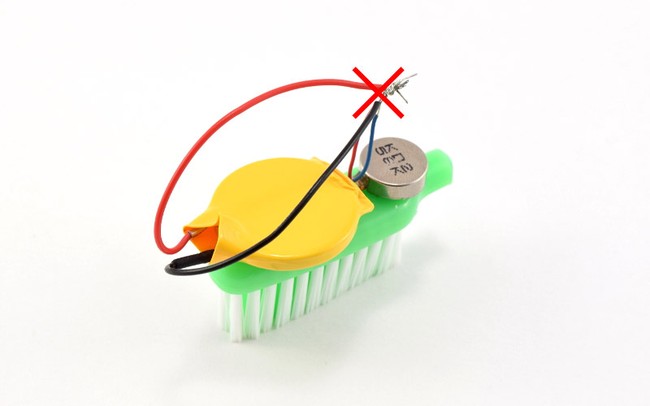
Figure 14. Do not let red and black wires touch. This will create a short circuit, quickly drain the battery, and prevent the motor from vibrating. - If your robot stops moving suddenly, make sure the wires did not come loose. Re-twist them tightly if necessary.
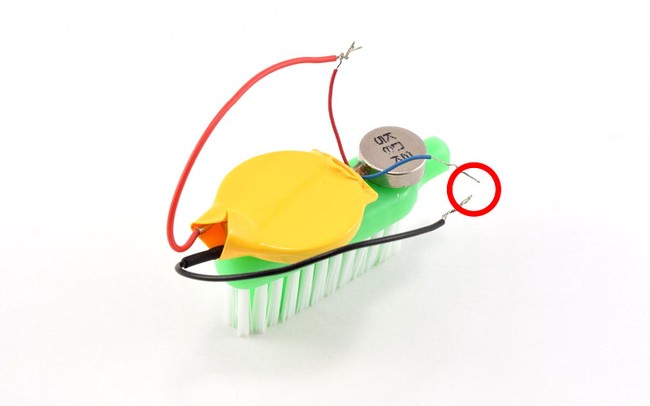
Figure 15. If your robot stops moving suddenly, make sure the wires did not come loose. Re-twist them tightly if necessary. - If your robot falls over, make sure the battery and motor are centered on the toothbrush. You can also let it run for 5-10 minutes to drain the battery and it will slow down.
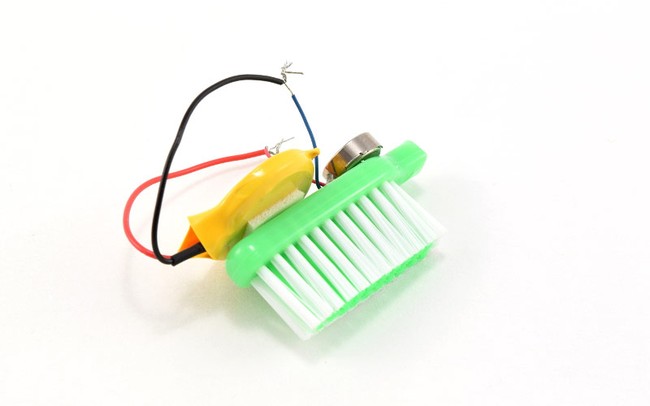
Figure 16. If your robot falls over, make sure the battery and motor are centered on the toothbrush. You can also let it run for 5-10 minutes to drain the battery and it will slow down. - Optional: decorate your bristlebot!
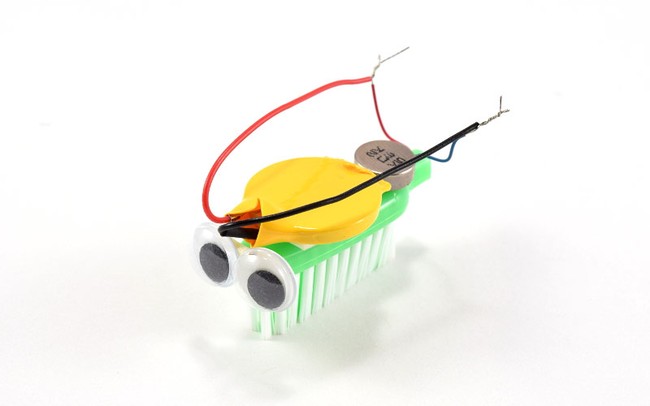
Figure 17. Optional: decorate your bristlebot!
/-/https/www.sciencebuddies.org/cdn/Files/7920/17/slideshow-01-foam-tape.jpg)
/-/https/www.sciencebuddies.org/cdn/Files/7921/17/slideshow-02-peel-tape.jpg)
/-/https/www.sciencebuddies.org/cdn/Files/7922/17/slideshow-03-remove-insulation.jpg)
/-/https/www.sciencebuddies.org/cdn/Files/7923/17/slideshow-04-insulation-removed.jpg)
/-/https/www.sciencebuddies.org/cdn/Files/7924/17/slideshow-05-attach-battery.jpg)
/-/https/www.sciencebuddies.org/cdn/Files/7925/17/slideshow-06-battery-attached.jpg)
/-/https/www.sciencebuddies.org/cdn/Files/7926/17/slideshow-07-peel-motor.jpg)
/-/https/www.sciencebuddies.org/cdn/Files/7927/17/slideshow-08-attach-motor.jpg)
/-/https/www.sciencebuddies.org/cdn/Files/7928/17/slideshow-09-motor-attached.jpg)
/-/https/www.sciencebuddies.org/cdn/Files/7929/17/slideshow-10-twist-wires.jpg)
/-/https/www.sciencebuddies.org/cdn/Files/7930/17/slideshow-11-complete-circuit.jpg)
/-/https/www.sciencebuddies.org/cdn/Files/7931/22/how-to-make-a-bristlebot.jpg)
/-/https/www.sciencebuddies.org/cdn/Files/7934/21/short-circuit.jpg)
/-/https/www.sciencebuddies.org/cdn/Files/7935/21/open-circuit.jpg)
/-/https/www.sciencebuddies.org/cdn/Files/7936/21/fall-over.jpg)
/-/https/www.sciencebuddies.org/cdn/Files/7937/21/bristlebot-googly-eyes.jpg)
Troubleshooting
- Do not let the exposed metal parts of the red and black wires touch each other directly. This will create a short circuit and drain the battery very quickly, and will prevent the motor from vibrating.
- If your robot stops moving suddenly, check to make sure that one or both sets of wires did not come loose. This will create an open circuit and prevent the motor from vibrating. Tightly twist the wires back together if this happens.
- If your robot falls over a lot, make sure the motor and battery are centered on top of the toothbrush. You can also let the robot run continuously for 3 minutes, and it will slow down slightly as the battery begins to drain.
- To turn your bristlebot off, just untwist one set of wires (you do not need to disconnect both). Make sure you turn your robot off when not in use to conserve battery power.
Racing Your Bristlebots
- Make a racetrack for your bristlebots by setting up three large books on a smooth, flat surface, as shown in Figure 18. This creates two "chutes" that will force your bristlebots to go straight.
/-/https/www.sciencebuddies.org/cdn/Files/6375/25/bristlebot-race-track.jpg)
Figure 18. Racing chutes for bristlebots, made using three large books.
- Get ready to race your bristlebots! Reconnect the wires for each robot to turn them back on.
- Test your bristlebots in your racing chutes. If the chutes are too narrow, your bristlebots might get stuck. If they are too wide, they might spin around or fall over. Adjust the width of the chutes, if necessary.
- Pick up your bristlebots and place them side by side in your racing chutes.
- Let go of both bristlebots at the same time. Watch closely to see which one makes it to the other end of the chute first.
- If one robot goes backwards, flip it around and start over.
- Record the winner of the race in your lab notebook.
- Repeat the race four more times, for a total of five trials. Make sure you record your results in your lab notebook.
- Optional: Use a stopwatch to record how long it takes each bristlebot to go down the chute. Have a volunteer help if it is too difficult to use a stopwatch and control both bristlebots at the same time.
- Analyze your results.
- Does one bristlebot consistently win the race?
- How do your results compare to your prediction about which type of bristlebot would be faster?
Troubleshooting
For troubleshooting tips, please read our FAQ: Racing Bristlebots: On Your Mark. Get Set. Go!.
Ask an Expert
Global Goals
The United Nations Sustainable Development Goals (UNSDGs) are a blueprint to achieve a better and more sustainable future for all.
/-/https/www.sciencebuddies.org/cdn/Files/19752/5/E-WEB-Goal-09.png)
Variations
- Try building more bristlebots with even more types of toothbrushes. Which toothbrush head works the best?
- If you would like to build a larger robot that works on the same principle as the bristlebot (vibrational motion), check out the Science Buddies project Art Bot: Build a Wobbly Robot That Creates Art.
- If you would like to try a more advanced project, you can build a light-following bristlebot in the Build a Light-Tracking Bristlebot project.
- Instead of using a chute, make a circular "arena" for your bristlebots to let them move around freely. Set up a video camera directly above the arena, looking down, and use it to record the bristlebot's motion. Then, analyze the video with a computer and make plots of the path each bristlebot follows. Do the paths seem totally random, or can you identify any patterns? For example, do certain bristlebots tend to always turn in one direction?
- Make a "maze" for your bristlebots and time how long it takes different designs to find their way out of the maze.
Explore More!
Looking for more robot fun? Explore the World of Robotics with This Suite of Projects!
Frequently Asked Questions (FAQ)
Careers
If you like this project, you might enjoy exploring these related careers:
/-/https/careerdiscovery.sciencebuddies.org/cdn/Files/1725/18/4161_Michelle_Easter_and_Curiousity_Clone.jpg)
/-/https/careerdiscovery.sciencebuddies.org/cdn/Files/1731/17/iStock-1187291213.jpg)
/-/https/careerdiscovery.sciencebuddies.org/cdn/Files/1450/21/iStock-1227179796.jpg)
/-/https/careerdiscovery.sciencebuddies.org/cdn/Files/1223/17/iStock-971549326.jpg)
Contact Us
Our kits are developed in partnership with Home Science Tools®. If you have purchased a kit for this project, Home Science Tools® is pleased to answer any questions not addressed by the FAQ above.In your email, please follow these instructions:
- Include your Home Science Tools® order number.
- Please describe how you need help as thoroughly as possible:
Examples
Good Question I'm trying to do Experimental Procedure step #5, "Scrape the insulation from the wire. . ." How do I know when I've scraped enough?
Good Question I'm at Experimental Procedure step #7, "Move the magnet back and forth . . ." and the LED is not lighting up.
Bad Question I don't understand the instructions. Help!
Good Question I am purchasing my materials. Can I substitute a 1N34 diode for the 1N25 diode called for in the material list?
Bad Question Can I use a different part?
Contact Support

/-/https/img.youtube.com/vi/tfk9F09I_5Y/0.jpg)
/-/https/img.youtube.com/vi/SjNR8mQKDqo/0.jpg)
/-/https/img.youtube.com/vi/RSxscDvVWwo/0.jpg)