Abstract
You have probably heard about using renewable energy sources like wind and solar power to provide electricity to homes and buildings, as well as hybrid or fully electric cars that use less (or zero) gasoline. But what about solar-powered robots? As robots become more common, it is increasingly important to use "green" energy sources to power them. In this project, you will build and test a popular robot called a bristlebot — a tiny robot made using toothbrushes—that can operate on either battery or solar power, and investigate how well it performs in different weather conditions.
Summary
None
A kit containing all the electronics parts needed for this project can be found in a kit from our partner Home Science Tools®.
No issues
Recommended Project Supplies
/-/https/www.sciencebuddies.org/cdn/Files/9115/9/bristlebot-advanced-pair-1100.png)
Objective
/-/https/www.sciencebuddies.org/cdn/Files/19030/4/solar-bristlebot-thumb.png)
Compare the performance of solar and battery power for a bristlebot in different weather conditions.
Introduction
Many of the devices you use every day require electricity to operate. Electricity can be supplied directly to devices that plug into wall outlets (like lamps and computers), and it can also be stored in batteries for cordless devices like television remote controls, cell phones, and even robots like the one you will build in this project! Modern life as you know it would not exist without electricity, but electricity comes at a cost. The electricity we use has to be created somehow, and creating electricity requires a source of energy.
One very common source of energy for creating electricity is burning fossil fuels, like oil and coal. Fossil fuels are being used up (mined or pumped out of the earth) faster than they are naturally replaced, so eventually we might run out of them. Burning them also creates greenhouse gases that contribute to climate change, and other pollutants that can harm the environment. Renewable energy sources are an alternative to fossil fuels. They get energy from sources that will not deplete, like the sun, the wind, or Earth's super-heated core. They also tend to be much cleaner and cause less pollution than fossil fuels.
Solar panels harness a big source of renewable energy: the Sun! They can create electricity from the Sun's rays, without creating any harmful emissions like fossil fuels do. You may have seen large solar panels on the roof of a house, but tiny solar panels are also used to power smaller devices like USB cell phone chargers or even miniature robots. In this project, you will build a miniature solar-powered robot, like the one shown in Figure 1. The robot is a type of bristlebot, a popular robot that gets its name from the fact that it uses toothbrushes as "feet."
/-/https/www.sciencebuddies.org/cdn/Files/6485/18/solar-bristlebot.jpg)
Figure 1. A mini solar-powered robot.
Despite the clean, renewable nature of solar power, it does have some drawbacks. The power output of solar panels can drop dramatically when it is cloudy, and they do not work at night when it is dark out. One of the biggest challenges to wide-scale use of solar power is figuring out how to effectively store energy gathered during the day for use at night, or during bad weather when the solar panels cannot create electricity.
With that in mind, the robot you build in this project will have two different sources of power: solar panels and stored energy in the form of batteries. You will build an electrical circuit—or a loop through which electricity can flow—that lets you toggle between powering the robot from its batteries or its solar panels (the solar panels do not recharge the batteries; you can just pick between the two). The circuit will provide power to two motors that make the robot move. You will investigate how the two different power supplies affect the robot's speed in different weather conditions. As you test your robot and analyze the results, consider some of the challenges that need to be overcome as fossil fuels are replaced with renewable energy.
Terms and Concepts
- Electricity
- Battery
- Energy
- Fossil fuels
- Greenhouse gases
- Climate change
- Renewable energy
- Solar panel
- Bristlebot
- Circuit
- Motor
- Breadboard
Questions
- Why is renewable energy important?
- What are some sources of renewable energy?
- What are some of the limitations of solar power?
- Do you think your robot will be faster using battery power or solar power?
- Do you think the weather will have any effects on the robot when it is running on battery power? What about the solar panels?
Bibliography
- Woodford, C. (2014, May 14). Electricity. Retrieved August 22, 2014.
- Grusin, M. (n.d.). What is a Circuit? SparkFun Electronics. Retrieved July 31, 2014.
- Science Buddies Staff. (n.d.). How to Use a Breadboard. Retrieved June 23, 2016.
- U.S. Energy Information Administration. (n.d.). EIA Energy Kids — Solar. Retrieved August 25, 2014.
Materials and Equipment 
Recommended Project Supplies
- Advanced Bristlebots Robotics Kit, available from our partner Home Science Tools®. You will need the following materials from the kit:
- Mini breadboard
- 2xAAA battery holder
- AAA batteries (2)
- Mini vibration motors (2)
- Toggle switch
- Mini solar cells (2)
- 1 inch red jumper wire
- 1 inch black jumper wire
- Note: This kit also contains materials for the Build a Light-Tracking Bristlebot project, a robot which will automatically drive toward a light source.
- You will also need the following materials, not included in the kit:
- Identical toothbrushes (2); be sure the longest bristles on the brush are all slanted in the same direction. See Figure 3 in the Procedure for details.
- Scissors or wire cutters
- Double-sided foam tape
- Optional: Craft materials to decorate your robot (such as googly eyes, colorful pipe cleaners, etc.)
- Outdoor area with direct sunlight. This project will not work with artificial light.
- A smooth surface you can take outdoors, or outdoor furniture, on which to test the robot; for example, a smooth piece of wood, plastic, or glass, or a large textbook. The robot will not travel very well on rough surfaces (like sidewalks or dirt) because the toothbrush bristles might get stuck.
- Objects to create walls to make the robot go straight; for example, two rulers or two textbooks you can place side by side.
- Stopwatch
- Lab notebook
Disclaimer: Science Buddies participates in affiliate programs with Home Science Tools®, Amazon.com, Carolina Biological, and Jameco Electronics. Proceeds from the affiliate programs help support Science Buddies, a 501(c)(3) public charity, and keep our resources free for everyone. Our top priority is student learning. If you have any comments (positive or negative) related to purchases you've made for science projects from recommendations on our site, please let us know. Write to us at [email protected].
Experimental Procedure
Assembling Your Robot's Body
Follow the steps in this slideshow to build your robot's body. Make sure you read the captions below each image for important notes about each step.
/-/https/www.sciencebuddies.org/cdn/Files/8163/9/chassis-slideshow-7.jpg)
Slideshow Images
/-/https/www.sciencebuddies.org/cdn/Files/8157/9/chassis-slideshow-1.jpg)
1. Cut the heads off two toothbrushes with slanted bristles.
/-/https/www.sciencebuddies.org/cdn/Files/8158/9/chassis-slideshow-2.jpg)
2. Do not use toothbrushes with straight bristles for this project, or your robot will not work.
/-/https/www.sciencebuddies.org/cdn/Files/8159/9/chassis-slideshow-3.jpg)
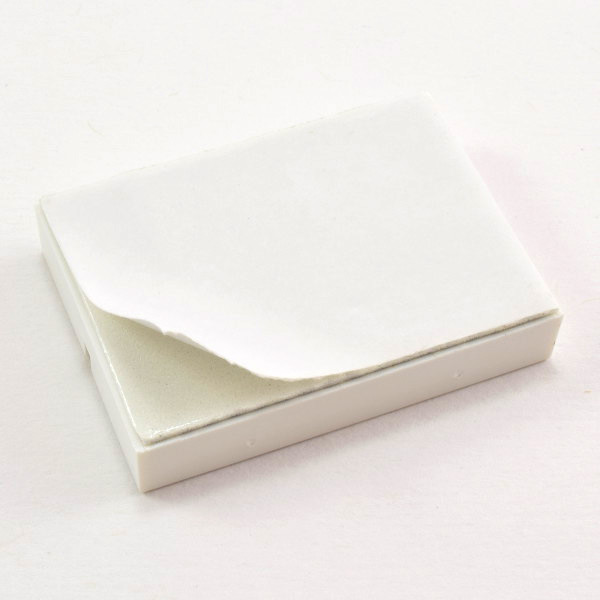
3. Peel the paper backing off the bottom of the breadboard to expose the sticky tape.
/-/https/www.sciencebuddies.org/cdn/Files/8160/9/chassis-slideshow-4.jpg)
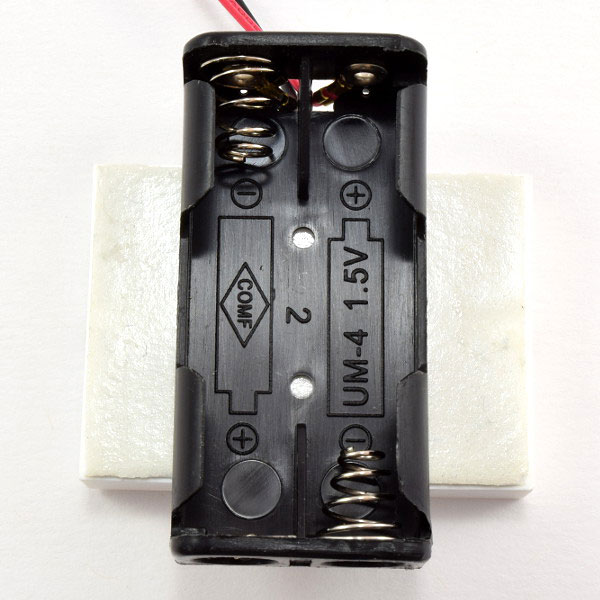
4. Mount the battery holder to the sticky tape, as shown. Make sure it is centered on the breadboard.
/-/https/www.sciencebuddies.org/cdn/Files/8161/9/chassis-slideshow-5.jpg)
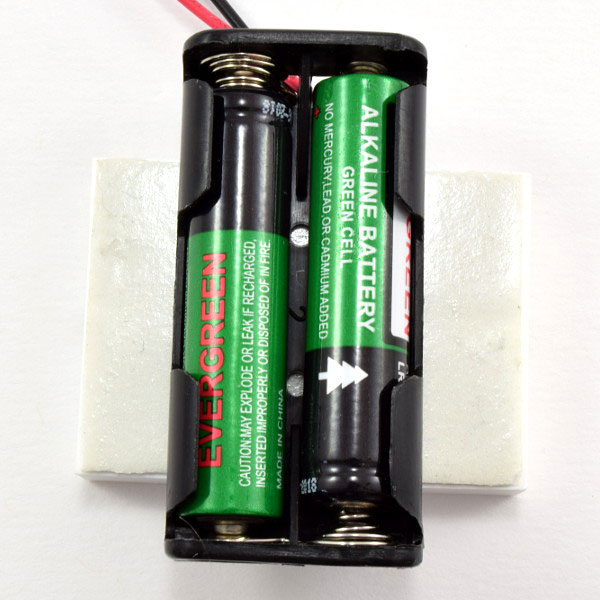
5. Insert the AAA batteries into the battery holder. Press the flat ends of the batteries up against the metal springs.
/-/https/www.sciencebuddies.org/cdn/Files/8162/9/chassis-slideshow-6.jpg)
6. Attach the two toothbrush heads on either side of the battery holder. Make sure to mount them symmetrically.
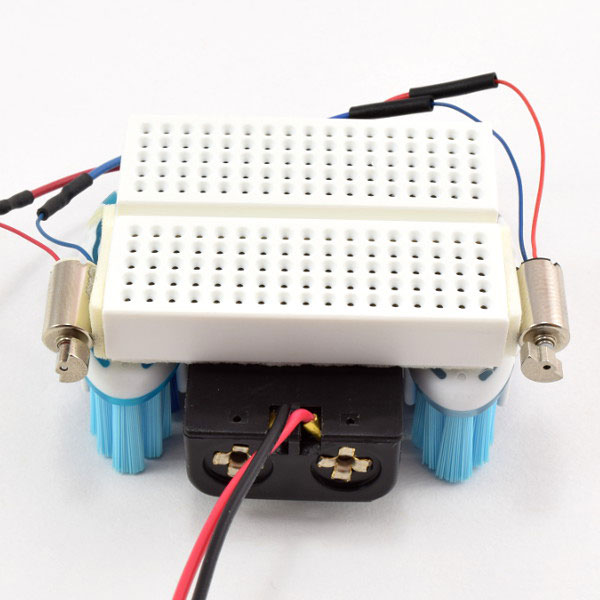
7. Attach the two vibration motors to the sides of the breadboard using double-sided foam tape. Make sure the small weights on the motors can spin freely and not get stuck.
End of Slideshow Images
Assembling Your Robot's Circuit
If you have never used a breadboard before, you should refer to the Science Buddies resource How to Use a Breadboard for Electronics and Circuits before you continue. Build the circuit on your robot's breadboard by following along with the slideshow. Make sure you read the captions below each image for important notes about each step.
/-/https/www.sciencebuddies.org/cdn/Files/8205/6/solar-circuit-11.png)
Slideshow Images
/-/https/www.sciencebuddies.org/cdn/Files/8196/7/solar-circuit-1.jpg)
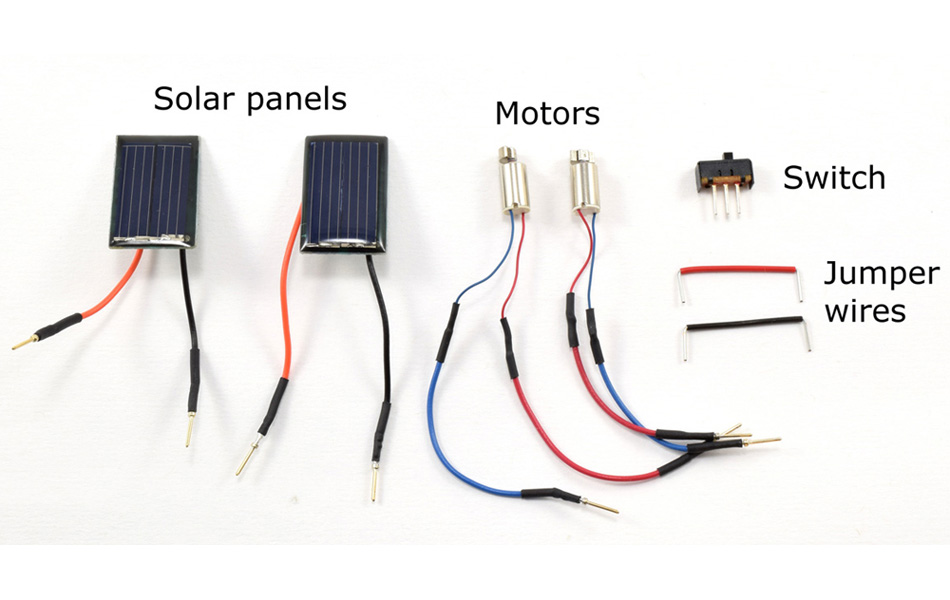
1. Identify these parts in your bristlebot kit.
/-/https/www.sciencebuddies.org/cdn/Files/8166/9/slideshow-circuit-2.jpg)
2. Orient the robot's body so the battery pack wires are facing to your right.
/-/https/www.sciencebuddies.org/cdn/Files/8197/6/solar-circuit-3.png)
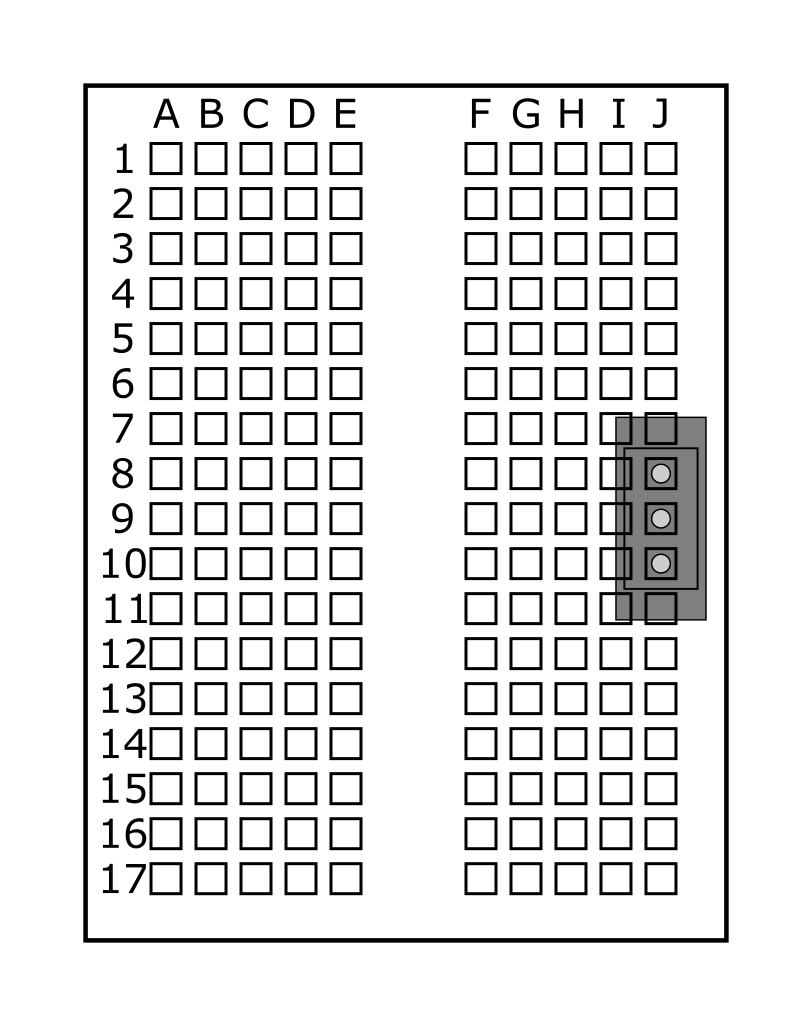
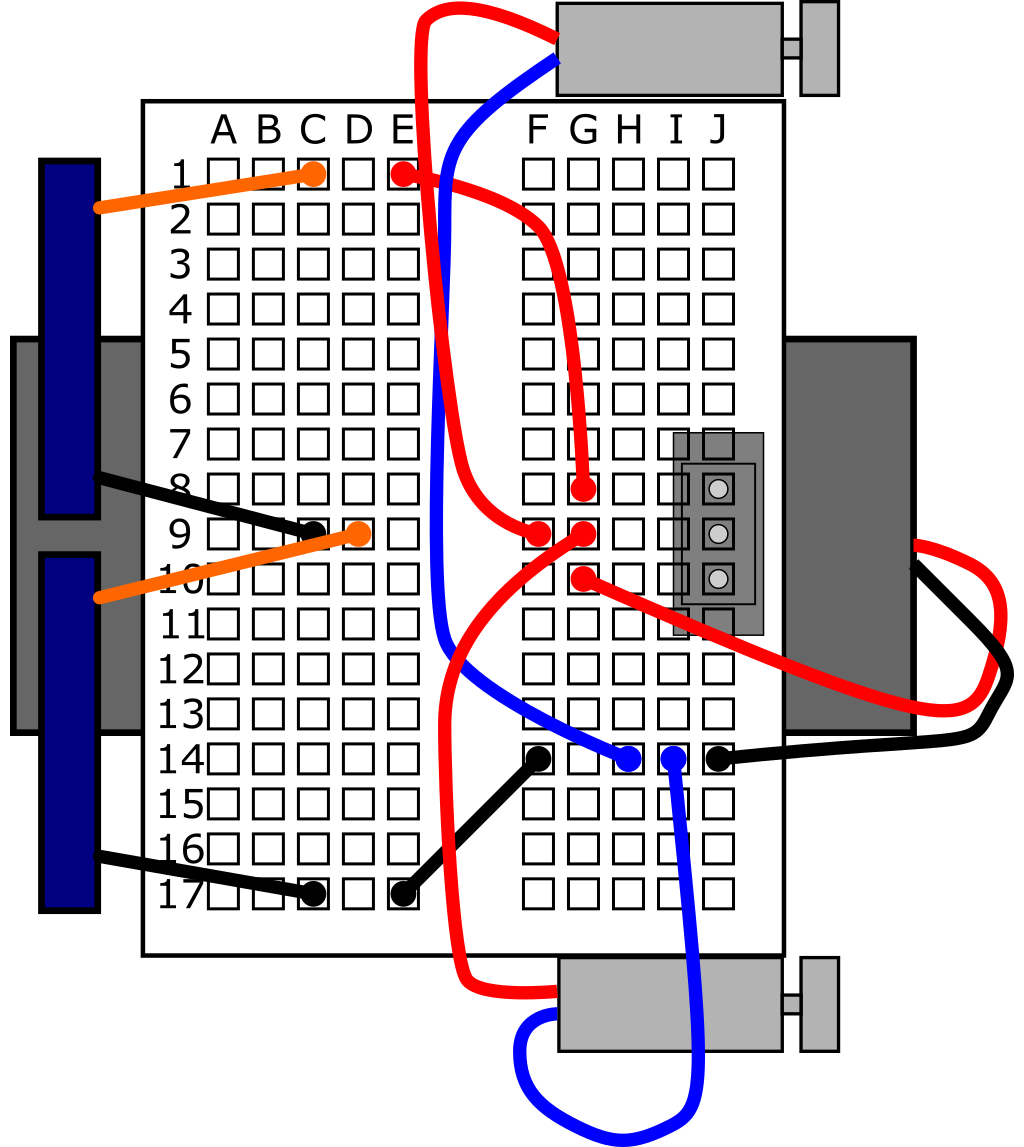
3. Blank breadboard. The breadboard in your kit does not have row and column labels. Labels are shown in the diagram for reference, but you will need to count the holes on your breadboard.
/-/https/www.sciencebuddies.org/cdn/Files/8198/6/solar-circuit-4.png)
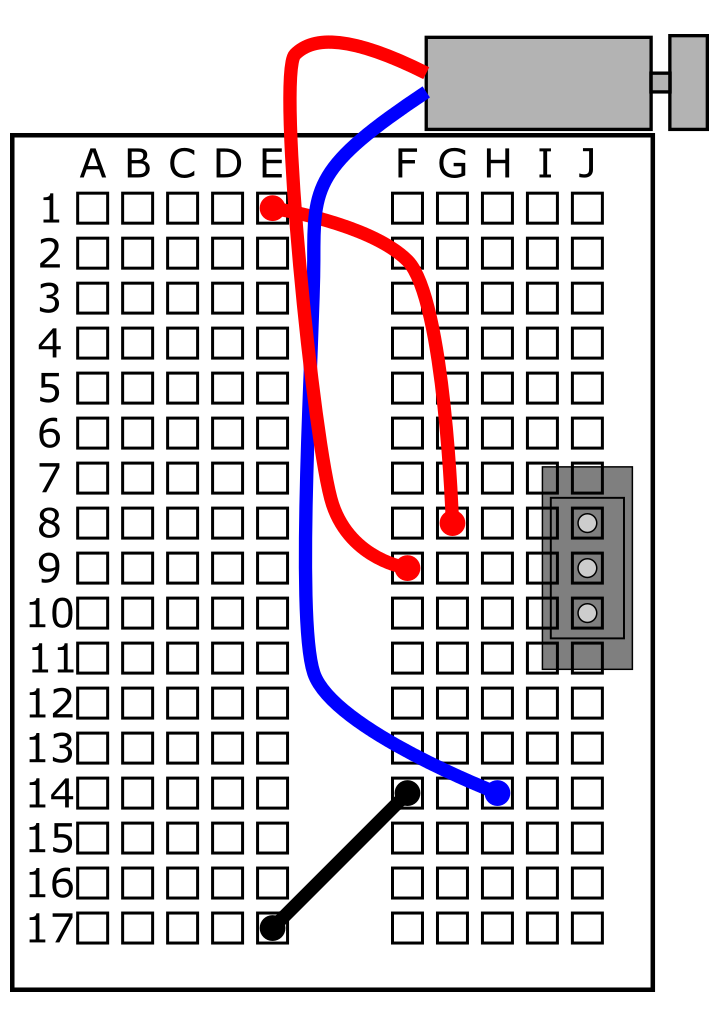
4. Insert the power switch into holes J8, J9, and J10. The direction in which the switch is facing does not matter. Slide the switch 'up' toward row 1 of the breadboard.
/-/https/www.sciencebuddies.org/cdn/Files/8200/6/solar-circuit-5.png)
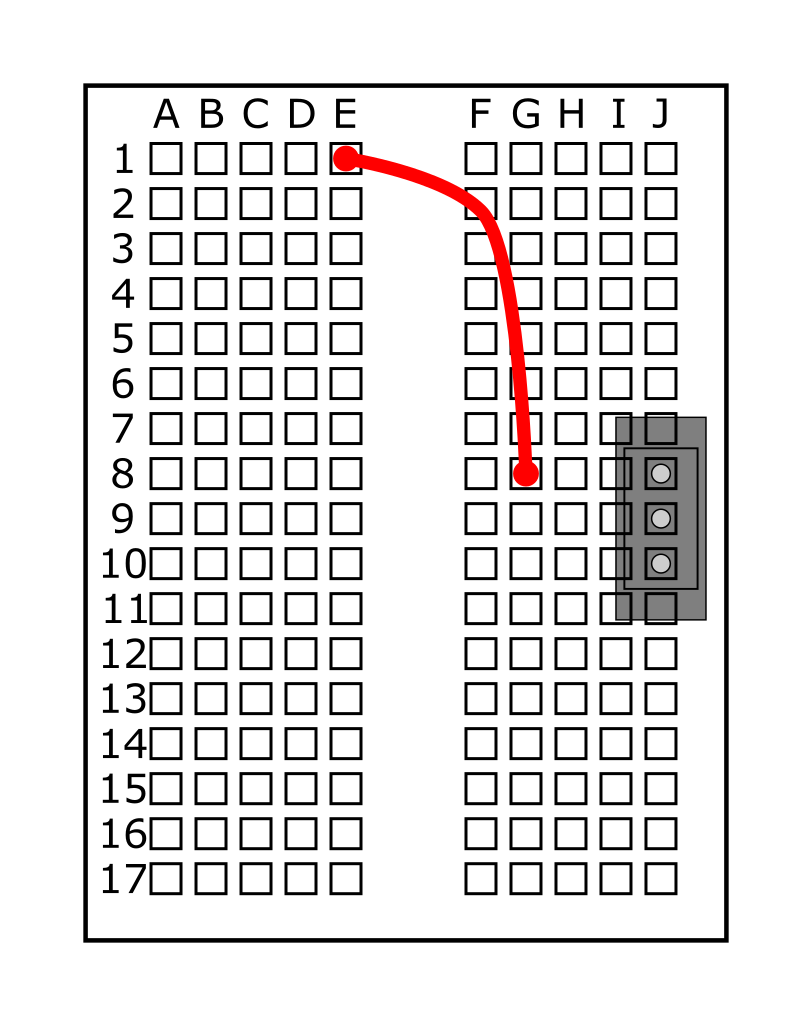
5. Connect the red jumper wire from E1 to G8.
/-/https/www.sciencebuddies.org/cdn/Files/8199/6/solar-circuit-6.png)
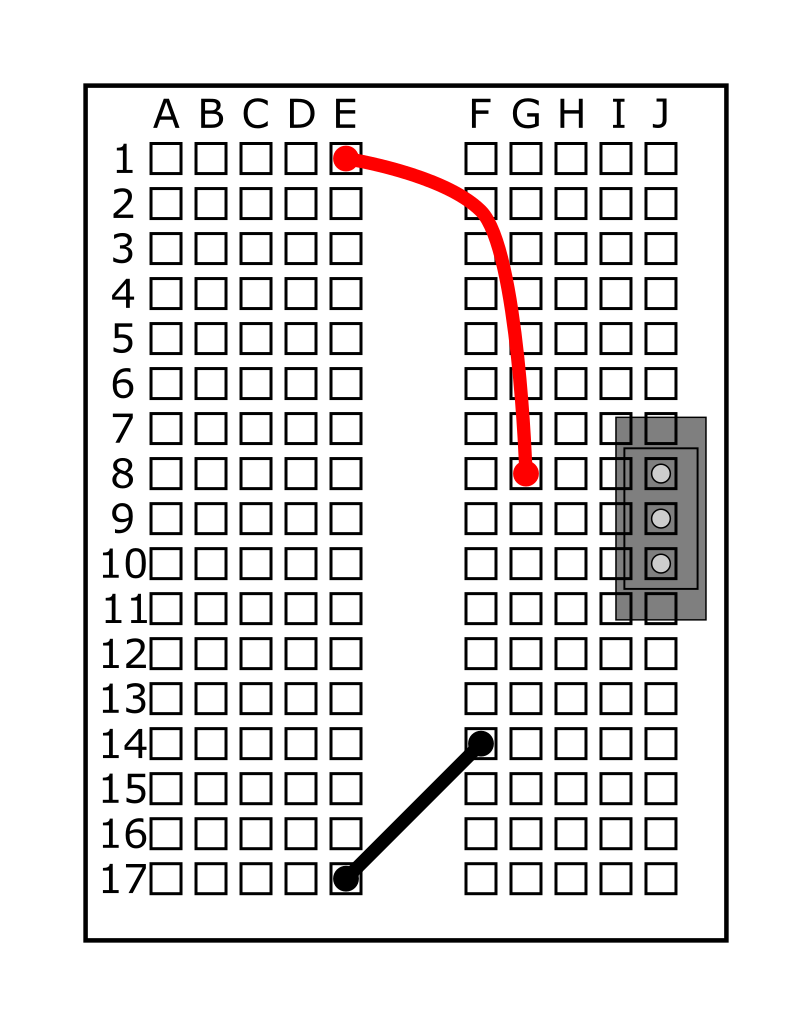
6. Connect the black jumper wire from F14 to E17.
/-/https/www.sciencebuddies.org/cdn/Files/8201/6/solar-circuit-7.png)
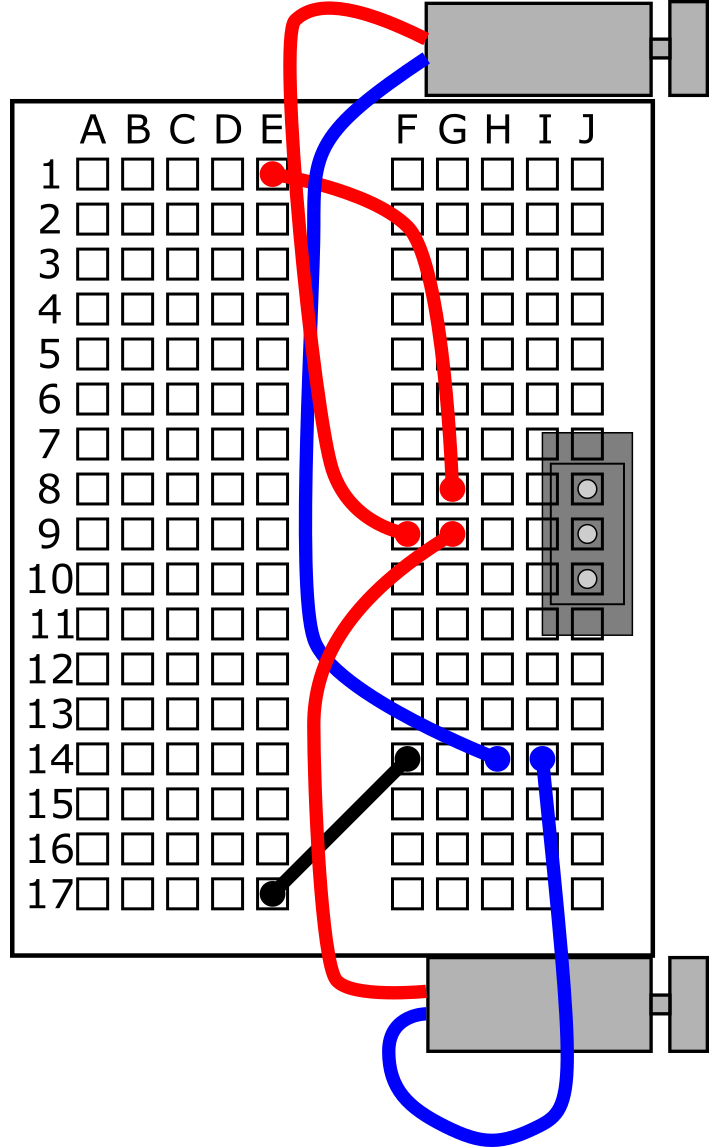
7. Connect the top motor's red lead to F9 and the blue lead to H14.
/-/https/www.sciencebuddies.org/cdn/Files/8202/6/solar-circuit-8.png)
8. Connect the bottom motor's red lead to G9 and the blue lead to I14.
/-/https/www.sciencebuddies.org/cdn/Files/8203/6/solar-circuit-9.png)
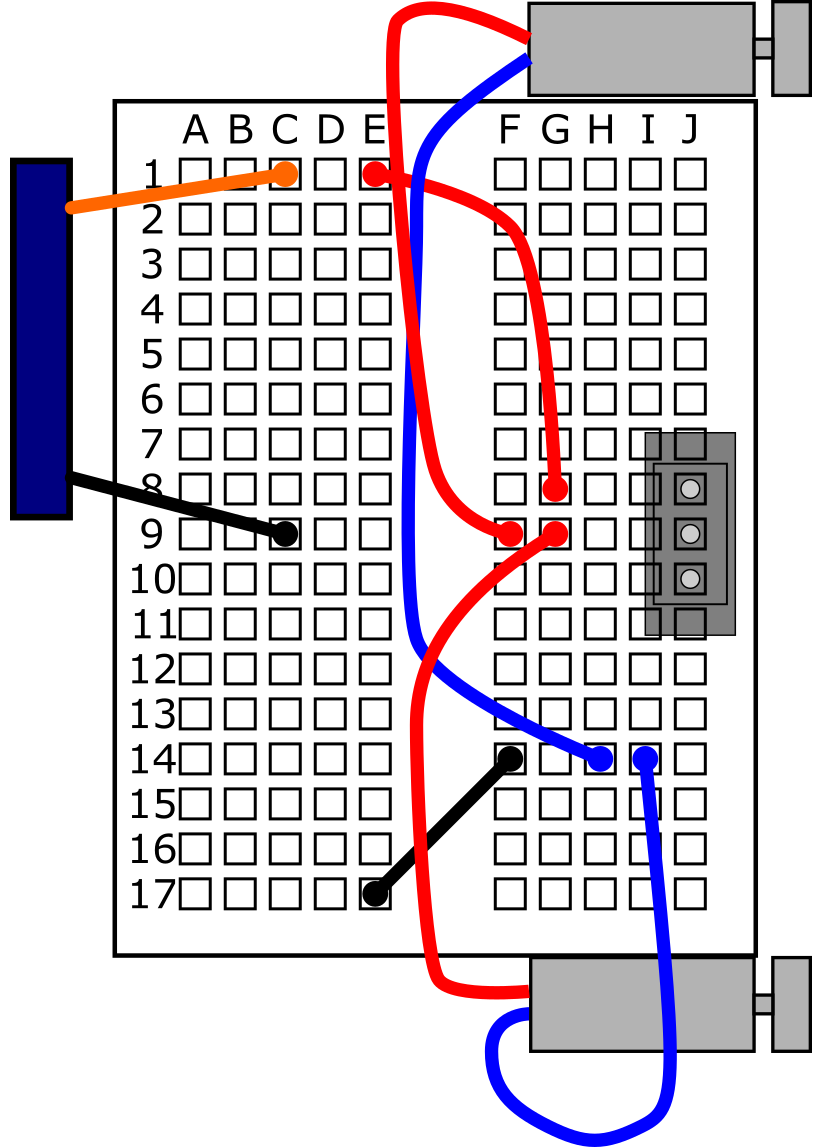
9. Connect the top solar panel's orange lead to C1 and the black lead to C9.
/-/https/www.sciencebuddies.org/cdn/Files/8204/6/solar-circuit-10.png)
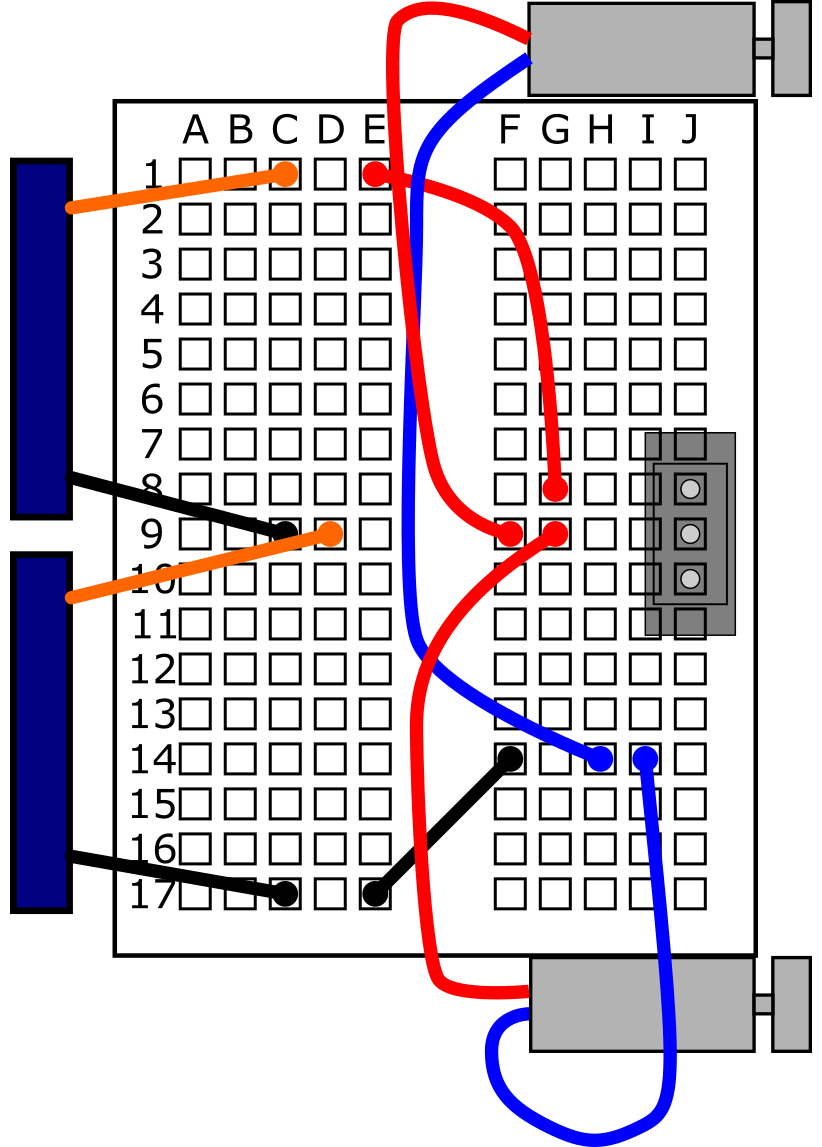
10. Connect the bottom solar panel's orange lead to D9 and the black lead to C17.
11. Connect the battery pack's red lead to G10 and the black lead to J14.
End of Slideshow Images
Comparing Solar and Battery Power
- Use household materials to set up a "chute" to force your robot to go straight, like the one shown in Figure 2. Make sure you use a smooth, flat surface (the bristles will get stuck on rough surfaces like carpet).
/-/https/www.sciencebuddies.org/cdn/Files/6500/11/solar-bristlebot-chute.jpg)
Figure 2. An example course for the robot to drive on. The lid of the plastic container provides a smooth, flat surface, and the rulers act as walls to help the robot go straight.
- In your lab notebook, set up a data table like Table 1. You will use the data table to record how long it takes the robot to go from one end of the course to the other in seconds (sec).
- The exact weather conditions you are able to test may depend on the time of year and the climate where you live. However, remember that you need to test the project outside, in natural sunlight. The solar panels will not work under artificial light.
- The order in which you do the following steps might also depend on the weather. For example, if you build your robot on a cloudy day, you can do the cloudy day trials first, and then the sunny day trials later.
| Power Source | Weather Conditions | Trial 1 (sec) |
Trial 2 (sec) |
Trial 3 (sec) |
Average (sec) |
|---|---|---|---|---|---|
| Battery | Full sunlight | ||||
| Battery | Cloudy | ||||
| Battery | Nighttime | ||||
| Solar panels | Full sunlight | ||||
| Solar panels | Cloudy | ||||
| Solar panels | Nighttime |
Table 1. Example data table to record how fast your robot can drive through the course.
- Take the robot and your test course outside on a sunny day.
- Get your stopwatch ready.
- Slide the power switch "down" (toward row 17 of the breadboard) to set the robot to battery power.
- Set the robot down on one end of your course. As soon as you do, start the stopwatch.
- Watch your robot as it goes down the course. If it gets stuck against one wall, quickly give it a gentle nudge to knock it loose. If your robot consistently turns sharply to one side and always gets stuck as a result, see the Help section for suggestions.
- As soon as the robot reaches the other end of the course, stop the stopwatch.
- Record the time in your data table in the row for "battery power" and "full sunlight".
- Repeat step 3 two more times and record the data in the appropriate trial columns.
- Switch the robot to solar power by sliding the power switch "up" (toward row 1 on the breadboard). Important: Make sure the robot's solar panels are aimed directly at the sun, as shown in Figure 3. This will ensure that they receive the maximum amount of solar power possible. The wires connected to the solar panels are flexible, so you can bend them slightly to aim the panels toward the sun.
/-/https/www.sciencebuddies.org/cdn/Files/6501/17/solar-panel-aim.png)
Figure 3. Make sure the solar panels are pointed directly toward the sun.
- Repeat step 3 with the robot set to solar power instead of battery power.
- Wait for a cloudy day, and repeat steps 3–5.
- Optional: If you live in an area with a lot of sunlight during certain times of the year, it might not be feasible for you to wait for a cloudy day. Instead, try doing your test very early in the morning or very late in the evening, when the sun is low in the sky and not as strong as it is during the middle of the day. Adjust the labels of your data table if necessary (for example, from "cloudy" to "early morning").
- Do your best to aim the solar panels directly at the sun through the clouds. You can guess where the sun is based on the time of day (ask an adult if you need help).
- Make sure you record all your results in the appropriate row of your data table.
- If the robot does not move at all, write "did not move" in the appropriate cell of the data table.
- Take your robot and test course outside at night, and repeat steps 3–5. Remember to record all your results in your data table and write "did not move" if the robot does not move at all.
- Analyze your data.
- For each row of your data table, calculate an average for the three trials. For example, if the trials were 8 s, 10 s, and 12 s, the average would be (8 + 10 + 12) / 3 = 10 s. Do not include "did not move" data points in an average, since they do not have a numerical value. If the robot did not move for all three trials, also write "did not move" for the average.
- Make a graph for the battery-powered data with the weather condition on the x (horizontal) axis and the average time to complete the course on the y (vertical) axis.
- Make a second bar graph for the solar-powered data with the weather condition on the x (horizontal) axis and the average time to complete the course on the y (vertical) axis. If the robot did not move for all three trials for a certain data set, write "N/A", which stands for "not applicable," meaning you could not record any times.
- Answer the following questions:
- Did weather impact the robot's speed using solar power? If so, in which weather condition did the robot move fastest? What about slowest?
- Did weather impact the robot's speed using battery power? If so, in which weather condition did the robot move fastest?
- What are the advantages and disadvantages of running the robot on solar power compared to with the battery?
- Now, it might be tempting to think about which power supply is "better" just based on the results of your experiment, but remember, there are some other factors to consider.
- Which power supply is renewable? (Note: You did not use rechargeable batteries in this project, but even if you did, such batteries are not considered renewable because they need electricity from a wall outlet to be charged, and that electricity likely came from a power plant using fossil fuels.)
- What challenges would you need to overcome to use different energy sources at night or when it is cloudy? Could you build a robot with rechargeable batteries that can store energy for later use? See the Make It Your Own section for more details.
- In this project, you are restricted to using the solar panels and battery pack that comes with the kit, but do you think you could use larger solar panels or battery packs to make the bristlebot run faster? How could this change your results?
Troubleshooting
For troubleshooting tips, please read our FAQ: Build a Solar-Powered Bristlebot.
Ask an Expert
Global Goals
The United Nations Sustainable Development Goals (UNSDGs) are a blueprint to achieve a better and more sustainable future for all.
/-/https/www.sciencebuddies.org/cdn/Files/19750/5/E-WEB-Goal-07.png)
/-/https/www.sciencebuddies.org/cdn/Files/19752/5/E-WEB-Goal-09.png)
Variations
- How does the robot's speed change if you change the angle of the solar panels relative to the sun (e.g. to the positions labeled "wrong" in Figure 4)?
- How does the robot's speed change if you test the solar panels at different times of day, or different times of year? Does this have to do with the sun's position in the sky?
- Look up the difference between series and parallel circuits. In the circuit for this project, you connected the solar cells in series. What happens if you connect them in parallel? Does the robot's speed change?
- Can you make a rechargeable solar-powered bristlebot? The goal is to make a circuit with solar panels and rechargeable AAA batteries. In direct sunlight, the solar panels can run the motors and charge the batteries. When sunlight is not available, the robot can run on backup battery power. This eliminates the need to manually select one of the two power supplies with a switch. See this page for a circuit design (requires extra components not included in your Advanced Bristlebots Kit).
- What happens if you remove the batteries from the robot to make it lighter, and only run it on solar power? Does that make the robot faster?
- Can you build a larger solar-powered robot? For example, check out the Build a Brushbot activity or the Art Bot: Build a Wobbly Robot That Creates Art project. You will need to purchase bigger solar panels to build a bigger robot.
- Use a multimeter to measure the open-circuit voltage and short-circuit current of both the AAA battery pack and the solar panels. How do the two power supplies compare in terms of the maximum voltage and current they can provide? How do the supplied voltages and currents change when they are "under load" (driving the motors)? Refer to the Science Buddies reference How to Use a Multimeter if you need help using a multimeter.
- How long does it take for your batteries to die if you leave the robot on continuously? Do an online search to look up the prices of AAA batteries and tiny solar panels. Use that information to calculate the payback period for the solar panels, or the amount of time it takes you to start saving money if the solar panels are initially more expensive than the batteries.
Explore More!
Looking for more robot fun? Explore the World of Robotics with This Suite of Projects!
Frequently Asked Questions (FAQ)
- Make sure you properly inserted the two AAA batteries into the battery holder, so the "+" symbols on the batteries line up with the "+" symbols inside the battery holder.
- Make sure the red and black wires from your battery pack are pressed all the way into the correct holes of the breadboard.
- Make sure the red and blue wires from your motors are pressed all the way into the correct holes of the breadboard.
- Make sure the spinning weights on the ends of the motors are not getting stuck against the double-sided tape.
- Make sure you are outside in direct sunlight, with the solar panels pointed toward the sun.
- Make sure the orange and black wires from your solar panels, and the red and black jumper wires, are pressed all the way into the correct holes of the breadboard.
- Make sure the red and blue wires from your motors are pressed all the way into the correct holes of the breadboard.
- Make sure the spinning weights on the ends of the motors are not getting stuck against the double-sided tape.
If your robot turns very sharply to one side, check the following:
- Make sure the battery holder is centered under the breadboard. If the battery holder is too far off to one side, this could cause the robot to turn excessively.
- Make sure the two toothbrush heads are mounted straight and parallel to each other. If one or both toothbrush heads are crooked, this can cause the robot to turn to one side.
- Make sure you are using two identical toothbrushes. If you use two different toothbrush heads, this could cause the robot to always turn to one side.
- Make sure both motors are spinning. If only one motor is spinning, this can cause the robot to drive in very tight circles.
The circuit for this robot is relatively simple. The circuit diagram is shown in Figure 4. The two motors are connected in parallel. A single-pole double-throw (SPDT) switch lets you toggle between solar power or battery power. The two power supplies are never connected at the same time, and the solar panels do not charge the batteries (for ideas on making a rechargeable solar circuit, see the Make It Your Own tab).
/-/https/www.sciencebuddies.org/cdn/Files/6502/8/solar-bristlebot-circuit-diagram.png)
Figure 4. Circuit diagram for the solar-powered bristlebot.
Careers
If you like this project, you might enjoy exploring these related careers:
/-/https/careerdiscovery.sciencebuddies.org/cdn/Files/1725/18/4161_Michelle_Easter_and_Curiousity_Clone.jpg)
/-/https/careerdiscovery.sciencebuddies.org/cdn/Files/1789/24/ill_11.png)
/-/https/careerdiscovery.sciencebuddies.org/cdn/Files/1223/17/iStock-971549326.jpg)
/-/https/careerdiscovery.sciencebuddies.org/cdn/Files/1731/17/iStock-1187291213.jpg)
Contact Us
Our kits are developed in partnership with Home Science Tools®. If you have purchased a kit for this project, Home Science Tools® is pleased to answer any questions not addressed by the FAQ above.In your email, please follow these instructions:
- Include your Home Science Tools® order number.
- Please describe how you need help as thoroughly as possible:
Examples
Good Question I'm trying to do Experimental Procedure step #5, "Scrape the insulation from the wire. . ." How do I know when I've scraped enough?
Good Question I'm at Experimental Procedure step #7, "Move the magnet back and forth . . ." and the LED is not lighting up.
Bad Question I don't understand the instructions. Help!
Good Question I am purchasing my materials. Can I substitute a 1N34 diode for the 1N25 diode called for in the material list?
Bad Question Can I use a different part?
Contact Support

/-/https/img.youtube.com/vi/XOQ12R4ClEk/0.jpg)
/-/https/img.youtube.com/vi/jhRyistosQk/0.jpg)
/-/https/img.youtube.com/vi/7hmTb7Iqm4s/0.jpg)