Summary
/-/https/www.sciencebuddies.org/cdn/Files/14827/8/caterpillar-automaton-thumbnail.jpg)
/-/https/i.ytimg.com/vi/xhN49I0cu9A/maxresdefault.jpg)
Introduction
Have you ever wondered how to create art with moving parts using nothing but cardboard, a few skewers, and some craft supplies? In this fun STEM activity, you will build an automaton, a machine that makes parts appear and disappear, move up and down, spin in circles, or all of these together. The instructions will show you how to build a moving caterpillar, but you can use your imagination to build any other animal or object you want!
Materials
- Cardboard
- Cardboard box; an old shoebox works well
- Cardboard tube or toilet paper rolls
- Cardstock or paper
- Scissors or utility knife
- Tip of compass or needle
- Glue
- Drinking straw
- Skewers, at least one that is 2 inches longer than the shoebox
- Beads with smooth surface
- Pencil
- Materials to color and decorate your creation

/-/https/www.sciencebuddies.org/cdn/Files/14828/7/automata-materials.jpg)
Instructions
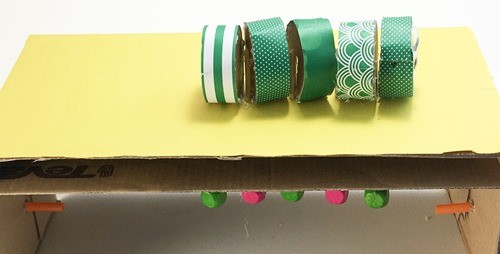
The procedure will walk you through building a caterpillar automaton. The body of the caterpillar consists of five short cylinders. Turning the axle makes these parts move up and down.
/-/https/www.sciencebuddies.org/cdn/Files/14829/7/caterpillar-automation-full-picture.jpg)
/-/https/www.sciencebuddies.org/cdn/Files/14830/9/drawing-automaton.png)
An automaton is made up of three main components: a case, a driving mechanism, and the moving object. The driving mechanism produces the motion for the object and sits inside the case. The moving object sits above the case, attached to skewers which stick up from the driving mechanism.
You can use the procedure to make this automaton or choose to have other objects move up and down. At the end of the procedure, some mechanisms that create other movements — turning objects, or objects that suddenly drop down — are shown. Whatever your design idea, be sure to look for solutions whenever you get stuck, keep trying and enjoy the process!
Create the Case
- All automata have three parts; a mechanism that drives the movement, a case that houses this mechanism, and the showcase parts that move. A cardboard box is used to houses the mechanism of this automaton.
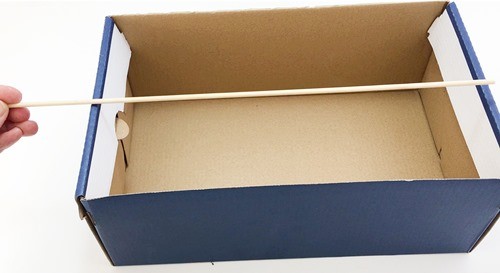
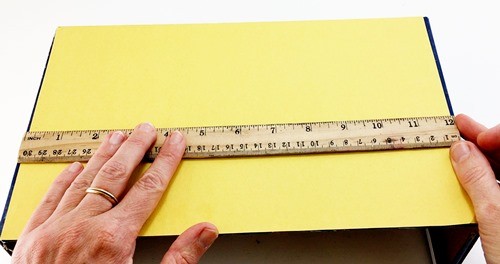
- Lay the skewer on top, parallel to the long side of the box. The skewer should stick out at least two inches. If not, look for a shorter box or a longer skewer.
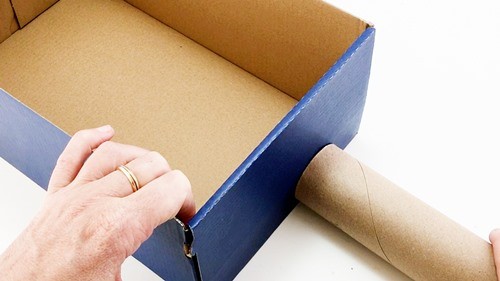
- The caterpillar or its substitute will sit on top of the cardboard box. Check that the height of your box is at least one inch more than twice the diameter of your cardboard tube. If your box is too low, glue new longer cardboard side panels to the box to make it higher.
- If the box has a lid, remove It. You can use the cardboard lid later.
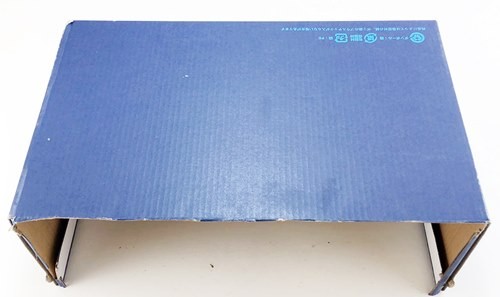
- Place the box open side down in front of you. The side facing up will support the automaton.
- The box will hold the mechanism that drives the movement. Cut out the side of the box facing you so you can easily access and see the mechanism once it is installed.
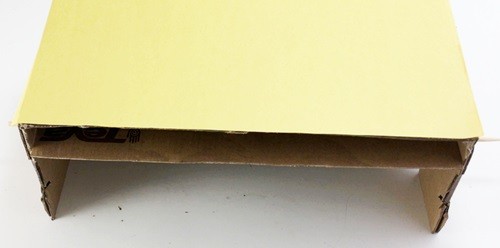
- Optional: Cover the top of the box with decorative paper.
- Cut out a piece of cardboard similar in size to the top panel of the box. This piece should snugly fit inside the box when it is placed parallel to the top panel of the box. It will be used to keep the moving pieces upright. Trimming the lid of the box often works well.
- Draw a pencil line on the box where you want the moving objects to be placed. Place it about midway and parallel to the front of the box. Extend the line to the side panels. Your driving axle will be under this line.
- On each side panel, mark a point directly under the line you drew in step 9. It should be one cardboard tube diameter from the bottom edge of the box.

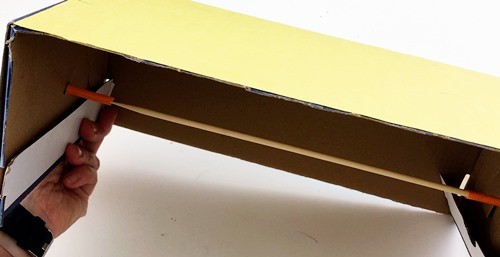
- Make a hole at those points (one in each side panel) and glue a 1 inch section of drinking straw in the hole.

- Thread a long skewer through these straws and make sure it spins easily without getting stuck. This rotation will drive the movement of your automaton.
/-/https/www.sciencebuddies.org/cdn/Files/14831/9/automaton-length-skewer-for-axle.jpg)
/-/https/www.sciencebuddies.org/cdn/Files/14832/7/automaton-measure-height-of-box.jpg)
/-/https/www.sciencebuddies.org/cdn/Files/14833/7/automaton-prep-box.jpg)
/-/https/www.sciencebuddies.org/cdn/Files/14834/7/automaton-panel-parallel-to-top-panel.jpg)
/-/https/www.sciencebuddies.org/cdn/Files/14835/7/automaton-draw-line.jpg)
/-/https/www.sciencebuddies.org/cdn/Files/14836/7/automaton-where-have-hole.jpg)
/-/https/www.sciencebuddies.org/cdn/Files/14837/7/automaton-add-short-straw.jpg)
/-/https/www.sciencebuddies.org/cdn/Files/14838/7/automaton-thread-skewer.jpg)
Build the Driving Mechanism
The caterpillar has five body parts that can independently move up and down. Each of them is driven by a short cylinder.
/-/https/www.sciencebuddies.org/cdn/Files/14839/7/automaton-axle-with-driving-cylinder.jpg)
If your design has more or fewer moving parts, create the same number of cylinders as you will have moving parts, and thread them all on the axle.
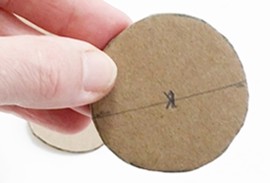
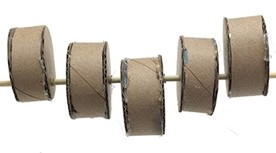
- Create ten identical cardboard circles the size of a cross-section of the cardboard tube. These will become the top and bottom faces of the five short cylinders.
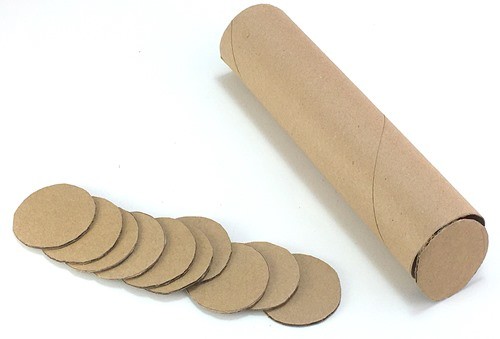
- Cut five sections about 3/4 inch long from the cardboard tube.

- Draw a diameter (the line that cuts the circle into two equal pieces) on half of the circles and measure its length. Draw a dot at a quarter of the diameter's length from the edge on three circles. Draw a dot at center of the circle on two other circles. For example, if your tube has a diameter of two inches (like most toilet paper tubes), you draw a dot 1/2 inch from the edge on three circles and at 1 inch on two more.
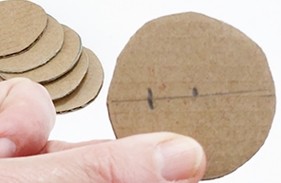
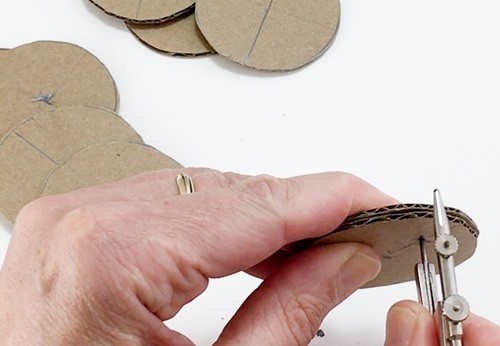
- Make five stacks of two flat circles, each with a circle marked with a dot on top of an unmarked circle. Align the two circles well and pierce a small hole through both circles on the dot you just drew. The tip of a compass or a needle are helpful tools to make these small holes.
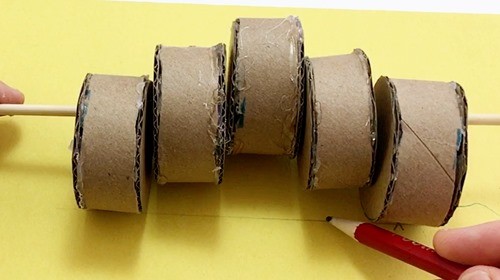
- Take a stack of circles where the hole is off-center. Thread a circle, a piece of cardboard tube, and the second circle onto the skewer.
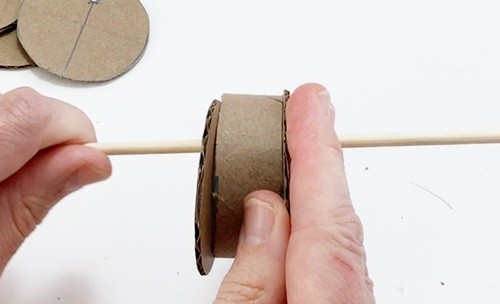
- Glue the two circles to the piece of cardboard tube, but do not glue them to the skewer yet.
- Repeat steps 5–6 using circles that have holes in the center.

- Continue repeating steps 5–6, alternating between centered and off-center circles. You should now have five short cylinders threaded on a skewer. This skewer will be the axle.
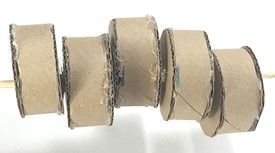
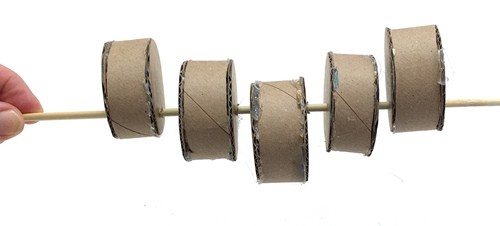
- Place the axle with cylinders in the box so it rests in the pieces of straw. Spin it and watch how the rotation of the axle makes the cylinders rotate. Skewers holding a section of the caterpillar's body will rest on these cylinders.
 What difference do you notice between the centered and off-center cylinders? How do you think the rotation of the axle will generate up and down movement of the body parts? Which sections, if any, do you expect to move most?
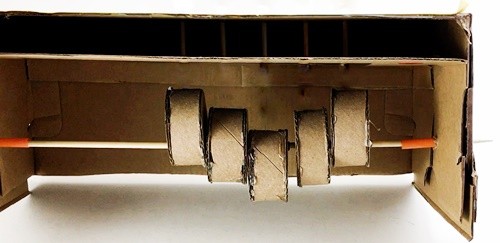
- Spin the cylinders on the axle so their tops make a V shape when viewed from the side.
What type of movement of the body parts do you think this V shape will create?
- You will finish the moving mechanism once everything is in place and all fine-tuning has been done.
/-/https/www.sciencebuddies.org/cdn/Files/14840/7/automaton-circles-tube.jpg)
/-/https/www.sciencebuddies.org/cdn/Files/14841/7/automaton-five-tube-section.jpg)
/-/https/www.sciencebuddies.org/cdn/Files/14842/8/automaton-dot-off-center.jpg)
/-/https/www.sciencebuddies.org/cdn/Files/14843/9/automaton-dot-in-center.jpg)
/-/https/www.sciencebuddies.org/cdn/Files/14844/7/automaton-make-off-center-hole.jpg)
/-/https/www.sciencebuddies.org/cdn/Files/14845/7/automaton-short-section-cardboard-tube-on-axle.jpg)
/-/https/www.sciencebuddies.org/cdn/Files/14846/7/automaton-thread-pieces-on-axle-2.jpg)
/-/https/www.sciencebuddies.org/cdn/Files/14847/9/automaton-driving-mechanism-in-random-shape.jpg)
/-/https/www.sciencebuddies.org/cdn/Files/14848/8/automaton-axle-with-driving-cylinder-small.jpg)
/-/https/www.sciencebuddies.org/cdn/Files/14849/7/automaton-put-axle-in-case.jpg)
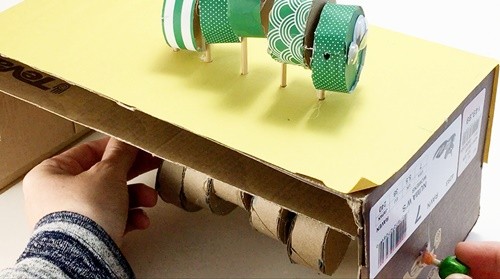
Create the Caterpillar or the Moving Object
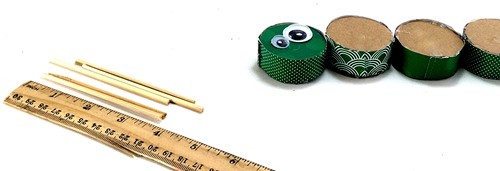
- The caterpillar consists of five short cylinders. These cylinders do not need to be as sturdy as the ones you use for the driving mechanism, but you want to make them look nice. You can make these cylinders by cutting pieces of a cardboard tube as described in the previous section, or, if you lack a cardboard tube with the diameter you want, glue a strip of cardstock between each pair of circles.

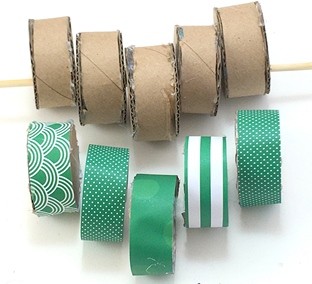
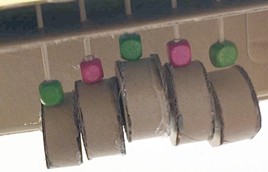
- Decorate the top of one piece to represent the face of the caterpillar. Details can be added at the end, but decorating is easier when you can place the cylinder flat.
/-/https/www.sciencebuddies.org/cdn/Files/14850/7/automaton-glue-paper-strip-to-circle-to-make-cylinder.jpg)
/-/https/www.sciencebuddies.org/cdn/Files/14851/7/automaton-axe-driving-cylinders-body-parts.jpg)
Put the Pieces Together
- Place the driving axle on top of the box, with the skewer parallel to the pencil line you drew in step 9 of the Create the Case section. The axle should stick out about 1/2 inch of one side of the box, and more on the other side.
- If needed, slide the cylinders on the skewer right or left so their position matches the location you want for the moving piece of your caterpillar's body.
- With pencil, mark the middle of each cylinder on the line on the box. This is where the skewers that hold the caterpillar will poke out of the box.
- Move the extra piece of cardboard that you cut in step 8 of the Create the Case section so it is pressed against the top of the box.
- Pierce the box and the piece of cardboard with a needle or the tip of a compass on the five marked spots.
- Enlarge the holes by pushing a skewer into them. Move the skewer up and down and wiggle it a bit to widen the hole. These skewers will need to move up and down smoothly. If the holes are too narrow then they will get stuck, but if the holes are too wide, then they will not stay upright.
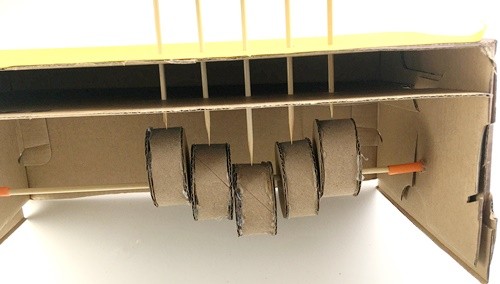
- Thread your driving axle through the drinking straws. Align it so the cardboard cylinders are directly below the holes in the top of the box.
- Move the extra cardboard piece down about 1 inch. Rotate the skewer to make sure the cylinders still rotate freely, with about 1/4 inch of free space between each cylinder (in any position) and the piece of cardboard. Glue the piece of cardboard to the box.
- Place skewers through the holes and let them rest on the driving cylinders. These skewers will hold the body of the caterpillar. Determine how long they need to be by looking at the one that sinks in the least. Mark that skewer at two inches above the top of the box and cut it to that length.
- Remove the driving axle from the box.
- Cut four more pieces of skewer to the same length as the one you cut in step 9.
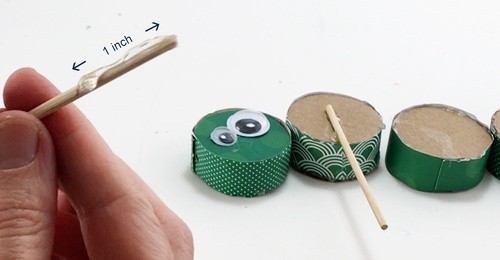
- Glue the top 1 inch of a skewer to a flat side of a piece of the caterpillar's body. Repeat until each piece of the caterpillar's body is attached to a skewer.
- Place the skewers holding the body parts in the holes, one skewer per hole. Remember to place the head piece on an end.
- Glue a bead on the lower end of each skewer. The bottom end of the bead must have a smooth surface so it can glide over a driving cylinder.
- Put the axle back in place.
- Let each bead rest on a cylinder. Glue a bead to the end of the axle that sticks out just a little, so that when the bead is pressed against the straw, the beads on the five skewers rest in the middle of each driving cylinder. Shift the driving cylinders along the axle if adjustments are needed.

- Turn the axle and see how the body parts move.
- Turn the middle cylinder so three cylinders point up and the tops of the 5 cylinders form a W shape. Rotate the axle again.How does this change modify the movement of the body parts?

- Experiment with putting the cylinders at different positions with respect to each other, and see which position works best for your design. For the caterpillar, we placed the cylinders so the top parts make a V shape.
- Once you have found a configuration you like, glue the cylinders in place on the axle.
- To make a handle on your axle, cut a rectangle from cardboard, fold it in two and glue it on with the axle sandwiched between the folded cardboard.
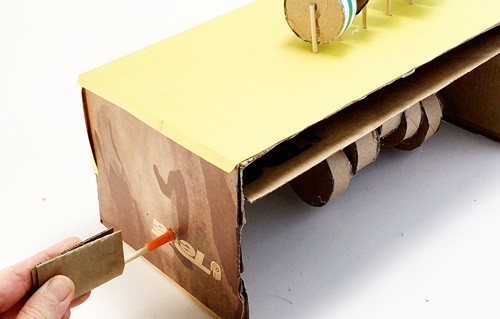
- Turn the driving axle and watch how the pieces move up and down.What makes a piece move up and down? Do all the pieces move the same amount? Why or why not? What would need to change in the design to make a caterpillar where all the pieces of the body move a lot?
- Finish decorating the caterpillar.
/-/https/www.sciencebuddies.org/cdn/Files/14852/7/automaton-indicate-where-have-holes.jpg)
/-/https/www.sciencebuddies.org/cdn/Files/14853/7/automaton-skewers-resting-on-driving-cylinders.jpg)
/-/https/www.sciencebuddies.org/cdn/Files/14854/7/automaton-glue-sticks-on-body-parts.jpg)
/-/https/www.sciencebuddies.org/cdn/Files/14855/8/automaton-glue-stick-on-body-part.jpg)
/-/https/www.sciencebuddies.org/cdn/Files/14857/7/automaton-attach-beads.jpg)
/-/https/www.sciencebuddies.org/cdn/Files/14858/7/automaton-beads-rest-on-cylinders.jpg)
/-/https/www.sciencebuddies.org/cdn/Files/14859/7/automaton-add-bead-to-axle.jpg)
/-/https/www.sciencebuddies.org/cdn/Files/14860/7/automaton-driving-cylinders-in-W-shape.jpg)
/-/https/www.sciencebuddies.org/cdn/Files/14861/7/automaton-add-handle.jpg)
/-/https/www.sciencebuddies.org/cdn/Files/14862/7/automaton-beats-go-up-down-1.jpg)
/-/https/www.sciencebuddies.org/cdn/Files/14863/7/automaton-beats-go-up-down-2.jpg)
How to Make Other Movements
-
Different driving mechanisms generate different movements.
What motions do you think result from the mechanisms shown in the picture?
/-/https/www.sciencebuddies.org/cdn/Files/14864/7/circular-rotation-automaton-mechanism.jpg)
/-/https/www.sciencebuddies.org/cdn/Files/14865/8/sudden-drop-automaton-mechanism.jpg)
/-/https/i.ytimg.com/vi/fC_g5-HIAwU/maxresdefault.jpg)
What Happened?
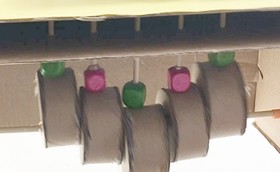
The head, middle, and end pieces of your caterpillar probably moved up and down the most, while the other two pieces moved very little. This happens because of the way the driving mechanism of this caterpillar was designed.
The driving mechanisms of this automaton consisted of five cylinders; two placed centered on the axle and another three placed off-center. Each skewer holding a piece of the caterpillar's body rests on top of one of these five cylinders. The tops of the cylinders that are centered on the axle do not change in height. They always stay about the same distance from the axle, so that body pieces resting on these cylinders do not move much. The tops of the three cylinders that were threaded closer to the edge of the cylinder move a lot. Sometimes, it is very close to the axle, and half a turn later, it is further away from the axle. This results in a body part that makes a larger up and down motion.
/-/https/www.sciencebuddies.org/cdn/Files/14866/8/drawing-automaton-driving-mechanism-V.png)
In the first drawing, the tops of the five driving cylinders form a V shape. The skewers that hold the body parts rest on these cylinders. As these skewers are all the same length, the body parts stick out of the box to form a similar V shape.
/-/https/www.sciencebuddies.org/cdn/Files/14867/9/drawing-automaton-driving-mechanism-flat.png)
In the second drawing, the tops of the five driving cylinders are level, and the body parts are level too.
/-/https/www.sciencebuddies.org/cdn/Files/14868/12/drawing-automaton-driving-mechanism-upside-down-V.png)
In the last drawing, the tops of the five driving cylinders make an upside-down V shape. The body parts take on the same shape as they are held up by skewers of equal length.
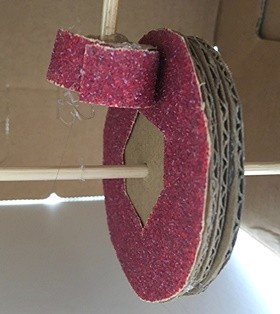
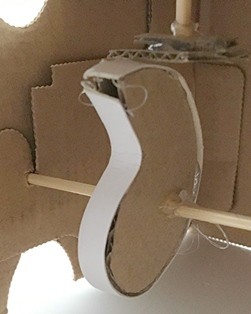
When you use a spiral-shape drive piece instead of a cylinder, you can create a gradual upward movement followed by a sudden drop. A mechanism that has two cylinders perpendicular to each other can make an object spin in circles instead of move up and down. If you keep exploring, you can even find mechanisms that make objects move forward and backward.
Digging Deeper
An automaton is a machine that follows a predetermined set of movements. Some are powered by wind or water, the one described in this activity is powered by a human turning a handle. Automata are not new. The word "automaton" originates from the Greek language and means "acting of one's own will." References to automata appear in Greek mythology, Jewish legends and ancient Chinese texts. Most automata were and are made to impress and entertain people, they are works of art. But recently, NASA has proposed an automaton, the Automaton Rover for Extreme Environments (AREE) powered by wind for practical reasons. It is designed to work on Venus, where surface temperatures reach at least 462 °C (864 °F).
Ask an Expert
For Further Exploration
- Make an automaton that uses one of the other driving mechanisms or look up more complicated driving mechanisms and try them out.
- Make an automaton to decorate a scene from your favorite child's book.
- This automaton was made of cardboard. Can you make one of wood, of metal wire, or recyclable materials?
- This automaton was powered by a human turning the axle. Can you make one that is powered by a stream of water or the wind?
/-/https/www.sciencebuddies.org/cdn/Files/20065/16/rubber-band-cars-thumbnail.jpg)
/-/https/www.sciencebuddies.org/cdn/Files/8238/8/artbot-thumbnail-triple.jpg)
/-/https/www.sciencebuddies.org/cdn/Files/7531/9/dancing-snowman-art.jpg)
/-/https/www.sciencebuddies.org/cdn/Files/13977/6/pantograph-results-thumbnail.jpg)
/-/https/www.sciencebuddies.org/cdn/Files/14110/5/moving-two-gears-around-thumbnail.jpg)
/-/https/www.sciencebuddies.org/cdn/Files/13273/5/archimedes-screw-thumbnail.jpg)
/-/https/www.sciencebuddies.org/cdn/Files/5721/7/squishy-circuit-butterfly.jpg)
/-/https/www.sciencebuddies.org/cdn/Files/7919/11/bristlebots.jpg)
/-/https/www.sciencebuddies.org/cdn/Files/6377/19/brushbot.jpg)
/-/https/careerdiscovery.sciencebuddies.org/cdn/Files/1450/21/iStock-1227179796.jpg)
/-/https/careerdiscovery.sciencebuddies.org/cdn/Files/1457/17/pexels-photo-3861938.jpg)
/-/https/careerdiscovery.sciencebuddies.org/cdn/Files/1907/18/pexels-photo-3153207.jpg)
/-/https/careerdiscovery.sciencebuddies.org/cdn/Files/1692/17/unsplash-G1Xk2C87Rb8.jpg)
/-/https/careerdiscovery.sciencebuddies.org/cdn/Files/19368/6/female-engineer-industrial-technologist-istock-1300259755.jpg)
/-/https/careerdiscovery.sciencebuddies.org/cdn/Files/19369/4/machinist-manufacturing-tool-die-maker-iStock-879134734.jpg)
/-/https/careerdiscovery.sciencebuddies.org/cdn/Files/19459/5/technician-repairing-operating-microscope.jpg)
/-/https/careerdiscovery.sciencebuddies.org/cdn/Files/20167/5/IndustrialProdManager_KeyPhoto.jpg)
/-/https/img.youtube.com/vi/2pHVIqcyf18/0.jpg)
/-/https/img.youtube.com/vi/EkiSAx6vjQk/0.jpg)
/-/https/img.youtube.com/vi/mabHwDuuLfU/0.jpg)