Summary
Introduction
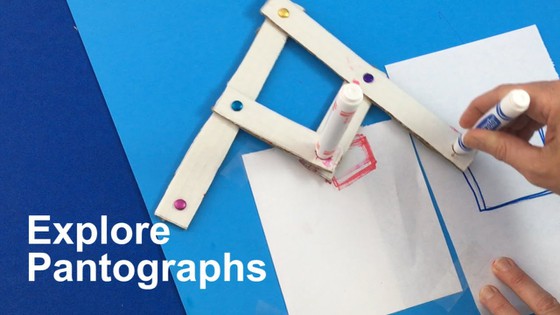
Have you ever wished you could copy a drawing but make it larger or smaller? If you've tried to create a larger or smaller copy of your work, you've probably realized that it is very hard to get the details right. A machine called a pantograph, however, could help. It makes copies that can be scaled up or down or made the same size. In this activity you will make your own pantograph and then duplicate your drawings. Can you figure out how it enlarges, shrinks or turns drawings upside down?
Materials
- Cardboard, at least 20 centimeters by 7.5 centimeters
- Poster board or large cardboard
- Scissors or utility knife
- Metric ruler
- Hole puncher
- Marker
- Pencil
- Brads (4)
- Paper
- Optional: Tape
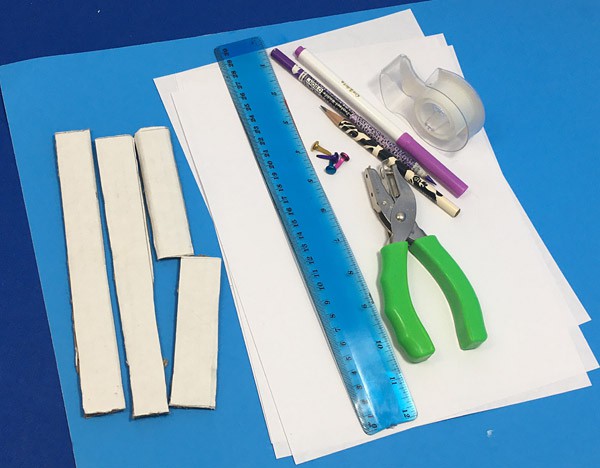 Image Credit: Sabine De Brabandere, Science Buddies / Science Buddies
Prep Work
- Carefully cut out (or have an adult help cut) two 20-by-2.5 cm cardboard rectangles. These will be the arms of the pantograph.
- Carefully cut two 10-by-2.5 cm cardboard rectangles sized to create the folding part of the pantograph.
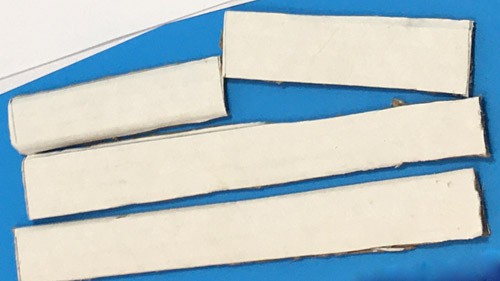 Image Credit: Sabine De Brabandere, Science Buddies / Science Buddies
- Punch holes near both ends of each of the four rectangles. Punch another hole in the center of each of the larger rectangles.
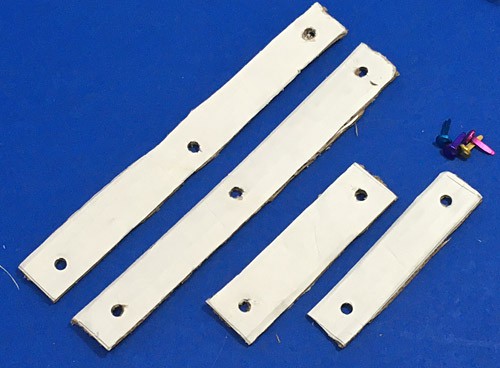 Image Credit: Sabine De Brabandere, Science Buddies / Science Buddies
- Place a longer rectangle in front of you so it forms an "I" shape.
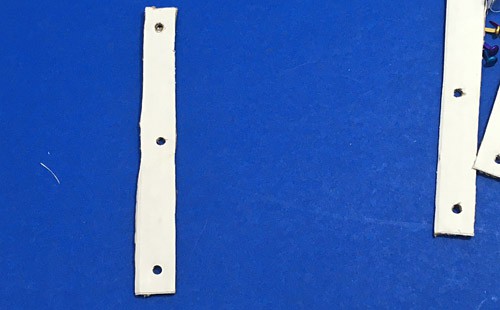 Image Credit: Sabine De Brabandere, Science Buddies / Science Buddies
- Use the other long rectangle and a short rectangle to transform the "I" shape into an "F" shape.
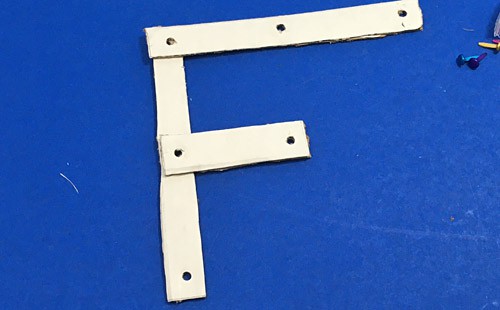 Image Credit: Sabine De Brabandere, Science Buddies / Science Buddies
- Use the last short rectangle to connect the end of the short horizontal line in the "F" shape to the middle of the top line in the "F" shape.
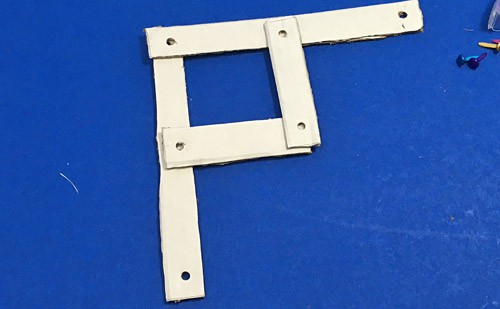 Image Credit: Sabine De Brabandere, Science Buddies / Science Buddies
- Use a brad and the punched holes to make a joint where the long rectangles overlap.
- Use two brads and the punched holes to make joints in which the short rectangles overlap with the middle of the long rectangles.
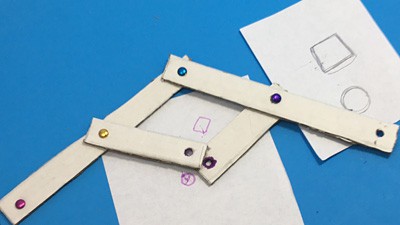
- Rotate the short rectangles so the unused holes at their ends overlap. You now have a pantograph that is ready to try out.
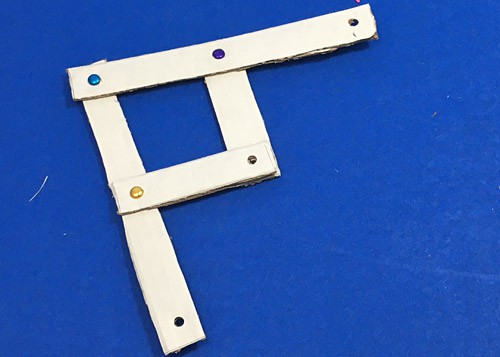 Image Credit: Sabine De Brabandere, Science Buddies / Science Buddies
Instructions
- Place a poster board on the table. Punch a hole in it near the left border.
- Place the pantograph on the poster board so that one of the unused holes in its arms overlaps with the new hole in the board. Use a brad to attach the end of the pantograph to the board.
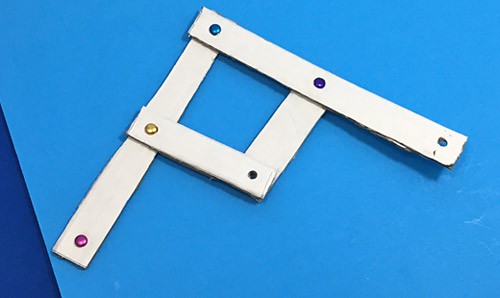 Image Credit: Sabine De Brabandere, Science Buddies / Science Buddies
- For the first setup put a pencil through the holes in the overlapping short rectangles near the center of the pantograph. The pantograph now has one unused hole. Place a marker through that hole. Attach the pencil and marker well (using the tape if needed). The tips of the marker and pencil should rest on the poster board.
- Take an unused pen or pencil and draw a 3-by-3 cm square on a blank paper. Place it under the pencil, and center an empty paper under the marker.
 In a moment you will trace the square with your pencil. What do you think will happen to the marker?
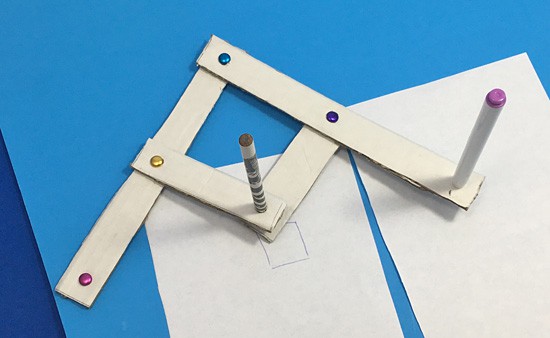 Image Credit: Sabine De Brabandere, Science Buddies / Science Buddies
- Try it out! If the papers slip, tape them to the poster board and try again.
Was your prediction correct?
- Remove the drawings with squares. Take a new sheet of paper, and draw a 4-by-8 cm rectangle. Place the rectangle under the pencil and a new blank paper under the marker. (If needed, attach the papers to the poster board with tape.)
What do you think the pantograph will draw when you trace the rectangle with your pencil?
- Trace the rectangle.
- Remove the new drawing and the one you traced, and compare them.
Is this an exact copy? How is the copy similar and how is it different?
- Place new papers under the pencil and marker. (If needed, secure the paper to the poster board with tape.) In a moment you will use the pencil connected to the pantograph to make a drawing of your choice.
What kind of drawing do you think the marker attached to the pantograph will produce while you are making your own drawing?
- Try it out.
Was your prediction correct?
- Try a different configuration of the pantograph. Switch the placement of the pencil and the marker. The pencil you will use to trace or draw is now connected to a long arm of the pantograph, whereas the marker is now placed where the two short rectangles join.
Do you think this change will impact the drawings the pantograph produces?
- Repeat steps 4-10. You now have three drawings with this setup of the pantograph.
How are these similar and how are they different from your first set of drawings? Can you determine how the placement of the pencil and marker make a difference? Why do you think that is the case?
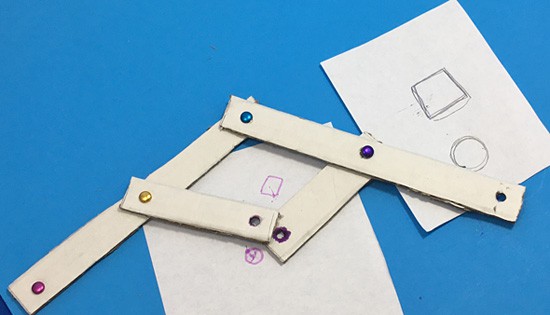 Image Credit: Sabine De Brabandere, Science Buddies / Science Buddies
- You tested two setups of the pantograph. Try a third setup by connecting the middle point of the pantograph (the point that connects the two shorter rectangles of the pantograph) to your poster board with a brad. Put the pencil at the end of one long arm and the marker at the end of the other long arm.
Can you predict what type of drawing will result from this setup?
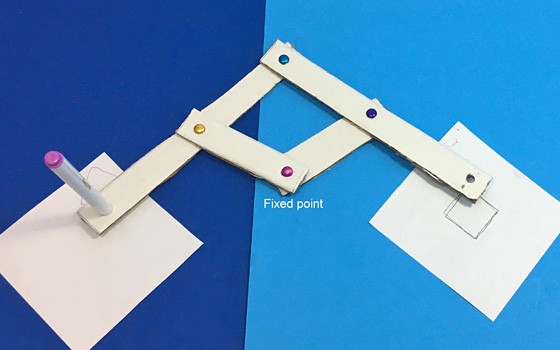 Image Credit: Sabine De Brabandere, Science Buddies / Science Buddies
- The pantograph you made is a machine.
What do you think makes up the mechanical structure of this machine? What makes it move? What powers it?
What Happened?
The pantograph should have enlarged your drawings when used in the first setup and made them smaller when used in the second setup. The mechanical structure holding the pencil and marker is made to do just that.
The pantograph you made is a machine. The four pieces of cardboard and the brads are the mechanical structure. It was powered by a human: you! You pushed and pulled the pantograph as you drew or outlined with the pencil. The mechanical structure ensured the marker and pencil moved in unison.
When the end of one arm of the pantograph is fixed in space the points where the pencil and marker were attached always move in the same direction: when one moves up, the other will move up too, etcetera. The amount they move is scaled because the point farther away from the fixed point always moves more. This allows you to make an enlarged or miniaturized copy.
 Image Credit: Sabine De Brabandere, Science Buddies / Science Buddies
A third setup keeps the joint connecting the two smaller rectangles fixed. This forces the two ends of the pantograph (the places where the pencil and marker were attached) to move in opposite directions: when one moves up the other moves down, etcetera. Because both the marker and the pencil were at the same distance from the fixed spot they moved the same amounts, creating an inverted (or upside-down) copy.
Digging Deeper
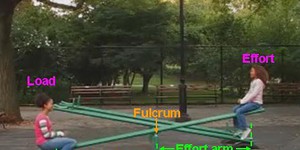
Machines are mechanical devices we use to complete specific tasks. Simple machines, such as levers, allow us to apply force to accomplish a task we might otherwise not be able to carry out. (Renaissance scientists defined six types of simple machines: a lever, a wedge, a pulley, a screw, a wheel and axle and an inclined plane.) Think of a seesaw on the playground. You might not be able to lift your friend off the ground on your own, but if you are each sitting on different sides of a seesaw, you can probably move so that your friend is lifted into the air. This is thanks to the work of a lever.
Machines work by having a power source and a mechanical structure. The power source provides the energy to get the device moving. In the case of simple machines they were first powered by humans. The mechanical structure controls the movements and makes up most of the body of the machine. In the case of the lever the mechanical structures include a beam and a pivot point called the fulcrum. The fulcrum is the point on the beam around which the beam turns. It can be anywhere on the beam.
More complex machines combine several simple machines to get a task done. A pantograph is a machine that helps to copy drawings. It combines two levers. How you use it determines if you will get an enlarged, a miniaturized or a reversed copy.
If you look closely you might see how the pantograph uses two levers. Each longer piece of cardboard serves as the rigid beam of a lever that rotates around a joint placed at the end of the beam. As you draw with the pencil you push and pull on the levers, making the whole pantograph move in an accordion-like motion. Unlike a playground seesaw, however, these levers aren't lifting weight up and down—they are controlling the distance over which an object (in this case the marker) moves.
Ask an Expert
For Further Exploration
- Look closely at the details of all your drawings. Can you find which setup of the pantograph diminishes little defects in the drawing—and which one makes them more apparent?
- Can you find the two levers in the pantograph? Can you figure out how they are used in an unconventional way?
- In geometry two figures are similar when they have the same shape but not necessarily the same size. The ratio of the length of corresponding sides is called the scale factor. Pantographs are easy ways to create similar figures. Can you find the factor by which your pantograph scales the drawings for each of the tested setups? How are these factors related?
- Can you make a pantograph that scales your drawing by a specific factor, for example 1/3 or 3, 1/5 or 5, and so on?
Related Resources
Project Ideas
Links
- Blog Post: Science Buddies: Mechanical Science Scissor Lift
- Ted Ed: The Mighty Mathematics of the Lever