Summary
/-/https/www.sciencebuddies.org/cdn/Files/17047/6/diy-mini-drone-arduino.jpg)
/-/https/i.ytimg.com/vi/QNnx2evKb_0/maxresdefault.jpg)
Introduction
How do drones automatically hover at a constant distance from the ground? Find out in this fun drone project as you build an altitude control circuit for a popsicle stick drone using an ultrasonic distance sensor and an Arduino™.
See this page for a complete list of our mini drone projects. You may wish to do the projects in order.
Materials
- DIY Mini Drone Kit
- Electronics Kit for Arduino
- Piece of paper or cardstock
- Scissors
-
Windows or Mac computer. See this page if you have a Chromebook. Your computer will need:
- Access to the Arduino IDE, either installed local version or web-based editor (note that Chromebooks can only use the web version). Watch this video for a comparison of the two options.
- USB port. The Science Buddies kit comes with a USB-A to B cable. The "B" end plugs into the Arduino and the "A" end plugs into your computer. You will need an adapter or different cable if your computer only has USB-C ports. Watch this video to learn about the different types of cables and adapters.
Disclaimer: Science Buddies participates in affiliate programs with Home Science Tools®, Amazon.com, Carolina Biological, and Jameco Electronics. Proceeds from the affiliate programs help support Science Buddies, a 501(c)(3) public charity, and keep our resources free for everyone. Our top priority is student learning. If you have any comments (positive or negative) related to purchases you've made for science projects from recommendations on our site, please let us know. Write to us at [email protected].
Prep Work
- Follow the instructions in the DIY Mini Drone activity to build your drone.
- If you do not know how to use a breadboard, refer to our Breadboard Tutorial before you continue.
- If you have never used an Arduino before, refer to our How to Use an Arduino guide.
Instructions
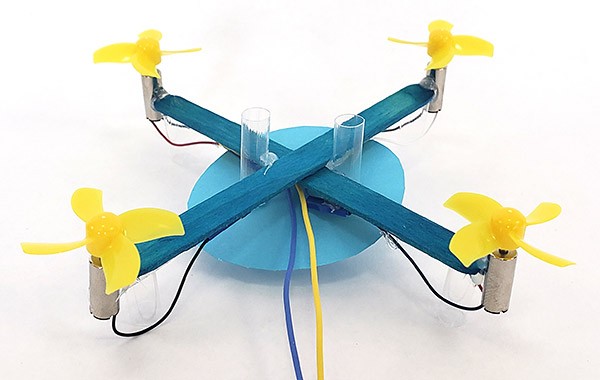
- After following the instructions in the DIY Mini Drone activity, your drone should look like this.

- Glue a second vertical piece of straw to the middle of your drone's frame, opposite the first piece.

- Cut out a small circle of paper, about 7 cm in diameter. Poke holes in it for the straws, and slide it onto the underside of your drone. This will provide a larger, flat surface for the sound waves from the ultrasonic sensor to bounce off of.
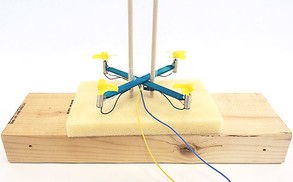
- Build a support for your drone with two dowels spaced apart so they fit through both straws. It is important to make sure the dowels are parallel or your drone will get stuck. Make sure the drone slides smoothly up and down the dowels. Optional: place a piece of soft foam at the base of the dowels. This will provide some padding if your drone falls.
- Alternatively, you can use two strings. Tape the strings to a shelf or the edge of a table, and let them hang down. Thread the drone onto the strings, and then make sure the strings are pulled taut (for example, by taping heavy weights to the ends, or by having a helper hold them).
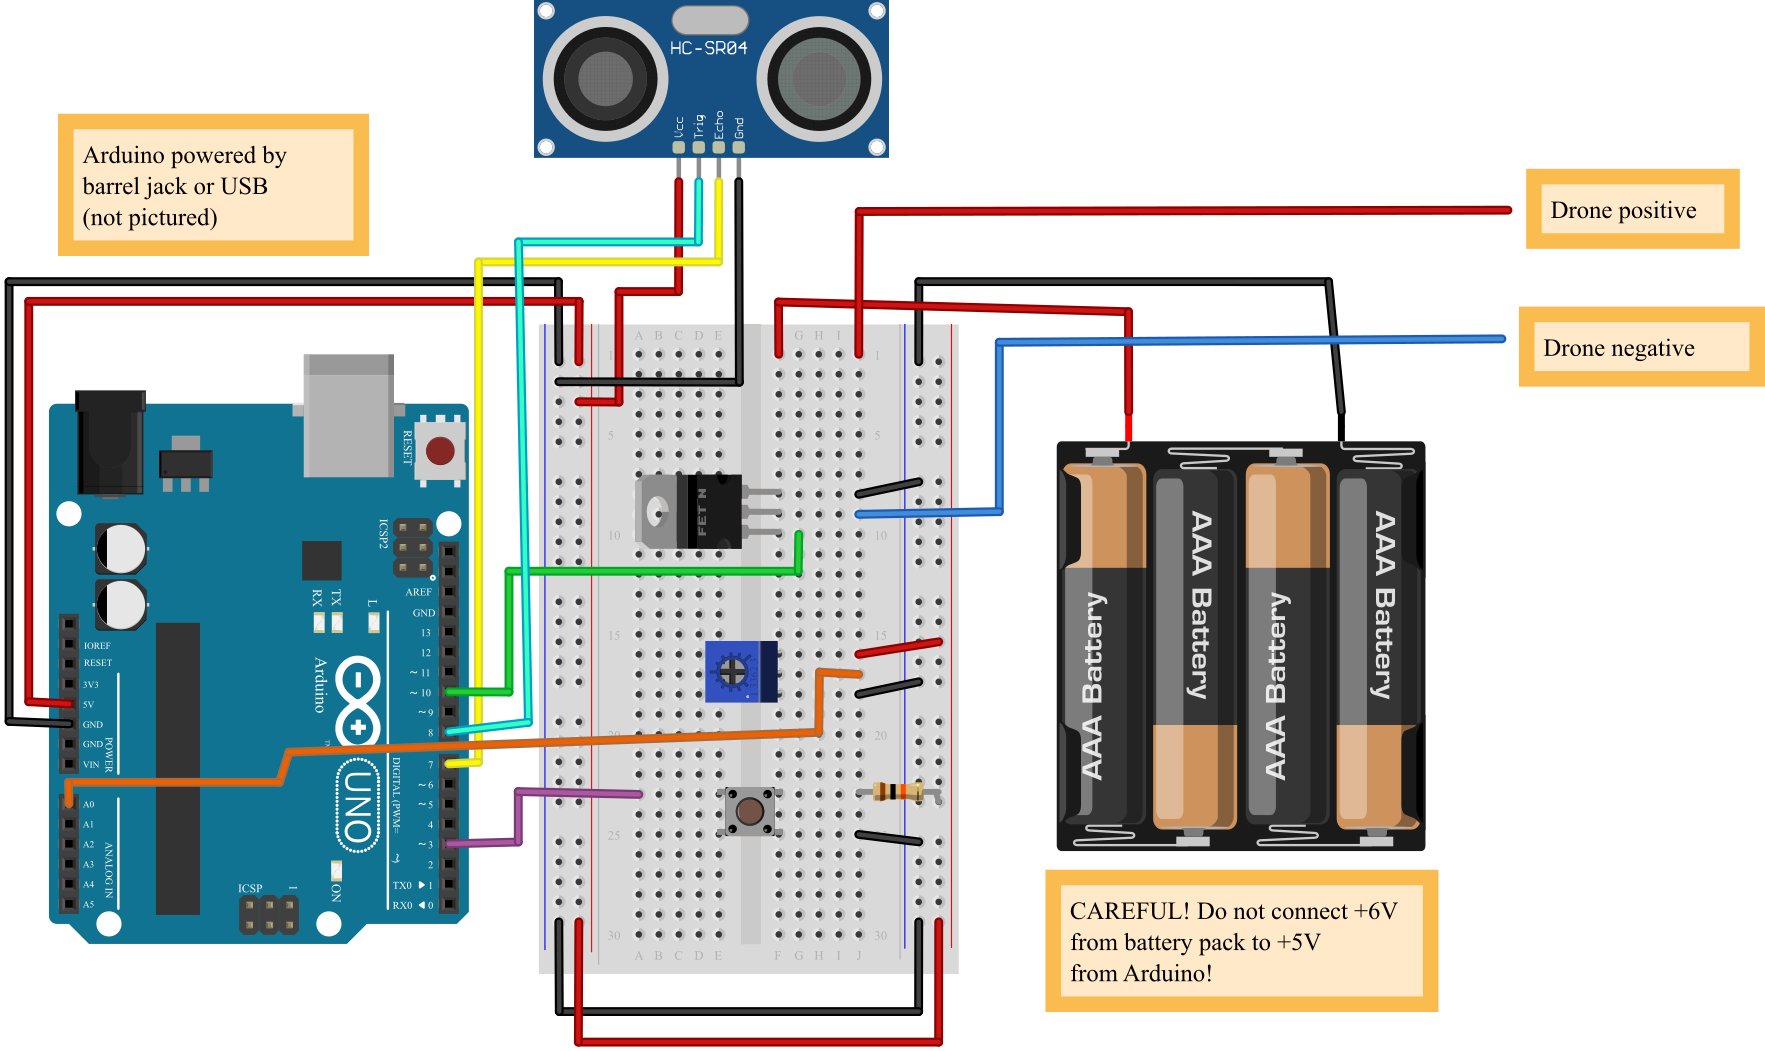
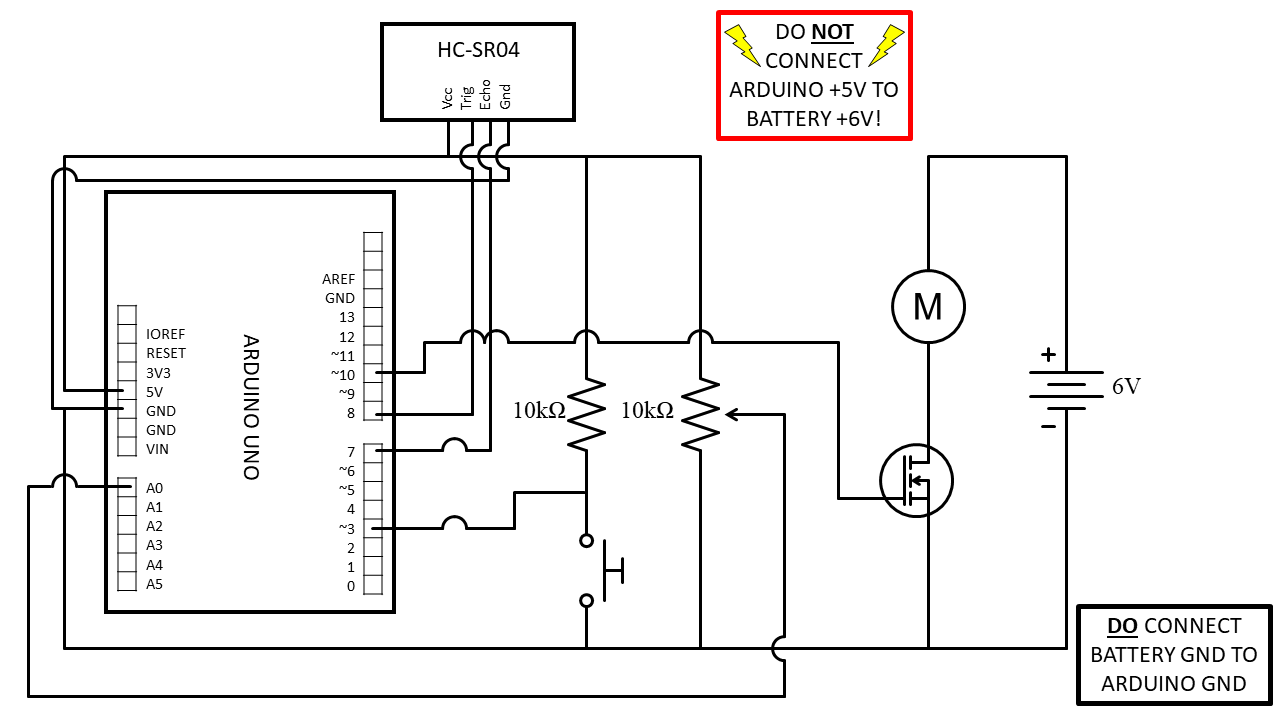
- Orient the breadboard so it is facing you with the writing upright. Then connect all of the following, as shown in the breadboard diagram (click for a bigger version of the diagram). If you know how to read a circuit schematic, you can use that instead. Note that the circuit diagram and code are for the HC-SR04 ultrasonic distance sensor. If you have PING ultrasonic sensor instead, you should follow the instructions in our PING ultrasonic distance sensor tutorial to modify your circuit and code.
- Arduino 5V pin to breadboard positive bus.
- Arduino GND pin to breadboard ground bus.
- Breadboard left positive bus to breadboard right positive bus.
- Breadboard left ground bus to breadboard right ground bus.
- HC-SR04 sensor GND pin to breadboard ground bus (use male-female jumper wires to connect to the sensor pins).
- HC-SR04 sensor 5V pin to breadboard positive bus.
- HC-SR04 sensor Trig pin to Arduino digital pin 8.
- HC-SR04 sensor Echo pin to Arduino digital pin 7.
- MOSFET in holes F8, F9, and F10, with the large metal tab facing to the left.
- Hole J8 to ground bus.
- Hole G10 to Arduino digital pin 10.
- Potentiometer in holes F16, F17, F18.
- Hole J16 to positive bus.
- Hole J17 to Arduino analog input A0.
- Hole J18 to ground bus.
- Push button straddling the middle gap of the breadboard, with pins in holes E23, E25, F23, and F25.
- Hole A23 to Arduino digital pin 3.
- 10 kΩ resistor from hole J23 to positive bus.
- Hole J25 to ground bus.
- Drone positive wire to J1. The drone's wires are too flexible to push into the breadboard on their own. Twist or crimp them to a short piece of jumper wire to make the connection.
- Drone negative wire to J9.
- 4xAA battery pack negative (black) wire to ground bus.
- 4xAA battery pack positive (red) wire to F1. Important: Do not connect the battery pack's positive wire to the breadboard's positive bus! This will create a short circuit between the Arduino's 5 V power and the battery pack's 6 V power.


- Upload the code to your Arduino.
- Download drone_altitude_control_code.ino to your computer. If you have some computer programming experience, you can look through the code and read the comments to understand how it works.
- Temporarily disconnect one of the drone's wires from the breadboard. This will prevent the drone from accidentally taking off when you power up your Arduino (this can happen depending on the last program that ran on the Arduino).
- Connect the Arduino to your computer with the USB cable.
- Open drone_altitude_control_code.ino in the Arduino IDE.
- Press the "Upload" button to send the code to your Arduino.
- Test your drone.
- Make sure the drone is threaded onto the guide poles.
- Place the ultrasonic sensor directly under the drone, facing up.
- Re-connect the drone's wire to the breadboard.
- Press the push button once to make the drone lift off.
- Adjust the potentiometer to change the drone's height.
- Gently tap the drone up or down with your finger or a pencil (watch out for the propellers!). What happens?
- Press the push button again to make the drone land. You can re-press the button to make it lift off again.
 What happens if you change the value of the variable K, re-upload your Arduino code, and test again?
- Troubleshooting:
- If your drone's motors do not spin at all, double-check all of your breadboard wiring. A single misplaced wire can prevent the entire circuit from working.
- To confirm that your drone is working, temporarily connect its two wires directly to the two wires from the 4xAA battery pack.
- Make sure all your wires are connected to the correct Arduino pins. The code does not "know" which pins you have plugged the wires into. You need to plug wires into the pins that are used in the code.
- If your drone flies but behaves erratically, try adjusting the ultrasonic sensor to make sure it is aimed at the bottom of the drone. Use the Arduino IDE's serial monitor to help debug (Tools→Serial monitor). This will display the measured distance in centimeters. If this value does not seem reasonable (for example, it is always zero, or it is 100 cm and you know your drone is definitely not that far away), then you are probably not getting good readings from the sensor.
- If your drone drifts up or down slightly instead of hovering, try changing the value of the PWM_offset variable in your code. This variable is a number between 0–255. By default, it is set to 150. If your drone drifts downward, try increasing the number. If your drone drifts upward, try decreasing the number.
/-/https/www.sciencebuddies.org/cdn/Files/16860/5/frame-straw.jpg)
/-/https/www.sciencebuddies.org/cdn/Files/17039/5/drone-two-straws.jpg)
/-/https/www.sciencebuddies.org/cdn/Files/17049/6/drone-paper.jpg)
/-/https/www.sciencebuddies.org/cdn/Files/17040/6/drone-two-dowel-supports.jpg)
/-/https/www.sciencebuddies.org/cdn/Files/17041/5/drone-two-string-supports.jpg)
/-/https/www.sciencebuddies.org/cdn/Files/17050/15/drone-arduino-altitude-breadboard-circuit-1.png)
/-/https/www.sciencebuddies.org/cdn/Files/17051/17/arduino-drone-control-circuit-diagram-1.png)
/-/https/www.sciencebuddies.org/cdn/Files/17052/11/diy-mini-drone-arduino-control-cropped.jpg)
Cleanup
What Happened?
When you run the Arduino code, the ultrasonic distance sensor sends out quick bursts of ultrasonic sound. It measures how long it takes these bursts to reflect back to the sensor, and uses this information to calculate the distance between the sensor and the drone (this is the same concept used by animals like bats for echolocation!). At the same time, the Arduino reads the voltage from the potentiometer, and converts this voltage to a desired height in centimeters. The code compares the drone's actual height to the desired height. If the actual height is too low, it increases the speed of the motors, making the drone fly up. If the actual height is too high, it decreases the speed of the motors, making the drone fly down. This allows the drone to automatically return to the desired height when you bump it up or down.
Changing the value of the variable K in the code changes the strength of the drone's reaction to disturbances. If the value is too low, the drone will move back toward the desired position very slowly. If the value is too high, the drone might move too fast and shoot past the desired position, then over-correct and fall past it again. Finding a value that is "just right" helps the drone quickly return to its desired position without bouncing around too much.
Digging Deeper
The code in this project uses feedback control, also called closed-loop control. Many systems that you encounter every day use feedback control. For example, the thermostat in your house automatically controls the heating or cooling to keep the inside of the house close to a set temperature.
Your circuit uses readings from the ultrasonic sensor to provide measurements, or feedback, about the drone's position to the Arduino. The Arduino subtracts this measured distance from the target distance to compute an error. It then increases or decreases the motors' speed by an amount that is proportional to the error, making the drone move up or down toward the target position, and reducing the error. This is called a proportional controller. The amount multiplied by the error is called the controller's gain, which is the variable K in the code. As you may have discovered, changing the value of K will affect how the drone responds to disturbances.
You can learn about how the parts of the circuit, like the push button, potentiometer, and ultrasonic sensor, interact with the Arduino by reading the comments in the code.
Ask an Expert
For Further Exploration
- Write code to make your drone follow a pre-programmed path, for example, automatically oscillating up and down between two different heights.
- Add more buttons to your circuit and use them to make the drone automatically fly to different pre-programmed heights.
- Change the value of the ramp_time variable in the code. What value gives the smoothest takeoffs and landings?
- For advanced students:
- Proportional controllers can be subject to a steady-state offset error. Can you determine this offset error between the target and measured distances? Does changing the controller gain K affect the error?
- Can you modify the code to use a proportional-integral-derivative (PID) controller? Can you tune the controller's gains to get the best response from the drone? Meaning, can you make the drone return to the target height as quickly as possible after a disturbance, without overshooting the position or oscillating?
- What is the bandwidth of the physical drone system? In other words, how quickly can you make the drone move up and down? If you program the Arduino to make the drone oscillate up and down 10 times per second by a height of 20 cm, is that physically possible?
/-/https/www.sciencebuddies.org/cdn/Files/16847/5/DIY-mini-drones-thumbnail.jpg)
/-/https/www.sciencebuddies.org/cdn/Files/17038/5/DIY-mini-drone-altitude-control-circuit.jpg)
/-/https/www.sciencebuddies.org/cdn/Files/17460/5/drone-automatic-balancing-thumbnail.jpg)
/-/https/www.sciencebuddies.org/cdn/Files/17476/5/popsicle-stick-drone-free-flight-thumbnail.jpg)
/-/https/www.sciencebuddies.org/cdn/Files/17160/5/drone-joystick-thumbnail.jpg)
/-/https/www.sciencebuddies.org/cdn/Files/17334/5/drone-motion-control-thumbnail.jpg)
/-/https/www.sciencebuddies.org/cdn/Files/17150/8/drone-steering-thumbnail.png)
/-/https/careerdiscovery.sciencebuddies.org/cdn/Files/1163/18/pexels-photo-1181472.jpg)
/-/https/careerdiscovery.sciencebuddies.org/cdn/Files/1725/18/4161_Michelle_Easter_and_Curiousity_Clone.jpg)
/-/https/careerdiscovery.sciencebuddies.org/cdn/Files/835/18/msfc-202000343.jpg)
/-/https/careerdiscovery.sciencebuddies.org/cdn/Files/1223/17/iStock-971549326.jpg)
/-/https/img.youtube.com/vi/uPSAk27B-Xs/0.jpg)
/-/https/img.youtube.com/vi/l-VWX6ndGpA/0.jpg)
/-/https/img.youtube.com/vi/dZhmcai85Y0/0.jpg)