Summary
/-/https/www.sciencebuddies.org/cdn/Files/17476/5/popsicle-stick-drone-free-flight-thumbnail.jpg)
/-/https/i.ytimg.com/vi/pvHyTATszZU/maxresdefault.jpg)
Introduction
Make your mini popsicle stick drone lift off in this activity! You will build a dual-joystick controller to steer your drone so you can fly it manually. How well can you fly without any help from automatic controls?
See this page for a complete list of our mini drone projects. You may wish to do the projects in order.
Materials
- DIY Mini Drone Kit
- Electronics Kit for Arduino
- You will also need to gather these items, not included in the kits:
- N-channel MOSFET (4)
- 2-axis analog joysticks (2)
- An additional solderless breadboard for your joystick controller
- Additional straws
- Paper or cardstock
- Identical retractable pens (4)
- Piece of corrugated cardboard
- Scissors
-
Windows or Mac computer. See this page if you have a Chromebook. Your computer will need:
- Access to the Arduino IDE, either installed local version or web-based editor (note that Chromebooks can only use the web version). Watch this video for a comparison of the two options.
- USB port. The Science Buddies kit comes with a USB-A to B cable. The "B" end plugs into the Arduino and the "A" end plugs into your computer. You will need an adapter or different cable if your computer only has USB-C ports. Watch this video to learn about the different types of cables and adapters.
Disclaimer: Science Buddies participates in affiliate programs with Home Science Tools®, Amazon.com, Carolina Biological, and Jameco Electronics. Proceeds from the affiliate programs help support Science Buddies, a 501(c)(3) public charity, and keep our resources free for everyone. Our top priority is student learning. If you have any comments (positive or negative) related to purchases you've made for science projects from recommendations on our site, please let us know. Write to us at [email protected].
Prep Work
- Follow the instructions in the DIY Mini Drone activity to build your drone, with the following important changes:
- Do not connect any of the motor wires to each other. Add a separate extension wire (roughly 1 m long) to each individual motor wire—8 wires total. To make it easier to keep track of the wires, make the extension wire colors match the motor wires.
- Use straws to build a "roll cage" for your drone. You can come up with your own design, but this picture shows an example. The yellow straws protect the propellers. The green straws make it harder for the drone to flip over.
/-/https/www.sciencebuddies.org/cdn/Files/17477/5/popsicle-stick-drone-free-flight.jpg)
Instructions
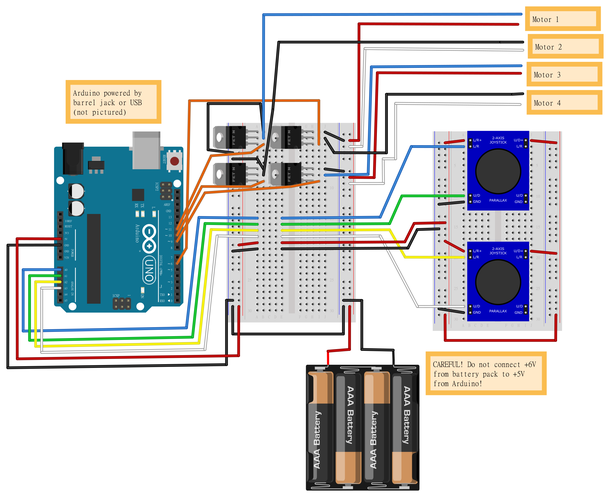
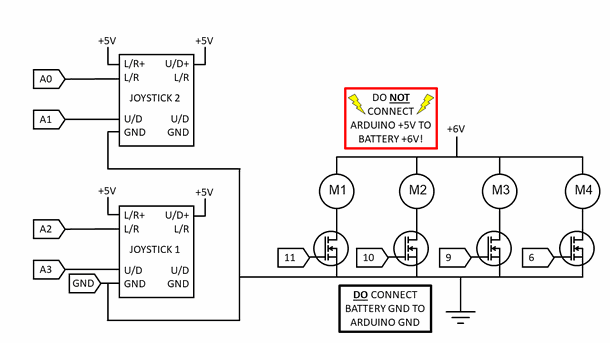
- Build the following circuit. Click for bigger versions of the breadboard diagram and circuit diagram. A few important notes:
- Make sure you do not short-circuit the Arduino's 5 V to the battery pack's 6 V.
- Use long jumper wires to connect the two breadboards, so you can easily pick up the "controller."
- Motors 1, 2, 3, and 4 are controlled by MOSFETs connected to Arduino pins 11, 10, 9, and 6, respectively (these are pins with PWM functionality for controlling motor speed).
- The joystick outputs are connected to the Arduino analog input pins as follows:
- Joystick 1 L/R: A2
- Joystick 1 U/D: A3
- Joystick 2 L/R: A0
- Joystick 2 U/D: A1
- Download drone_free_flight.ino. Read through the commented code to attempt to understand how it works. Note that there are several variables you can change that will affect your drone's steering.
- Upload the code to your Arduino.
- Place your drone on a flat, level surface and slowly try pushing on the right joystick ("joystick 2" should be on your right when you hold the controller). This joystick steers the drone forward, backward, left, and right. See if you can control the drone's direction as it glides around on the ground.
- Let go of the right joystick. Try to slowly press up on the left joystick to increase the speed of all four motors and make your drone lift off the ground.
 Can you use the right joystick to steer your drone and keep it level while it is up in the air?
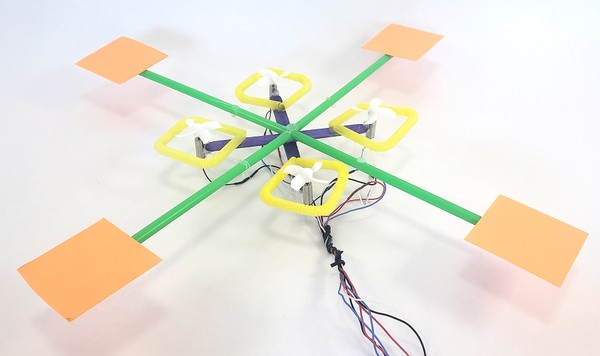
 - Try adding fins to your drone. They will increase drag, slowing down the drone's rotation. You can experiment with the size, location, and orientation of the fins. This picture shows just one example. If you are having trouble with your drone's propellers getting tangled in the wires, you can also try bundling the wires together with a twist tie, as shown in the picture.
 Does adding fins make it easier to steer your drone?
 - Try changing the speedChange variable in the code to change your drone's steering sensitivity.Does increasing or decreasing the variable make it easier to steer the drone?
/-/https/www.sciencebuddies.org/cdn/Files/17478/5/drone-free-flight-breadboard-diagram.png)
/-/https/www.sciencebuddies.org/cdn/Files/17479/5/drone-free-flight-circuit-diagram.png)
/-/https/www.sciencebuddies.org/cdn/Files/17481/5/drone-fins.jpg)
Cleanup
What Happened?
You probably found that it is quite difficult to steer a drone manually! Your drone is unstable, meaning it tends to flip over and crash. Adding a roll cage and fins can help slow the drone down and make it harder to flip. You might be able to control the drone's direction as it glides around on the ground, but it is very difficult to make the drone fly up in the air without crashing. Recreational drones use automatic control to help them stay level. Read the Digging Deeper section to learn more.
Digging Deeper
Most toy drones (the kind you can buy in a store) use a mix of automatic and human control. A human operator can make the drone move up, down, left, right, forward, and backward with a controller, typically with two joysticks. However, the drone also has on-board sensors that detect its angle of tilt, and constantly makes small adjustments to the motor speeds to keep itself upright. These automatic adjustments are necessary because as you discovered, human reaction time is not good enough to keep the drone from crashing!
Ask an Expert
For Further Exploration
- To explore some of the sensors that drones use to help with automatic flight control, check out the additional projects in this mini popsicle stick drone series, listed below.
- If you are ready to move on to build your own fully functional, radio-controlled drone, check out the resources in the Build Your Own RC Drone project.
/-/https/www.sciencebuddies.org/cdn/Files/16847/5/DIY-mini-drones-thumbnail.jpg)
/-/https/www.sciencebuddies.org/cdn/Files/17038/5/DIY-mini-drone-altitude-control-circuit.jpg)
/-/https/www.sciencebuddies.org/cdn/Files/17047/6/diy-mini-drone-arduino.jpg)
/-/https/www.sciencebuddies.org/cdn/Files/17460/5/drone-automatic-balancing-thumbnail.jpg)
/-/https/www.sciencebuddies.org/cdn/Files/17160/5/drone-joystick-thumbnail.jpg)
/-/https/www.sciencebuddies.org/cdn/Files/17334/5/drone-motion-control-thumbnail.jpg)
/-/https/www.sciencebuddies.org/cdn/Files/17150/8/drone-steering-thumbnail.png)
/-/https/careerdiscovery.sciencebuddies.org/cdn/Files/1655/17/pexels-photo-2898316.jpg)
/-/https/careerdiscovery.sciencebuddies.org/cdn/Files/835/18/msfc-202000343.jpg)
/-/https/careerdiscovery.sciencebuddies.org/cdn/Files/1223/17/iStock-971549326.jpg)
/-/https/img.youtube.com/vi/4LHWjt0eqzQ/0.jpg)
/-/https/img.youtube.com/vi/Wg8VoLTMz1M/0.jpg)
/-/https/img.youtube.com/vi/OKJmI8Ap5L8/0.jpg)