Summary
/-/https/www.sciencebuddies.org/cdn/Files/17160/5/drone-joystick-thumbnail.jpg)
/-/https/i.ytimg.com/vi/E3MUlPjK-HE/maxresdefault.jpg)
Introduction
How do you steer a drone using a controller with a joystick? Find out in this activity as you program an Arduino to interface with an analog joystick, similar to those found in most video game controllers. You can use the joystick to make a mini popsicle stick drone tilt side to side or move up and down.
See this page for a complete list of our mini drone projects. You may wish to do the projects in order.
Materials
- DIY Mini Drone Kit
- Electronics Kit for Arduino
- 2-axis analog joystick
- Piece of paper or cardstock
- Scissors
-
Windows or Mac computer. See this page if you have a Chromebook. Your computer will need:
- Access to the Arduino IDE, either installed local version or web-based editor (note that Chromebooks can only use the web version). Watch this video for a comparison of the two options.
- USB port. The Science Buddies kit comes with a USB-A to B cable. The "B" end plugs into the Arduino and the "A" end plugs into your computer. You will need an adapter or different cable if your computer only has USB-C ports. Watch this video to learn about the different types of cables and adapters.
Disclaimer: Science Buddies participates in affiliate programs with Home Science Tools®, Amazon.com, Carolina Biological, and Jameco Electronics. Proceeds from the affiliate programs help support Science Buddies, a 501(c)(3) public charity, and keep our resources free for everyone. Our top priority is student learning. If you have any comments (positive or negative) related to purchases you've made for science projects from recommendations on our site, please let us know. Write to us at [email protected].
Prep Work
Instructions
Joystick for Altitude Control
If you did the DIY Mini Drone: Arduino™ Altitude Control project, follow these instructions to replace the potentiometer with the joystick for altitude control.- Rebuild your circuit as shown in the diagram below (click for a bigger version of the breadboard layout or circuit diagram).
- Remove the potentiometer completely.
- You will need to move the button up on the breadboard to make room for the joystick.
- Connect the joystick's pins, as follows:
- L/R+ and U/D+ to 5V (breadboard positive bus)
- L/R to Arduino analog input A1
- U/D to Arduino analog input A0
- GND to breadboard ground bus
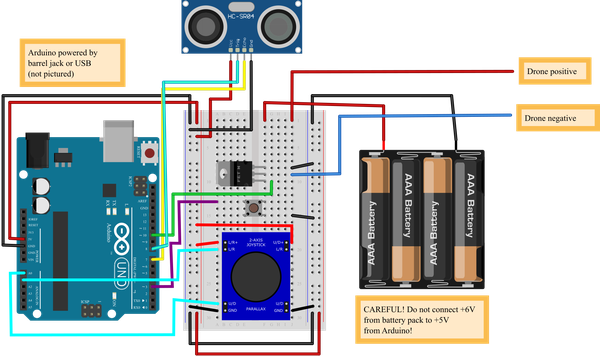
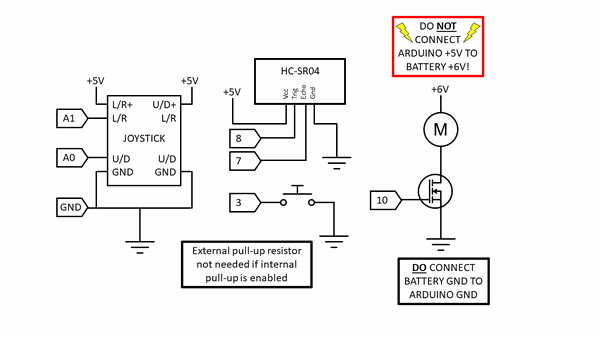
- Download drone_altitude_joystick.ino and upload it to your Arduino.
 What happens when you run the code and push the joystick up and down?Does anything happen if you push the joystick left to right?
 - Try changing the scale variable in the code. This variable controls how quickly the analog voltage from the joystick changes the drone's target height. The smaller the number, the faster the drone will move.What happens when you change this number? Can you find a value that feels "just right" for controlling the drone with the joystick?
/-/https/www.sciencebuddies.org/cdn/Files/17162/9/joystick-breadboard-diagram-altitude.png)
/-/https/www.sciencebuddies.org/cdn/Files/17163/9/joystick-altitude-circuit-diagram.png)
Joystick for Drone Steering
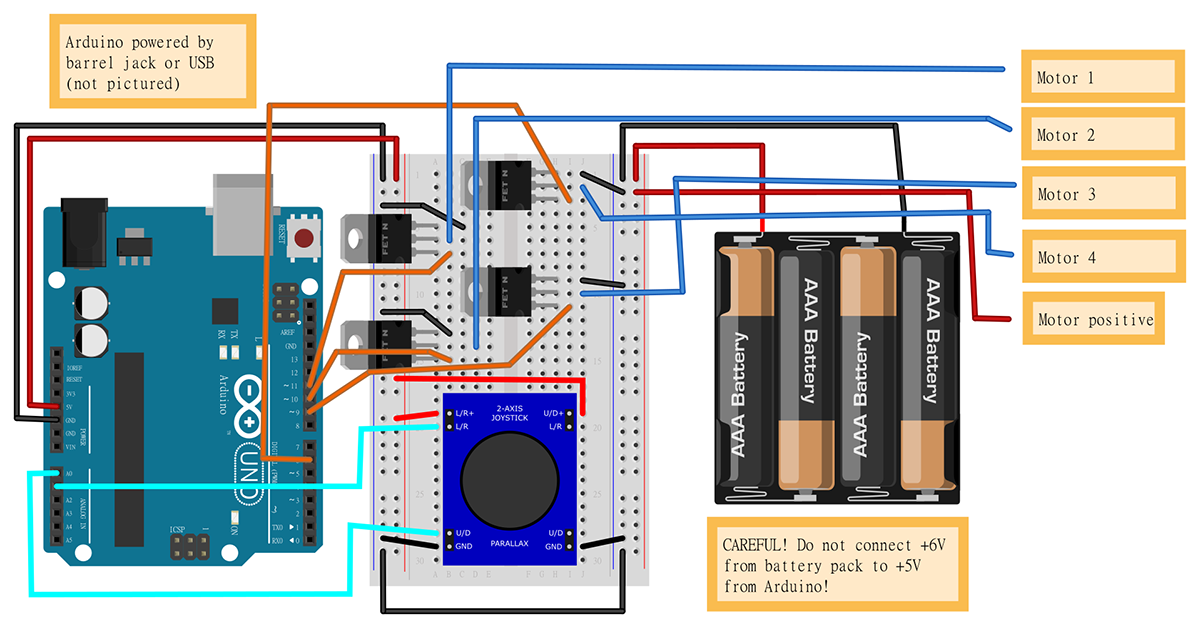
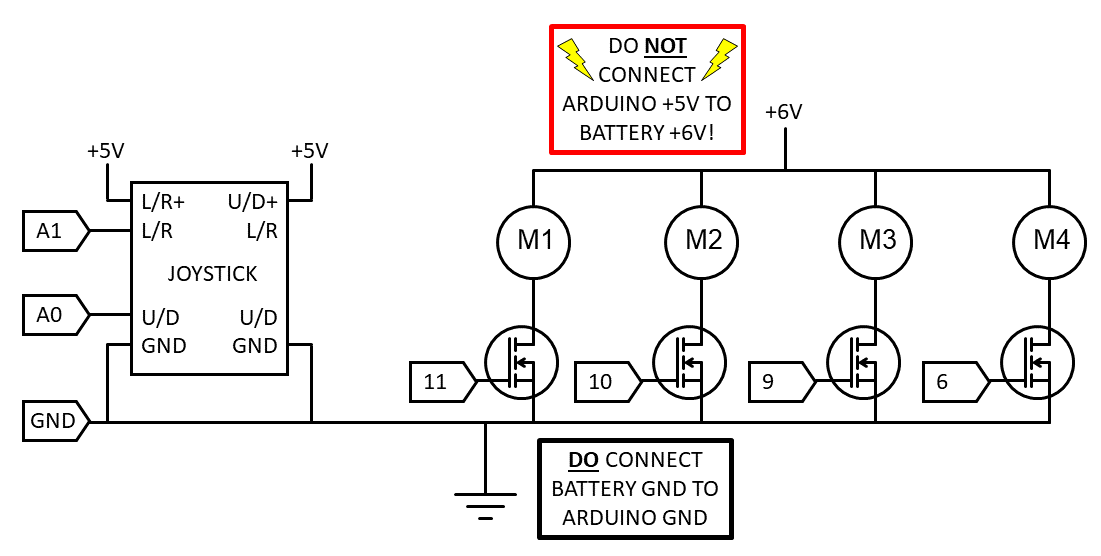
If you did the Program Drone Steering with an Arduino® project, follow these instructions to replace the buttons with the joystick for steering control.- Rebuild your circuit as shown in the diagram below (click for a bigger version of the breadboard layout or circuit diagram).
- Remove all four push buttons from the breadboard.
- Connect the joystick's pins, as follows:
- L/R+ and U/D+ to 5V (breadboard left positive bus in the diagram below—the right bus is used for 6 V from the battery pack. Do not connect the two!).
- L/R to Arduino analog input A1.
- U/D to Arduino analog input A0.
- GND to breadboard ground bus.


- Download drone_steering_joystick.ino and upload it to your Arduino.What happens when you run the code and press the joystick up and down or side to side?Does anything happen if you move the joystick in a circle?
- There are several variables in the code that you can experiment with changing, but you need to be careful (explained in more detail in the next step). You will not break your drone, but you might see some strange or unexpected behavior depending on the values you enter for these variables.
- defaultSpeed sets the default speed for each motor when the joystick is in the neutral position.
- speedChange sets the maximum possible speed change for each motor.
- a is a multiplier that converts the analog joystick voltage to a speed change for each motor.
- Why do you need to be careful when changing these values? Because of something called overflow. The Arduino controls the motors' speed using a pulse-width modulation (PWM) signal via the analogWrite() function. For the Arduino UNO, analogWrite() only accepts values between 0 and 255. If you try to enter a value of 256, it will overflow and wrap back around to zero. Conversely, if you try to enter a value of -1, it will wrap back around to 255. This is why you need to be careful when changing the defaultSpeed, speedChange, and a variables. Depending on the values you enter, the code may calculate motor speed values (e.g. the variable motor1speed) that are outside the allowed 0–255 range. This will result in strange drone behavior, such as a motor spinning very slowly when you expect it to spin very fast, causing your drone to tilt in the wrong direction. You could get around this problem by adding IF statements to make sure the motor speeds stay within the allowed range, such as:
if(motor1speed>255){motor1speed=255;}
if(motor1speed<0){motor1speed=0;}
/-/https/www.sciencebuddies.org/cdn/Files/17165/5/joystick-breadboard-diagram-steering.png)
/-/https/www.sciencebuddies.org/cdn/Files/17166/5/joystick-steering-circuit-diagram.png)
Cleanup
What Happened?
If you did the altitude control project, then when the joystick is in its neutral position, the drone should automatically hover in place (thanks to the automatic feedback control from the Arduino and ultrasonic distance sensor). When you push the joystick up (or down), the drone will move up (or down) until you let go of the joystick. When you let go of the joystick, it will automatically hover in place at the new altitude. Pushing the joystick farther will make the drone move faster. Changing the scale variable will change how quickly the drone responds to the joystick input. If it responds too quickly, the joystick may feel too sensitive, and it will be hard to make small adjustments to the drone's height. Conversely, if it responds too slowly, then it may take a long time to move between positions, even when you push the joystick all the way up or down.
If you did the steering project, then when the joystick is in the neutral position, all four motors spin at the same speed, and the drone should fly level. When you tilt the joystick in any direction, it will proportionally increase the speed of some motors and decrease the speed of the opposite motors, causing the drone to tilt in the same direction you push the joystick. Changing some of the variables in the code can change the joystick's sensitivity, but as explained in the procedure, you may see strange behavior (the drone tilting in the wrong direction) if you change the variables too much.
Digging Deeper
In this activity, you used a single joystick to either control your drone's up-and-down motion or side-to-side tilt, while the drone was constrained (either by guide poles or springs) and could not move in other directions. Real drones are free-flying and free to move in three-dimensional space. A free-flying object has a total of six degrees of freedom, or ways that it can move. Three of these motions are translational (moving in a straight line): forward/backward, left/right, and up/down. Three are rotational (spinning): roll (tilting side to side), pitch (tilting forward and backward), and yaw (spinning left to right while remaining level).
Real drone controllers typically have two joysticks for you to use to control their motion. However, two joysticks only gives you four total directions to control, not six (up/down and left/right on the left joystick, and up/down and left/right on the right joystick). So how do you control a flying drone that has six degrees of freedom? Even though the drone has six degrees of freedom, they are not all independent. That means that some of them depend on each other. For example, when a drone rolls (tilts) to the right, it will also start moving to the right. This means that the drone's roll and left/right translation are coupled. The same applies to the drone's pitch and forward/backward motion. You cannot change one without changing the other. This means that you can steer the drone in 3D space with two joysticks instead of three.
Ask an Expert
For Further Exploration
- Can you build or 3D-print a handheld controller for your joystick instead of mounting it on a breadboard? You could also include some buttons, like the lift off/land button in the altitude control project.
/-/https/www.sciencebuddies.org/cdn/Files/16847/5/DIY-mini-drones-thumbnail.jpg)
/-/https/www.sciencebuddies.org/cdn/Files/17038/5/DIY-mini-drone-altitude-control-circuit.jpg)
/-/https/www.sciencebuddies.org/cdn/Files/17047/6/diy-mini-drone-arduino.jpg)
/-/https/www.sciencebuddies.org/cdn/Files/17150/8/drone-steering-thumbnail.png)
/-/https/www.sciencebuddies.org/cdn/Files/17460/5/drone-automatic-balancing-thumbnail.jpg)
/-/https/www.sciencebuddies.org/cdn/Files/17334/5/drone-motion-control-thumbnail.jpg)
/-/https/www.sciencebuddies.org/cdn/Files/17476/5/popsicle-stick-drone-free-flight-thumbnail.jpg)
/-/https/careerdiscovery.sciencebuddies.org/cdn/Files/1163/18/pexels-photo-1181472.jpg)
/-/https/careerdiscovery.sciencebuddies.org/cdn/Files/1655/17/pexels-photo-2898316.jpg)
/-/https/careerdiscovery.sciencebuddies.org/cdn/Files/835/18/msfc-202000343.jpg)
/-/https/careerdiscovery.sciencebuddies.org/cdn/Files/1223/17/iStock-971549326.jpg)
/-/https/img.youtube.com/vi/2awrEVrPpdI/0.jpg)
/-/https/img.youtube.com/vi/q9X-ez31oiY/0.jpg)
/-/https/img.youtube.com/vi/CPOKDru-2ug/0.jpg)