13 Icebreaker Activities for Science Class!
Kick off the new school year with one of these STEM activities! Easy to plan, low-cost, and accessible to all grade levels, these creative science and engineering icebreakers help set the stage for a great school year. Students will get to know one another, maybe remember your name, and leave knowing that science class is going to be awesome!
/-/https/www.sciencebuddies.org/cdn/Files/19761/5/2023-science-class-icebreakers-13.png)
It's back-to-school time! This means a brand new year, maybe a brand new group of students, or even a new grade level. The first few days are often spent settling in, learning student names, and explaining classroom rules, policies, and objectives. Balancing the "business" involved in starting the year with hands-on activities can help students feel comfortable in the classroom and with their peers and make everyone excited about the year to come.
Back-to-school icebreaker activities (aka ice breakers) often take the form of arts and crafts projects to help fill the bulletin board or start covering the walls for a family-focused back-to-school night. If your standard icebreakers don't include science and engineering, you and your students are missing out!
Science is fun, and you can get students excited about STEM from the start with simple hands-on experiments and activities.
We've got suggestions for 13 fantastic icebreakers that are rooted in science. Some of these experiments do double-duty as ways to also create things to decorate the classroom. These STEM experiments work well for grade-level classrooms as well as for science subject classes in upper grades. These activities are for middle and high school students, too! Doing "simple" science activities with older students is a great way to ease into the year. Try having students work in teams or use these activities as friendly challenges. Don't be afraid to choose something that seems easy to welcome students into your cool classroom!
With these science and engineering ideas, you'll be jumping into teaching science right from the start with activities your students will also think are lots of fun!
Thirteen Fun STEM Icebreakers for Science Class!
1. Stack Liquids!
Make a colorful density column with the Stacking Liquids experiment. Students will take advantage of differences in density to make a cool stack of liquids. Depending on the grade and how many liquids will be used, you can provide the order (and densities) for students to follow or provide clues and information to help them solve the stacking challenge. Small density columns in disposable plastic cups (with lids) make a great take-home activity. Tip! Instead of using different liquids, you can also try water with varying amounts of sugar or salt added to change the density. (Directions for a related independent student science project are available.)
The science: After learning about properties of miscibility and density, students will be able to stack liquids so they don't mix together and instead sit in a layered column. In the activity, the three liquids used do not mix, and if the stack is turned upside down, the liquids move back into their density layers. Understanding why is exactly the point! How can liquids that are miscible be put into a density column? A lesson plan with background information and directions for leading this experiment in the classroom is available for educators.
2. Cotton Ball Launchers
No teacher wants to encourage paper wads, but cotton balls might be all right for some unbridled icebreaker fun! With cardboard tubes, rubber bands, and pencils (broken and short ones work well), students can make simple cotton ball launchers and then experiment to see if they can master their launch skills.
The science: This simple engineering project creates a launch device that stores elastic potential energy (when the rubber band is stretched) to propel the cotton ball (when the rubber band is released).
3. Jumping Sticks Chain Reaction
Ready, set, let go! The Popsicle Stick Chain Reaction activity is a creative way to demonstrate elastic potential energy and energy transformation while assembling (and activating) a fun chain reaction. With wooden tongue depressors (which are more flexible than popsicle sticks or other wooden sticks), students can weave a chain that will send sticks flying when released. As a friendly classroom competition, students might work in groups to see who can make the longest chain in a set amount of time.
The science: Each stick is bent when added to the chain, which adds energy to the chain. This energy is stored as elastic potential energy. When the chain is let go, the energy is released, and the sticks fly into the air in sequence. See the activity's "Digging Deeper" section to trace the energy transformation at different points of the chain reaction.
4. Make a Mobile
Balance it! Use the science in the Balance the Forces Within a Mobile activity to explore the physics of balance while creating cool hanging art. Students might work together on a large community mobile for the classroom (think of it as the opposite of a game like Jenga, each student adding to the mobile and adjusting the elements to keep everything balanced). Or use mobiles for an "About Me" project made of individual drawings, images, or notes drawn, written, or glued onto pieces of cardstock or heavy paper. Imagine a self-portrait focal piece with three to five additional images or notes that contain things the student wants to share about their interests. Older students might add additional elements to mobiles, including beads or small recycled objects that require careful balancing.
The science: Balancing the elements of a mobile can be challenging because the mobile is moving in the air. Students will observe various forces at play and Newton's first law of motion. (See additional resources to teach Newton's laws.)
5. Paper Towers

Building paper towers is perfect as a paper-based engineering design challenge and team- or community-building activity. The materials are easy to gather, and the rules are simple. You can customize the challenge to fit the grade level and the time available. Maybe you set a time limit, and the goal is to see who can build the tallest tower that doesn't fall over. Or maybe you integrate the original challenge rule about the tower needing to be able to hold something (like an unopened can of food). Don't be afraid to simplify the challenge for an icebreaker. The fun is in the building, the challenge of using simple materials to solve the task, and the race against whatever time limit you provide.
The science: This was the 2021 Engineering Challenge project and is a great opportunity to use the engineering design process. Lesson plans are available for grades 3-5, 6-8, and 9-12. To see examples of paper towers students have built with this challenge, see Thousands of Tall Paper Towers (and Lots of Tape!).
6. Paper Bridges
Spark a bit of friendly competition with this paper-based STEM bridge-building activity. How much weight can a bridge made from a single sheet of paper hold? Challenge students to design their bridges and test them using pennies as weights. This challenge works well with younger students, but it is also a great exercise in engineering design and physics for older students. You can change up the challenge a bit by allowing more materials or making different requirements for the bridge construction or testing.
The science: Changing the shape of the bridge and giving it vertical sides or walls can make the paper bridge significantly stronger without changing the quantity of materials.
7. Sharpie Tie-Dye 'About Me' T-Shirt Art
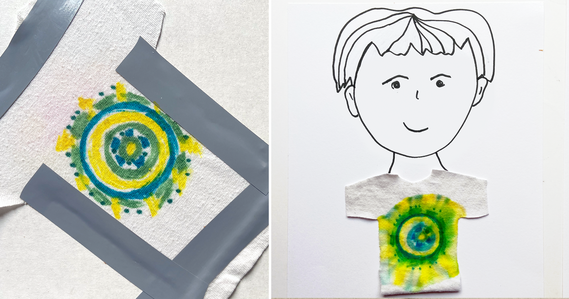
Decorating a paper cutout of a shirt (or a person) is a great way for kids to express their personality and help you and their classmates get to know them. You can find a range of these "About Me" or self-portrait pieces lining classrooms at all grade levels. With a bit of chemistry, you can turn this classic activity into a colorful icebreaker STEAM activity.
The premise is simple: if you draw on fabric with permanent markers and then drop on some isopropyl (rubbing) alcohol, the colors will spread and blend, resulting in something that looks a bit like tie-dye. This marker tie-dye technique can be used for full-size t-shirts, but it offers an easy and unexpected way to decorate mini t-shirts for an "About Me" project or self-portrait. To make mini t-shirts, you'll need to cut small t-shirt-shaped pieces from a white or light-colored cotton t-shirt. (Recycled shirts work well. You can cut a number of mini t-shirts from a single shirt!) Ideally, fabric for this activity is stretched (over the opening of a mason jar, for example), but taping the fabric to a piece of cardboard is an easy alternative. (Tip! We recommend putting down newsprint, butcher paper, or other covering to protect surfaces against the permanent markers and alcohol.)
Have students draw in the center of their mini t-shirt with permanent markers (like Sharpies). Have them focus just on adding color, like swirly patterns or stripes, not realistic drawings. After the drawings are in place, alcohol needs to be dripped onto the colored portion. The marker ink will break down and begin to spread and blend. Small pipettes or plastic medicine droppers can be used to add the alcohol. Students can do this individually, or an adult or teacher can go around the room and drop the alcohol onto each student's tie-dyed mini t-shirt. Enjoy the oohs and ahhs as the colors begin to spread. Leave the fabric pieces to dry. Once they are dry, kids can glue their mini t- shirts to a piece of cardstock that has a head and neck drawn on it. Students can fill in their face and hair features before or after the shirt is added. In the end, your students will have created a custom set of About Me art you can hang up in the room or on the bulletin board!
The science: If you try this with water, you will find that the colors don't spread. But permanent marker ink is soluble in isopropyl alcohol. The ink won't dissolve with water, but it will dissolve in alcohol.
8. Make Pinwheels
This classic craft activity has windy science built in! Let students decorate the papers they will use to make their pinwheels, and then use the directions in the Find the Best Pinwheel Design activity to assemble the pinwheels. Three designs to test are provided, and one will work better than the others. For an icebreaker, you could present all three options and have students choose which one they will each try and then compare. Or you could have all students make the first design. If you have windy weather, these may spin while outdoors, or kids can try them in front of a fan in the classroom. Even if spinning them isn't possible, these at least will make for a great class photo with kids each holding their colorful pinwheels! Once finished, pinwheels can then be sent home for testing or placed in a recycled container in the classroom as decoration.
The science: Wind turbines operate on the same principles students can observe in a pinwheel. In the activity, students are presented with different designs for the rotor blades (the arms of the pinwheel). One of these designs will spin better than the others.
9. Invisible Ink
No matter how you use it, invisible ink is generally a classroom crowd pleaser. Being able to write and reveal secret messages is pretty cool, and science holds the key to making this something kids can easily explore in the classroom. For younger students, educators might prepare secret messages in advance, writing an affirmation or positive word on sheets to be handed out to students. They can then reveal them by painting with a special turmeric and alcohol solution. (Note: Use Method 2 in the activity directions.) Older students might write their own messages with the baking soda mixture and then have to sort out how to reveal them from available materials. Or you might provide several "recipe" cards for formulas they can try, with only one of them being the correct formula.
The science: There are several methods that can be used to create and reveal invisible ink. The turmeric method in the activity is one that makes the invisible message (written with a baking soda and water mixture) change color because turmeric changes color in response to an acidic or alkaline environment.
10. Marble Run
This activity can work at any time of the year and can be excellent for a STEM station in a room where there is a dedicated wall space, but making a community wall marble run is perfect for an icebreaker classroom activity. You'll need an assortment of cardboard tubes and other lightweight recycled materials, containers, tape, and a few marbles for this activity. And, of course, you'll need a wall! Depending on your school, a hallway wall might work, but any wall space in the classroom can be used. Break students into groups, and have them work together to create a marble run. They'll need to test and make changes along the way to get the marble to successfully make it from start to finish, but they'll have fun engineering their marble run.
The science: To design a successful marble run, students will use potential and kinetic energy as they create a run that moves from top to bottom.
11. Airplane Launchers
Making paper airplane launchers is a simple engineering activity but a lot of hands-on fun as students get to know one another and settle into a new year. Students can make their launchers indoors using assorted materials and then test outside (or in a gym) during recess. For older students, this activity can easily be turned into a friendly competition to see who can launch a plane the farthest with a DIY launcher. (Everyone should use the same style of basic paper airplane.) (Note: The directions are in the activity, but a lesson plan is also available with an emphasis on potential and kinetic energy.)
The science: In order to take off, an airplane has to generate enough lift to overcome its weight. The faster an airplane goes, the more lift it generates. A catapult can give a plane a boost to help it accelerate over a shorter distance.
12. Marker Chromatography Art
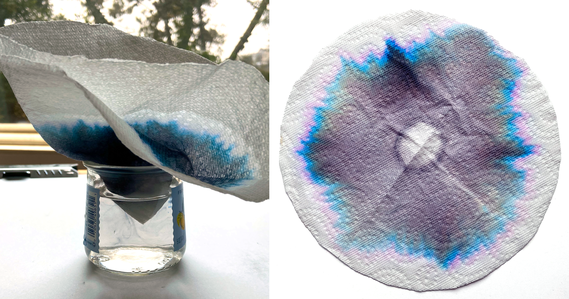
What colors might you find lurking inside a black marker? What colors are in a red marker? How does the formula for an ink color differ in markers made by different companies? Are all black markers the same? With a simple paper chromatography activity, students can take a peek inside to reveal the different color components that make up marker inks.
You can use coffee filters for this activity, but for a simple icebreaker, you can use paper towels. Fold a square paper towel in half and then in half again. Open it up and use a water-based to draw a thick circle around the center point (about an inch away from the center). Fold the paper towel back up. So that these end up circular, use scissors to trim the upper part of the folded paper towel in a semicircle. Put the folded paper towel, point-side down, into a jar of water so that just the bottom of the paper towel is in the water. Thanks to capillary action, the water will begin climbing up the paper towel. As it passes through the ink, the color molecules in the ink formula will begin to separate. As the water continues to climb, you may see different colors appear that are all part of the ink formula for the marker. Once the water reaches the edge of the paper towel (or stops carrying color), carefully remove the paper towel from the water and lay it out to dry.
Depending on the markers used, this paper chromatography activity can make some interesting patterns! Students can compare different markers of the same color or experiment with multiple colors of markers, rings of color, stripes of color, or other explorations! (Note: The finished filter art can be used to make other things, including flowers and butterflies, but we think the colorful filter art is cool on its own, too! Punch a hole in them and hang them up. They will fade over time.)
The science: This activity uses paper chromatography to investigate the colors of ink components in different markers. Chromatography is a method of separating a mixture or solution into its individual components. Students can also use paper chromatography to investigate colors in candies, leaves, and flowers.
13. Paper Rockets
Making paper rockets doesn't require many materials or a lot of time, but this STEM building activity can be an engaging icebreaker and easily transitions from inside to outside (or an empty hallway) for testing. How far can a rocket made from paper and tape fly? Students put it to the test and explore the role fins play in keeping the rocket balanced in flight. (Note: The activity is perfect for a casual icebreaker. NGSS-aligned lesson plans are also available for elementary school and middle school educators who want to teach the scientific method using paper rockets.)
The science: Flying objects have features to keep them stable in the air and to help them stay on course (fly straight). Rockets and missiles often have triangular fins at their bases that help ensure the center of pressure is behind the center of mass.
/-/https/i.ytimg.com/vi/lYITnkFxa5A/maxresdefault.jpg)
/-/https/i.ytimg.com/vi/ZWJfIdZOpP4/maxresdefault.jpg)
/-/https/i.ytimg.com/vi/GTO3HDSjxOU/sddefault.jpg)
/-/https/i.ytimg.com/vi/Wg8VoLTMz1M/maxresdefault.jpg)
/-/https/www.sciencebuddies.org/cdn/Files/17440/4/paper-towers.png)
/-/https/i.ytimg.com/vi/CqYGVW2Eu6Y/maxresdefault.jpg)
/-/https/www.sciencebuddies.org/cdn/Files/17739/5/science-class-icebreaker-tiedyeshirt-onpaper2.png)
/-/https/i.ytimg.com/vi/Q7FXhuBYmxM/maxresdefault.jpg)
/-/https/i.ytimg.com/vi/AOVD7WgFP2s/maxresdefault.jpg)
/-/https/i.ytimg.com/vi/zTTuB_afFyQ/maxresdefault.jpg)
/-/https/i.ytimg.com/vi/9Fv0-501msc/maxresdefault.jpg)
/-/https/www.sciencebuddies.org/cdn/Files/17737/4/filter-art-paper-towel-marker-combo.png)
/-/https/i.ytimg.com/vi/0hThMoHB88w/maxresdefault.jpg)
Bookmark this Resource!
/-/https/www.sciencebuddies.org/cdn/Files/19764/4/icebreakers-tiedye-IG.png)
/-/https/www.sciencebuddies.org/cdn/Files/19765/4/2023-science-class-icebreakers-IG2.png)
Other Fun STEM Activities for the Classroom
For other great science-backed ideas to use with students when having fun is part of the recipe for success, see these collections:
/-/https/www.sciencebuddies.org/cdn/Files/17438/17/2024-paper-stem-activities-blog-thumb.png)
/-/https/www.sciencebuddies.org/cdn/Files/14431/4/2020-toiletpaper-tube-STEM-blog-thumb.png)
/-/https/www.sciencebuddies.org/cdn/Files/17364/7/endofyearSTEM-blog-thumb.png)
Categories:
You Might Also Enjoy These Related Posts:
- 10 STEM Projects to Get Started Building Circuits on a Breadboard!
- Boredom Busters: STEM Activities for End-of-Year and Summer Fun
- 14 Paper STEM Activities! - Science and Engineering with Simple Materials
- A Simple 10-Step Guide to the 2026 Ball Run Challenge--Science Buddies Engineering Challenge
- Black History Month STEM - Learn More About These 40 Scientists for Black History Month!
- 4 Ways to Teach Engineering Design
- 12 STEM Activities for Lunar New Year - Year of the Horse Science
- 10 Reasons to Do the Ball Run Engineering Challenge


/-/https/img.youtube.com/vi/3N4-6QKaXhU/0.jpg)
/-/https/img.youtube.com/vi/FSMbrMxCyYU/0.jpg)
/-/https/img.youtube.com/vi/0KjnJYoIqPA/0.jpg)