Smart Science Project Display Boards
Taking Project Display Board creation step by step helps students create great display boards that showcase their science and engineering projects. Our Project Display Board guide gives students a clear understanding of what belongs on the board so that they can build their boards section by section without waiting until the last minute!
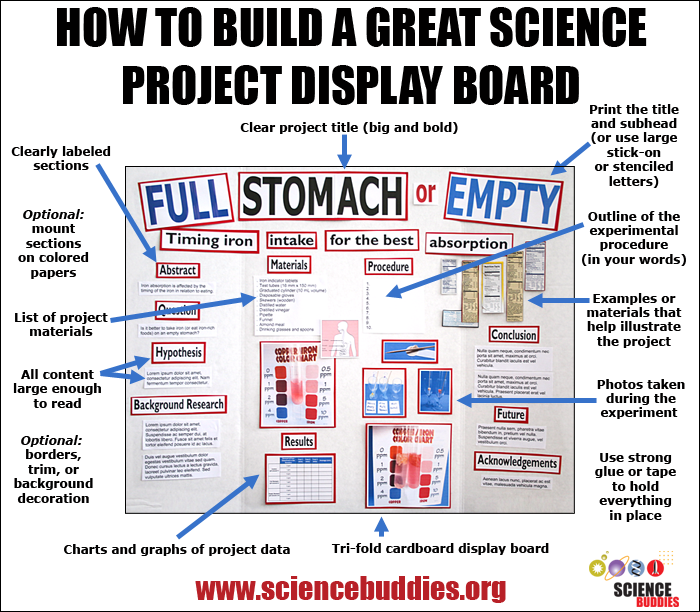
A diagram of an example science project display board gives directions on how to build a great board. The board should contain a clear project title, outline of experiment and procedures, examples or materials to illustrate the project, photos of the experiment, strong glue, a tri-fold display board, charts and graphs of data, background decoration, easily read words, a list of project materials and clearly labeled sections.
A Final Step in a School Science Project
At many schools, creating a Project Display Board is an important step in finishing a student science project assignment or getting ready for the science fair. After the science experiment is over, the analysis of data complete, and conclusions drawn, putting together the Project Display Board gives the student a chance to summarize the project and share it with others. By preparing the sections of the display board to present their hypothesis, procedure, and findings, students summarize key parts of their project in ways that help reinforce their learning. Creating the Project Display Board and communicating their results is a wonderful chance for students to really synthesize what they have learned from their science project.
What Goes on the Board?
Students following the Scientific Method or the Engineering Design Process for their projects will find that many of the steps they followed in doing their project will become sections on their display board. Teachers may have specific requirements regarding sections that are required, so students should always check with their teacher and carefully read any assignment details or grading rubrics.
The following sections are commonly used on K-12 science project display boards:
- Title
- Abstract
- Science Question
- Hypothesis
- Materials
- Procedure
- Data/Results
- Analysis and Conclusion
- Acknowledgments
With a list of the modular elements for the display board at hand, students can start planning the display board at any time during the project. We recommend having students review the Project Display Board guide before starting to build their project display boards for helpful information regarding materials, fonts, sizes, adhesives, and layout. (Teacher Tip! Teachers can assign the Project Display Board guide using Google Classroom Integration to help ensure students review project display board basics!)
Building the Board
In combination with the Science Buddies Project Display Board resource, the following steps can help students efficiently work through the process of putting together a science project display board:
- Get a board. (Make sure you get the appropriate size and type of board required by your teacher or the science fair.)
- Make decisions about whether or not you will mount sections on colored papers. If you plan to do this, decide about your color scheme (e.g., what color cardstock or paper do you need?).
- Buy (or gather) glue, markers, cardstock (if you plan to mount sections).
- Sketch or map out the board layout. What sections will you be using? Do you have photos from your project you will include? Will you use data charts or tables? Taking time to draw out your board will make it much easier for you to create your content and put things in place. Plus, you can use your sketch as a checklist for creating the board materials, marking off each section as you complete it. (You can use the diagram in the Project Display Board resource as a starting point, but your own display board may require a slightly different arrangement to accommodate your materials, so take time to make your own diagram!)
- Use your computer to prepare the title and subhead elements (or else prepare these elements with stick-on letters, Board Mate stencils, or very careful and neat marker lettering on sturdy paper). Be sure your title and subhead are appropriately sized and easy to read! (The font-size recommendations in the Project Display Board guide may seem huge to you when looking at the text in your word processing program. But when you print out your title and glue it to the board, it probably won't seem nearly so large.) Don't glue or stick anything in place yet!
- Type in your section headers and contents and print them out, making sure to note font size recommendations in the Project Display Board guide. (After you print out your materials, lay them out on the board and then stand back 3-5 feet from the board. Can you still read the section headers?)
- If mounting elements, trim your printed materials, glue them to cardstock, and trim again so that you have neatly mounted sections.
- Arrange your elements on the display board so that you can make sure everything fits and can make the best use of the space before you glue anything in place. Leave space for your photos and any charts and tables you plan to incorporate.
- Don't write anything directly on your board until you have all printed elements in place. If you need to write by hand, use chisel-tipped or other broad-tipped poster markers that will result in clear, neat, bold, and readable text!
- Determine the best size for photos, and print them out. (Mount them on cardstock if you have done this for other board elements.)
- Determine the best size for data tables and charts and print them out. (Mount them on cardstock if you have done this for other board elements.)
- Lay everything out on the board and play with the arrangement of elements until everything fits well. If something needs to be bigger or smaller to fit, take time to re-print the material!
- Glue everything in place.
- Stand back and admire your work!
Creating a project display board you will be proud to show off at the science fair or in the classroom doesn't have to be difficult. Follow the steps and create your elements one at a time, and slowly you will see the board take shape!
It's a Big Board!
There are many sizes of display boards available, but science fairs typically require a 36" x 48" tri-fold display board. Cardboard display boards are standard for many science fairs and school assignments, but students should check with their teachers or local fairs for specific guidelines.
Once a student has a blank project display board, the size can be intimidating. It can seem like a lot of space to fill. Taking things step by step, and following some important guidelines to make sure the information on the board is readable, students will find that the space fills up quickly! There are a number of standard sections that belong on the science project display board. By approaching the creation of the board formulaically, or as if following a recipe, students can spend time preparing the content for the sections of their boards without getting anxious about the design and layout of the board. Using the step-by-step approach described above, students will find it easy to create the materials needed for the board and can even work on parts of the board while the project is underway. Once the data is all gathered and conclusions drawn, the remaining board elements can be prepared and the final board assembled.
Teachers—Add It to Google Classroom!
With Google Classroom Integration, teachers can add the Project Display Board resource as a student assignment, helping to ensure students review the resource for helpful information about sections, sizes, materials, and planning. Having students review the Project Display Board guide and turn in a sketch of their board plan can be a great way to get them started thinking about the board and help them stay on track with this final step of the science project.
Additional Resources
For more information about creating a project display board, see the following resources and posts at Science Buddies:
- 10 Tips for a Winning Science Project Display Board
- Science Fair Project Display Boards
- Everything You Need to Know About Fonts for Display Boards
- Mastering the Project Display Board
- Get a Jump Start on the Project Display Board
- Perfecting the Project Display Board
You Might Also Enjoy These Related Posts:
- Spring Science Projects: 26 Science Experiments for Spring
- 6 Picks for St. Patrick's Day STEM
- Why Do Science Projects: Elevate Your Science Classroom: Taking Independent Student Science Projects to the Next Level
- Free science project support in the Ask an Expert forums
- Ahead of the Curve: A Science Teacher's Guide to Proactive Science Project Planning
- 2024 Rubber Band Car Engineering Challenge—10 Steps to Success
- Why Integrate Science Projects in the Classroom—A Teacher's Perspective
- 10 Reasons to Do the Rubber Band Car Engineering Challenge