Mastering the Project Display Board
The project display board offers students a wonderful opportunity to show off and summarize their science fair project. What goes into making a well-organized and successful project display board, and how can students fill all that blank space? Review project display board basics with students to help them create effective display boards that showcase their hands-on STEM projects.
It's science fair season, and as students wrap up their science, technology, engineering, and math projects and prepare for the science fair, many face an important final step in the process: creating a project display board.
Science Buddies has free scientist-authored projects ideas in more than thirty areas of science. The range of projects and science questions students can choose to investigate with an independent, hands-on project is exciting. Despite the diversity in student interest, in experimental procedure, in hypothesis and data analysis, the science fair project process, for most students, culminates in the creation of a project display board. This board will be on display at a science fair or presented in class. While a student may be on hand to answer questions about the project, the project display board should provide enough information for a viewer to understand what the project was and what the student observed or discovered.
The Finishing Touch
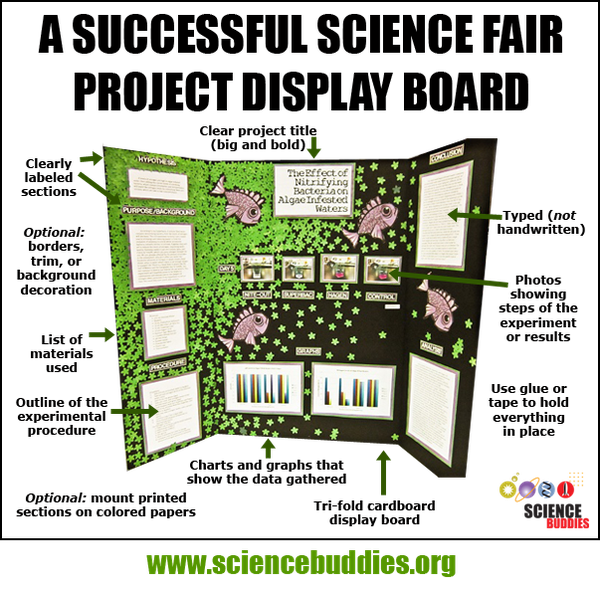
The project display board needs to contain several key blocks of information, needs to explain the project the student did and the outcome, and, ideally, should be visually interesting and engaging. For some students, assembling the project display board is a fun and creative part of the science fair project. For other students, the idea of filling the board can be a real challenge. Display boards come in several sizes, but fairs often require a tri-fold display board that measures 36" x 48".
The "standard" science fair project display board is big! All of that blank space can be intimidating for students, but understanding what goes on the board; storyboarding, outlining, and organizing the content that will be used on the board; and making smart visual choices about the size of the elements (including headlines and subheads) and the use of photos, charts, and decorative elements can make a big difference in how a display board turns out.
On Track with the Display Board
The following tips can help students make the most of the display board:
- Don't wait until the last minute. A great board takes time to put together, and students can work on sections of the board even before the project is complete. (See Get a Jump Start on the Project Display Board for planning strategies.)
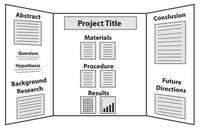 Storyboard the display board. On a blank sheet of paper, block out the sections you will include and where they will go. This will help you determine how best to fill the space, help you decide what to include, and serves as a blueprint for assembling the board sections.
- Use the steps of the scientific method or engineering design process as a guide. The stages of a student's project can be used to help prepare and organize the sections of the display board.
- Make use of headers. The title, headers, and even subheads help a user make sense of the material on the board at a glance.
- Pay attention to the assignment. Teachers may request certain project components be included on the board, so be sure and check any rubric or assignment sheet provided.
- Be careful to ensure the elements on the board are readable. Headlines and titles should be readable at a distance. There is plenty of space, so larger fonts work well. (See Everything You Need to Know About Fonts for Display Boards.)
- Use visual elements to grab attention. Headlines, photos, charts and diagrams, borders, trims, and even background design elements related to the project can help draw attention to your board. (See Science Fair Project Display Board Materials and Construction Techniques for an overview of basic materials.)
- Be neat. A well-executed display board is neatly done, contains printed sections (not handwritten), and shows care and organization.
- Show off your exciting project!
There may be hundreds of projects on display at a local fair, and as visitors walk through the fair, they move from display board to display board. A really well-done board draws viewers in for a closer look. With guidance, a clear understanding of how to approach constructing the board, and time spent creating the board, students can create project display boards that share and showcase their science project for their teachers, science fair judges, and visitors.
Project Display Board Resources
For additional information for K-12 students doing a science fair project display board, see the following resources at Science Buddies:
- Science Fair Project Display Boards
- Perfecting the Project Display Board
- Get a Jump Start on the Project Display Board
- Science Fair Project Display Board Materials and Construction Techniques
- Everything You Need to Know About Fonts for Display Boards
- Science Fair Project Display Board Checklist
- Keep a Great Science or Engineering Project Laboratory Notebook
- Getting Started with Your Science Laboratory Notebook
- Ensuring a Positive Science Fair Project Experience
You Might Also Enjoy These Related Posts:
- Rubber Band Car Challenge Entries Cross the Finish Line!
- Tenth Annual Science Buddies Engineering Challenge Revealed
- 2023 Engineering Challenge Sees Record Participation
- Ninth Annual Science Buddies Engineering Challenge Announced with Support from EPAM Systems
- Best of STEM Resources in 2019
- Polymers Project Gets a Slime Update
- New Series of Science Buddies Books
- Science Buddies Annual Report: Supporting STEM Education